Pages

Saturday, 25 September 2021

Winter Wonderland Window

Hi everybody.  This is my card for the Rudolph Days Challenge.  I was too late for July so intended it for last month but Mo was unwell so it was cancelled.  I won the die there several months ago, and wanted the challenge to be the place I first used it.  The die is from Tutti and called Winter Wonderland Window.

I started by die cutting it twice from white and red card backing it with Stick It adhesive and cut a square of kraft card to put it on.  I then took out all the white die cut pieces and put them aside whilst I stuck the main white piece down onto the kraft card.  I then picked out all the red inner pieces..I did try to keep the whole red piece together so I could see where all the pieces went and apart from a few the adhesive backing kept it together quite well.  I have to say that the big pieces were fine to fit in but the smaller pieces were difficult to place without them dropping and disappearing on my table.  I managed pretty well with a pokey tool, but the bear's nose jumped somewhere and after a minute search I found it and stuck it down.

I mounted the kraft on to a red mat before adding it to my white card.  When I had finished I noticed that the bear's nose had disappeared and this time I could not find it..it obviously lost some stickiness when it did the disappearing act..lol.  I had to use what looked like the same piece from the white set and coloured it with a red Inktense Pencil and stuck it with glue this time so hopefully it will stay put.  

I did make this second card using the leftover red pieces but cut off the frame holding it all together leaving just the five window pieces separate and mounted on to a snippet of green card leaving spaces between.  I then mounted this onto a snippet of gold card which has an embossed pattern before attaching to my base card..a much simpler look. 

The first with the infilling does look nicer I think but I'm not sure that it is nice enough to spend so much time and effort on using this technique, so I think this will be a one-off.  I have left them both without the sentiment for now and will decide what's appropriate nearer the time.

Thanks for visiting my blog today and I'll see you again soon.


I am entering the following challenges:

Happy Little Stampers September Christmas Challenge - Anything Goes (no optional twist).
The Holly and Ivy Christmas Challenge - No. 101 Anything Christmas Goes.
Merry Little Christmas Challenge - No. 38 September Anything Christmas Goes.
Pixie's Crafty Workshop Challenge - No. 412 Where we use up snippets of paper and card etc.  (the red die cut pieces were leftover snippets from a previous card and the green and gold were also snippets)
NBUS Challenge - No. 30 Where we use our Never Before Used Schtuff.

Monday, 20 September 2021

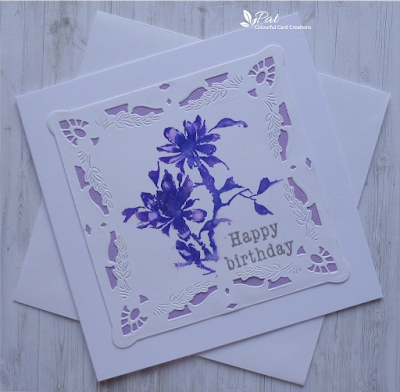
Summer Dream Birthday

Hi everybody.  I know it's a long time since I posted but hubby and I have been away for two weeks in a cottage in Wales and I have been sorting things out since our return.  We are having a new boiler fitted which was supposed to be happening whilst we were away and preparations had to be made before we went which took extra time.  Unfortunately we saw as soon as we returned that the boiler and parts were here but no work had been done as our plumber was unwell, and so it's being done this week.   You can imagine it is complete chaos here.   I have done some commenting but I apologise to anyone that I've missed and will visit as soon as I can.  We enjoyed the time away which was much needed and the weather was mostly good.  Although it wasn't quite like a holiday in normal times we made the best of it.

I'm showing another birthday card today using Penny Black's Summer Dream stamp quite old so not sure that you will find it now, and also using a Marianne frame die called Petra's Square, Bird and Nest which I won a long time ago and am ashamed to say have never used, mind you the trouble I had cutting it may mean that it won't come out to play again very soon...lol.
 

I started by cutting the frame and as I've said it was a difficult one.  I had to throw the first away because after a tussle with getting the pieces out it broke around one of the intricate corners and I ended up using something a little thinner and the only thing I had was Bristol Smooth watercolour card and consequently although this is one of the whitest watercolour papers it still looks a little yellow against the base card and I think I should have run it through again with the rubber mat to emphasise the pretty detail more, but perhaps I will next time, but I had lost a little patience with it by this time..lol.  I then stamped the silhouette flowers with Wilted Violet and Blueprint Sketch Distress Inks and a very litte spritzing with water to soften it a little.  I used my stamp positioner so I could go over it several times to get the right effect and I only inked part of the stamp so that it would sit well within the frame.  I finished with a sentiment heat embossed using WOW Metallic Silver Embossing Powder and matted it on to a piece of lilac card as a backing to the cut out shapes, and added it to my 6" square white card.

Before I go I would like to say thank you to two new followers - Michonne Remmers whose blog I couldn't find but if you let me know I will gladly give you a shout out, and Lesley Gillett whose blog you will find here and definitely worth a visit if you haven't seen it before.

Thank you for looking at my blog today and I'll see you again soon.


I am entering the following challenges:

NBUS Challenge - No. 30 where we use our Never Before Used Schtuff. 
Addicted to Stamps and More Challenge - No. 414 Any Occasion.
Stamping Sensations Challenge - September - Stamp of the Moment.  I have had this PB stamp for a long time but I love the beautiful stylish look of the magnolia.