Pages

Sunday, 27 February 2022

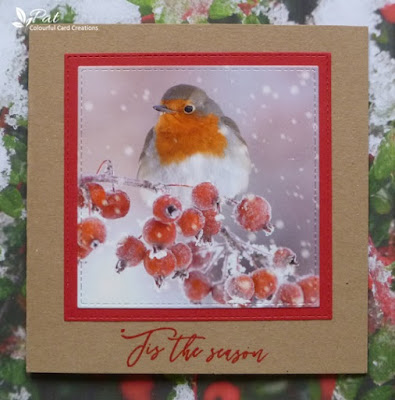
Upcycled Robin

Hi everyone.  I have a  simple Christmas card today made by upcycling one of last year's cards featuring a beautiful robin which I thought was too cute not to be reused.

All I did was to die cut the piece with a square stitched die and then die cut the red layer using a snippet of card with the next size up to make a mat for it and made a kraft card base on which I stamped a sentiment using Versafine Satin Red Ink heat embossed with WOW Clear Gloss Embossing Powder.  

Thank you for your visit today and I'll see you again soon.


I am entering the following challenge: 

Rudolph Days February Challenge - Anything Goes.
Snippets Playground Challenge -  Where we use our snippets of card and paper etc.

Thursday, 24 February 2022

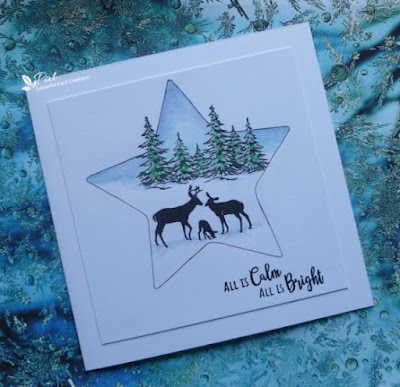
All is calm, all is bright

Hi everyone.   I am just about in time for the CAS Christmas Challenge,  and the theme this time is to make a card with a Winter Scene.  I used a set of stamps from Issue 90 of Creative Stamping Magazine which when I checked was Nov/Dec 2020..I can't believe I've had them that long.  I used the background trees and the deer family which were just the right size for what I had in mind.  I also used a set of XCut Nested Star dies..the largest one.

I started with the piece of white card cut just about 1/2" smaller than my card and cut a mask from some copy paper using the star die.  I decided the easiest way to do it was to use the positive piece to get the position of the star right on the piece of card, and just marked with pencil the points and the inner corners before stamping the trees and deer with Versafine Clair Nocturne Ink.  I put some colour on the trees leaving some white bits for the snow on the branches using Pine Needles Distress Ink applied with a waterbrush, and then added the sky using Salty Ocean DI and darkened around the edges with Chipped Sapphire DI, which I also used for the shading beneath the deer and under the trees.  I then place the negative mask and pencilled lightly around the whole of the star and when happy I went over the lines with my 01 Black Micron Pen.  I finished by adding a bit of White Sakura Pen on the branches of the trees and in the sky for a more snowy look and stamped a sentiment from the same set of stamps, again using the Nocturne Ink,  and then heat embossed it using WOW Clear Gloss Embossing Powder. 

Thank you for visiting my blog today and I hope to see you again soon. 


I am also entering the following challenges:

ABC Christmas Challenge - C & D for Clean and Simple/Distressing.
Christmas Card Throwdown Challenge - Masculine Card.
The Holly and Ivy Christmas Challenge - No. 110 Anything Christmas Goes.
Happy Little Stampers February Christmas Challenge - Anything Goes + Optional: Snowflakes (so pleased to be chosen the winner of this challenge).

Tuesday, 22 February 2022

Faux Cloisonne

Hi everybody.  I am joining in with the CAS Mix Up Challenge with the theme this month of Faux Cloisonne which includes using shiny print from magazines with gold embossing to give the look of cloisonne which is enamelled work frequently with gold outlines.  I found an old calendar which had some landscape scenes and one had this field of bluebells and I instantly thought of lilacs and so I got out this set of Just Rite stamps with a couple of different sized lilac images and also some sentiments which hasn't seen any love for a very long time, in fact I have never used this smaller of the two stamps before.  I also used a Sweet Dixie Stencil called Fern Flourish.

 
I started by stamping the lilac onto the calendar page and heat embossed it with WOW Metallic Gold Rich Embossing Powder and then fussy cut it out.  I decided to stamp and emboss just the leaf again on an area of green and cut and stuck this over the top.  I then made a background using the stencil and my gelli plate using three Distress Inks...Salty Ocean, Blueprint Sketch and Cracked Pistachio.  I rubbed the ink pads randomly on to my gelli plate and then brayered them lightly to blend, and placed the stencil over the top pressing it down firmly to make contact with the plate using a piece of kitchen towel which lifted some of the ink from the plate in the open sections of the stencil.  I then lifted the stencil off and placed a piece of Clarity stencil card over the top to take the print.  I was pleased with the look but thought it might come out a bit darker but probably the lighter look is better for a background.  I used a set of nesting dies by XCut called Ornate Frame and cut the largest of the dies from white card and then the next size down from the stencilled piece, and before layering them up I added some Shaded Lilac DI blended around the edges of this to make it stand out more against the white.  I finished by adding  a simple small sentiment also from the set, stamped using Versafine Imperial Purple ink and heat embossed with WOW Clear Gloss EP, and then added the lilac using some Stick It Silicone Glue for a little dimension.

Thank you for visiting my blog today and I'll see you again soon. 


I am also entering the following challenges:

We Love Stamping Challenge - Anything Stamped (Option: Add Stencilling).
Addicted to Stamps and More Challenge - No. 423 Birthdays.
Happy Little Stampers February CAS Challenge - Inky.
Happy Little Stampers February Stencil Challenge - Anything Goes.
Allsorts Challenge - I Love....  (my choice Flowers and embossing).
NBUS Challenge - Where we use our Never Before Used Schtuff.
CAS on Sunday Challenge - No. 225 Spring Flowers.
Watercooler Wednesday Challenge - Anything Goes and their very last challenge..so sad to see another lovely challenge finish, but best wishes for the future to all.


Monday, 14 February 2022

Happy Valentine's Day

Hi all.  I am really loving doing some zentangle and after looking at some designs online I found something which I have used as the basis for for my card for hubby.  He did love the tangling, so a win with this card..lol.  I have just about managed to get the card up before the day is over, and depending where you are there will still be some of the day still to enjoy.

I started by pencilling the outline to get a good shape to the heart and the inner designs before filling in with my black Micron pens Nos. 01 and 03 and whilst having a sort out of a few boxes came across a set of pens with fairly fine nibs which actually say they are for writing on CD cases, but I probably got them to colour peel-offs many years ago, but they miraculously still worked, and there was a nice red, so coloured some of the patterns in and also added some patterns in the white chequerboard spaces.  I finished by die cutting the piece with a stitched die and decided it would look nice on a red card, and then used some of the offcut of the piece of red backed with Stick It adhesive to die cut the sentiment, and I added it to the top and bottom because they were the least busy areas of the card and so more visible.  I also added some shading with a pencil and a paper stump/tortillion around the outside edge of the heart and also at the top and bottom of the heart in between each of the patterned areas at the edge and also in the areas where the strips have a curve.  I could perhaps have made it darker but thought that with the colour it might be a bit too much so kept it light.

Thank you for visiting me today, and I'll see you again soon.


Friday, 11 February 2022

Japanese Dreams Box Card

Hi everybody.  I saw this box card here and I was taken by the design and the fact that it folds down flat for posting, and although I don't usually do this type of crafting I decided to challenge myself and give it a go using this set of stamps from Creative Stamping No. 104 called Japanese Dreams.  I started with an  A4 sheet of pearlescent card in a dusky pink shade and also a snippet of deep pink parchment.  


I started by cutting the A4 piece of card down to 10" and then following the steps I put in the various folds.  I don't have a large scoreboard which hampered me rather so I ended up using a ruler and marking where to put the crease and then used a ball tool with quite a fine end to put the crease lines in.  I managed it but my tip would be don't use pearlescent card which for a start is not coloured on both sides, and also the pearlescent outer layer is inclined to crack.  I could have started again but decided to carry on.  I didn't follow the video too closely as my design is totally different to hers.  

I embossed a piece of parchment using the folder that came with the magazine and then I stamped the Japanese lady onto a snippet of white card using the straight to stamp technique and my brush markers - a pink, purple and black  I used my stamp positioner so I could  go over the lines of the stamp  with the brush markers in the areas that I wanted and then using a waterbrush I pulled the ink out,  and also added some extra putting the ink down on my glass mat and lifting it with the waterbrush.  I then fussy cut the image.  I found another couple of snippets of card on which I had used Alcohol Inks floated on water and by dragging the card through the water it picks up the ink, another new to me technique.  These I used to cover the front panels and cut them more or less to size.  I used one of the floral image stamps and continued with the same technique inking and this time spritzing the stamp, twice on each snippet of card, and then I added some blended Picked Raspberry Distress Ink around the edges.  I also had a snippet of white card with the same branch stamped onto it which I did to see how the pens would look so decided to fussy cut this out to use on the inside of the card.

Finally I used the strip of leftover pearlescent card to make the band which holds the card shut and I added another floral image from the set stamping it on to the leftover snippet of parchment heat embossing it with WOW Bright White Opaque Embossing Powder and used a Purple Inktense Pencil without water to shade it a bit using a paper stump/tortillion to blend it into the parchment.  I decided to darken down the white embossing with the pencil as it seemed a bit bright and used the paper stump to blend it in a bit.  I also blended some of the Picked Raspberry ink over the band itself to make the pink darker which made it match the front panels better.  It wasn't totally successful but I decided it looked OK.  

I then added the embossed background and flower branch and lady to the inside and then added the panels to the front of card, cut to fit, and then finished the construction.  The video will show you step by step how to do the whole thing.  If I end up sending it to someone I will add a piece of paper to the back of the card to write the message on to.

This isn't perfect but for a first attempt I was fairly pleased.  I have decided that I either need to buy a better scoreboard or get a scoring blade for my cutter as this would improve the quality of the folds and make it much less labour intensive.  

Thank you for visiting me here today and  I'll see you again soon.


I am entering the following challenges:

Snippets Playground Challenge - No. 421 Where we use our snippets of card and paper etc.
NBUS Challenge - No. 35 Where we use our Never Before Used Schtuff.
We Love Stamping Challenge - February - Anything Stamped (Option: Add Stencilling).
River of Creativity Challenge - No. 10 Anything Goes.
Simon Says Wednesday Challenge - Emboss It.