Pages

Thursday, 30 June 2016

Killer Heels

Hi there everybody.  Today's card was made using another freebie from Tattered Lace which is their stiletto heel die which has been so popular, and I was really pleased to see it as a freebie a month or two back and I've only just got round to using it.  I can hear you saying 'not another freebie', but I have been unable to resist as there have been so many really lovely dies and embossing folders with magazines recently that have just begged me to take them home .. lol.


As you can see the title is quite appropriate as heels of that height would certainly kill me were I to try to wear them ...lol.  I die cut two of them from snippets of pearlescent white card and another two from some snippets of a light turquoise glitter card.  I decided to add some bits of the glitter card ones to the white pair to highlight the more flourishy parts, and after I started cutting and snipping the very tiny pieces and gluing them to the white stilettos I began to regret this rash move!  Lets just say that quite a bit of time and patience was required as it was rather fiddly!

I had a left over piece of background from this card here and I cut it back and made a fancy edge using a Sue Wilson Gemini Border die called Pictor which is another NBUS item, and fixed this to another snippet of the same glitter card which I backed with a snippet of dark blue card before adhering it to my usual square white base card.

I finished the card with a sentiment cut from another snippet of dark blue card which I first backed  with a piece of Stick It adhesive.

Before I finish I would just like to introduce a new follower Kath whose blog you will find here, and I hope those that haven't seen it will go and take a look at her wonderful creations.

Thank you for all the interest you show in my blog which I greatly appreciate.

Pat  x

I am entering the following challenges:

Pixie's Crafty Workshop - Week 235 where we use up our snippets of paper and card etc.
Simon Says Wednesday Challenge - Anything Goes.


Sunday, 26 June 2016

Rudolph Days Challenge for June

Hi all.  I can't believe we are half way through the year already and although I haven't made many Christmas cards yet each one is one more than I would have made without this fun Rudolph Days Challenge.  It is run by Mo at  Scraps of Life by Scrappymo, and is always anything goes and runs from the 25th to the end of each month.


I have had this Snowman Trio stamp from Serendipity since the back end of last year but never got round to using it so this is the first outing for this one.   I coloured the snowmen using my Spectrum Noir pencils on to a piece of white card about 5" square and the stars were coloured with a gold gel pen.

I got out a new Marianne Design Embossing Folder called Snow Flakes and ran the piece through the folder, but have to admit made a bit of a silly mistake and put it in the wrong way round so the snow goes inwards instead of outwards, but was short of time and so I decided to go with it as it still looks OK I think.  I bought this to replace a Simon Says Snowfall Stencil which I seem to have lost.  I do hate to misplace anything and I have hunted high and low but cannot find it, so rather than have the expensive delivery cost from the US I found this, but am hoping that it will eventually reappear as I really do prefer the look of that one ....darn it!

I mounted this on to a piece of gold mirri card and also die cut a sentiment from a left over piece of the mirri which I had backed with the Stick It adhesive, and after assembling stuck it in place as you can see.

A fairly simple card but these cute snowmen will definitely be coming out to play again before too long.

Thanks for visiting my blog today.

Pat  x


Tuesday, 21 June 2016

Lilac Time

A feminine card today and I am using a new NBUS stamp set from Just Rite called Lilac Blossoms and a freebie Diesire die which I got recently with a magazine.


I used a snippet of white card and cut the freebie border die four times to form the square and mounted it on to my square white base card.  I cut the piece of card the same size as the square white base card and found the centre of each side to try to get the die placed correctly and it worked really well.  I decided to take the whiteness of the edges using some of the Faded Lilac DI and blended using blending foam before gluing this to the base card.

I found another snippet of white card and stamped the largest Lilac blossom using Versafine Smokey Gray Ink and then coloured using Distress Inks and a water brush.  The colours were a combination of Faded Lilac, Broken China and Picked Raspberry mixed together for the flowers and for the flower centres Mustard Seed.  The leaves and branches were Mowed Lawn, Mustard Seed and Walnut Stain in varying degrees.

I cut a stitched square from a snippet of white card and added a snippet of light green behind and stamped the sentiment using the Smokey Gray ink with some WOW Clear Embossing Powder heat embossed over the top.  I stuck these two layers together to form the mat for the Lilac flower which I fussy cut and adhered to the mat using Pinflair Glue Gel. 

Thank you for taking a look today.

Pat  x

I would like to enter the following challenges:

Pixie's Crafty Workshop - Week 234 where we use up our snippets of paper and card etc.
Happy Little Stampers - Anything Goes with Dies.
Penny Black and More - Flower Power.

Monday, 13 June 2016

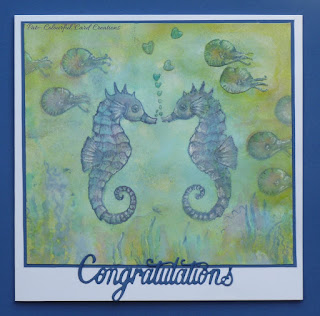
Seahorses for Anniversary

Hi all.  Now, seahorses and anniversary cards at first glance don't really seem to go together, but I had the idea that the bubbles rising from the seahorses mouths should be heart shaped.  I have two new sets of stamps from Chocolate Baroque called Steampunk Funky Fish and Steampunk Sea World.  I have to say the steampunk thing is a slight departure for me but I thought the stamps were interesting and just a little bit different and will make good cards for the men in our lives who are never that easy to make for.


I used the gelli plate to make a background using a snippet of white card and Distress Inks in Faded Jeans, Peacock Feathers and Adirondack Lettuce.  I applied them randomly to the gelli plate and sprayed with some water and mixed them around a little before pulling the print.  I then cut the background down and added in the bit of greenery in a very washy way, and some small Nautilus which I think are so cute, stamping with tthe Faded Jeans and added a little Peacock Feathers and Victorian Velvet.  I added the heart shaped bubbles by hand and then coloured with the Peacock Feathers ink. 

There is a large and a small seahorse in the set and I needed two of the large sized ones so I used my gelli plate to make a mirror image by inking the stamp with the Faded Jeans and stamping on to the gelli plate.   I place the gelli plate on to a piece of card which it tends to stick to and then you can turn it over quite easily to stamp it on the card.  The image does come out slightly less defined but on the whole works well  I coloured them with the two blues and the pink.

I decided to add a bit of white gel pen on the seahorses and the shells and used the Glossy Accents on the seahorse eyes and the heart shaped bubbles.

I matted the finished piece on to a snippet of dark blue card and added this to the square white base card and using another snippet of the dark blue card which I first backed with Stick It adhesive, I die cut the sentiment.

The photos I took of the card showed up a mark where I must have overwet it and it had puckered and I had ummed and aahed about whether it was acceptible, but I decided to cut two more of the Nautilus from a snippet of white card and coloured to match the ones stamped in the background and placed them strategically ...lol.   I would say the colours were a little brighter in real life than in the photo.

Thank you for dropping by today.

Pat  x

I would like to enter the following challenges:

Pixie's Crafty Workshop - Week 233 where we use up our snippets of card and paper etc.
Chocolate Baroque Challenge - No 23.  It is always a colour challenge.  I have used the colours if somewhat watered down so hope this is acceptable.


Tuesday, 7 June 2016

Embossed Flying Duck Birthday

Hi everybody.  I bought this That Special Touch mask - Flying Ducks fairly recently with masculine cards in mind and a husband of one of my cousins has a birthday at the weekend so I decided to give it an outing, its first actually so NBUS!

I had in mind to use some texture paste which I have which is clear gloss.  Well, I had three attempts which were all dismal failures so I gave it up as a bad job and decided to use Versamark Ink through the stencil and heat emboss.  I used WOW Silver Metallic Embossing Powder on to a snippet of dark blue card and applied it through the stencil with a piece of blending foam which worked well.  I did need to tidy it up a little and there were inevitably a few stray bits but it was OK.


I also used a Creative Expressions Embossing Folder called  Checkboard Pinpoint and embossed a snippet of orange card which at first I wasn't sure about as it was a very bright colour, but once embossed and adhered to the base card with the dark blue card on top looked fine.

I had a space at the bottom which I decided to fill with a new NBUS Petite Striplet die called Tiled Squares.  I cut a strip from a snippet of dark blue card using the outside die and then cut the inner die using a snippet of orange, and layered the two together

I finished by stamping a sentiment with Versamark Ink and heat embossed using the WOW Silver Metallic EP using another snippet of the dark blue card, and cut it into a double fishtail banner and placed it over the Tiled Square.

Thank you for looking at my blog today.

Pat  x

I am entering the following challenge:

Pixie's Crafty Workshop  - Week 232 where we use up our snippets of paper and card etc.
Uniko Challenge - No 32 Masculine with the Optional Twist of Father's Day which I didn't do.