Pages

Tuesday, 29 June 2021

Old Fashioned Rose

Hi everyone.  This is a card I made to send to a family member who has had to have a nasty operation to let her know we are thinking of her.  I have recently bought some 120gsm paper/card from Craft Creations which I am trying out with digital images because I like really white card which this is and also it will easily go through the printer which my usual 300gsm card will not.  I have also tried using some Bristol Smooth which is about 250gsm and that proved a struggle too.  I bought a multi media pad because I thought it would be lighter weight, but to be honest it really doesn't seem any better than the BS that I have and it is not white enough to use matted on to my other card unless it is completely coloured with no white showing.


I have this pretty rose digital image which I printed in grey onto the 120gsm material and thought I would use my Inktense pencils with a waterbrush keeping the brush as dry as I could and taking the ink from the pencil on to the brush before adding it to the image.  It started off well but as I went along it did warp in one spot and it would not flatten out so I ended up fussy cutting the image out.  I used  a snippet of white card to make a frame using a Spellbinders Captivating Squares which I don't think is available anymore, and I used the second slightly smaller die within the frame and dry embossed it by running it through my machine.  I added this twisted so that it made this diamond shape and used some silicone glue to attach the rose to the frame which gave it a bit of dimension.  I finished with a sentiment stamped with Versamark and heat embossed using WOW Platinum Metallic Embossing Powder.

With the demise of Feedburner I have added Bloglovin' to my sidebar and hopefully it is working properly. 

Thank you for visiting my blog today and I'll see you again soon.


Friday, 25 June 2021

Vine Heart and Lotsa Leaves Gelli Prints

Hi everybody.  I decided to get out my gelli plate for this anniversary card and use a set of 18 Royal and Langnickel acrylic paints which I bought recently very cheaply and the colours are quite good and ideal for using with the gelli plate.  I also used a Claritystamp stencil called Vine Heart, just the inside piece.  Before I started I laid a piece of card beneath the gelli plate so I could line up the print each time in the right place.


I started with a pink and purple and put some of each on the gelli plate and rolled it out with my brayer.  I then laid the stencil down over the wet ink and pulled the print which obviously left some white areas and  then I lifted the stencil off and added some pink to the plate and rolled it over and then laid the piece of card over it and pulled the print again which added the pink to the outlines.  I thought it was a bit bright so I added some more of the purple to the outside edges and laid the card over and pulled the print again, which I thought looked better.  I then cut the piece down and rounded the edges and as the heart was a little indistinct I used an Inktense Pencil in a similar colour and went over the outlines with just the pencil, no added water.  I finished by adding a sentiment using Versafine Imperial Purple Ink and heat embossed using WOW Clear Gloss Embossing Powder before adding it to my 6" square white card.

I am entering the following challenges with this first card:

Watercooler Wednesday Challenge - No. 318 All About Occasions.


I thought at the same time I would show you another gelli print I did a while back using gouache paints as this was before I bought the acrylic paint set, and some real leaves which I picked up on a recent walk as I have seen quite a few tutorials of this technique.  I also used  a leafy branch from the Autumn Poppy set of stamps from Chocolate Baroque and also a birthday sentiment using a recently acquired magazine freebie set.   

I have had the gouache paints for a very long time and there weren't many that hadn't dried up, so I ended up using a green and yellow. 

I used a piece of repositionaable tape to hold the paper in place so that I could lift it and lay it over in the same position each time.  I used the yellow first spreading it evenly over the plate using my brayer and pulled the print.  I put a piece of repositionable tape over the edge of the piece of white stencil card to hold it in place before I started as I needed it to go back down in exactly the same place on the plate.  I then reinked the plate with the green and placed the leaves over it pressing them down to make good contact with the surface before putting the same piece of card back over and rubbing it to transfer the leaf outline to the card and pulled the print again.  I then removed the leaves from the plate and put the piece of card back down and pulled the print again to transfer the detail of the leaves, not as clear as I would have like but definitely visible enough to see that they were leaves.  

I added some leaves from a Chocolate Baroque set called Autumn Poppy and stamped using Versamark and heat embossed using WOW Metallic Gold Embossing Powder.  I then added a gold embossed sentiment to the centre of the card and matted it on to a piece of sage green card before adding it to my 6" square white card.

The print was quite dark but the gold embossing showed up well in real life, but I was disappointed that it wasn't so easy to see in the photos I took, and unfortunately I wanted a masculine card for a friend's birthday which had to be posted quickly, so I was not able to take more.  I had intended this for last month's Twofer challenged but never managed to make the second card.  This has happened a lot lately! 

I'm sorry this was rather a long post but I only decided to add the second one in after I started the post, and I probably wouldn't have shown it at all otherwise as I wasn't sure it was good enough but it does illustrate the technique which I think is interesting.

Thank you for visiting me today and I'll see you again soon.  


I am entering the following challenges with this second card:

Addicted to Stamps and More - No. 408 Birthdays.  (Happy 9th Birthday to the Challenge!)

Tuesday, 8 June 2021

Bluebird

Hi there.  Another birthday card for a male member of the family using a Crafty Individuals stamp called Bluebird with Branch and Berries, an Indigoblu stamp French Script and a square stitched die.


I started by making a smooshed background using a piece of white card and Iced Spruce and Tumbled Glass Distress Inks on my glass mat, spritzed with water and the paper laid over it, using one colour at a time to build up the layers of colour and I added the script stamped with the Tumbled Glass.  When dry I stamped the pretty bird using Versafine Smokey Gray Ink and and coloured it with my Inktense Pencils picking up the colour from the tip with a waterbrush, and when finished I added a little orange around the bird's chest straight from the pencil.  I also added a few clouds to the sky with more of the Tumbled Glass using a home made cloud mask, and the sun using Adirondack Sunshine Yellow applied with a  blending tool, and finally some Glossy Accents on the berries and the bird's eye.  I layered it on to the white stitched mat and added a sentiment to the base card using the Smokey Gray Ink and heat embossed with WOW Clear Gloss Embossing Powder before adding the topper to the card.

Thank you for dropping by my blog today and I hope to see you again soon.


I am entering the following challenges:

CAS Mix Up Card Challenge - June Watercolour Challenge with the theme Flight.
Simon Says Wednesday Challenge - Masculine.
Happy Little Stampers June Watercolour Challenge - Anything Goes.

Tuesday, 1 June 2021

On the Look Out

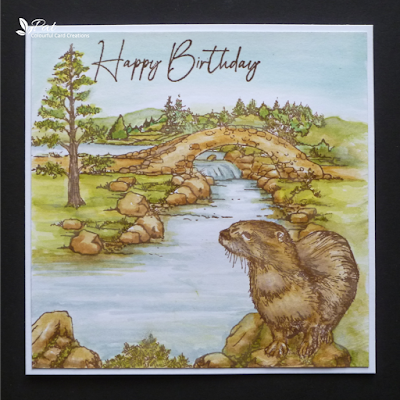
Hi there everyone.  I have a card for our son's birthday made with one of the otters from a set by Hobby Art Stamps just called Otters and also another set which has scenic and water related backgrounds called Waterfalls.  It was sent over three weeks ago to Australia in the hope that it would arrive in time.  The post is rather variable to there and sometimes cards have been late which is very annoying, but this time it arrived with a good few days to go so I was really pleased.


I started by stamping the otter using Versafine Vintage Sepia ink and then masked it before stamping the rock it is standing on, and also made a mask for the rock so I could add the greenery in between before adding just a part of the same rock to the left.  I then stamped the scene using the same ink with various stamps from the background set including the river and bridge and I extended the river edges just inking the left hand rocks and added them again further into the foreground on the left had side and curved the bank around them to let the river disappear round a bend, and also similarly on the right just to fill the gap up to immediately behind the otter.  I then coloured the scene with my Distress Inks using approximately three greens, three browns and a couple of blues, and I extended the scene outwards a bit more to the left and there were some little rocks with tufts of grass with which I edged the extra piece of road, and  I also extended the bank of the river in the distance and painted the hills to the left and right and also added the large single tree.  Finally I stamped the sentiment again using the Vintage Sepia ink heat embossed with WOW Clear Gloss Embossing Powder.

Thank you for taking a look today and I hope to see you again soon.


I am entering the following challenges:

Simon Says Wednesday Challenge - Anything Goes.
Uniko Challenge - No. 65 Anything Goes (Optional Twist: Die Cuts).
Happy Little Stampers June Watercolour Challenge  - Anything Goes.
NBUS Challenge - No. 27 Where we use our Never Before Used Schtuff (both the otter  and the background stamps have never been used before).