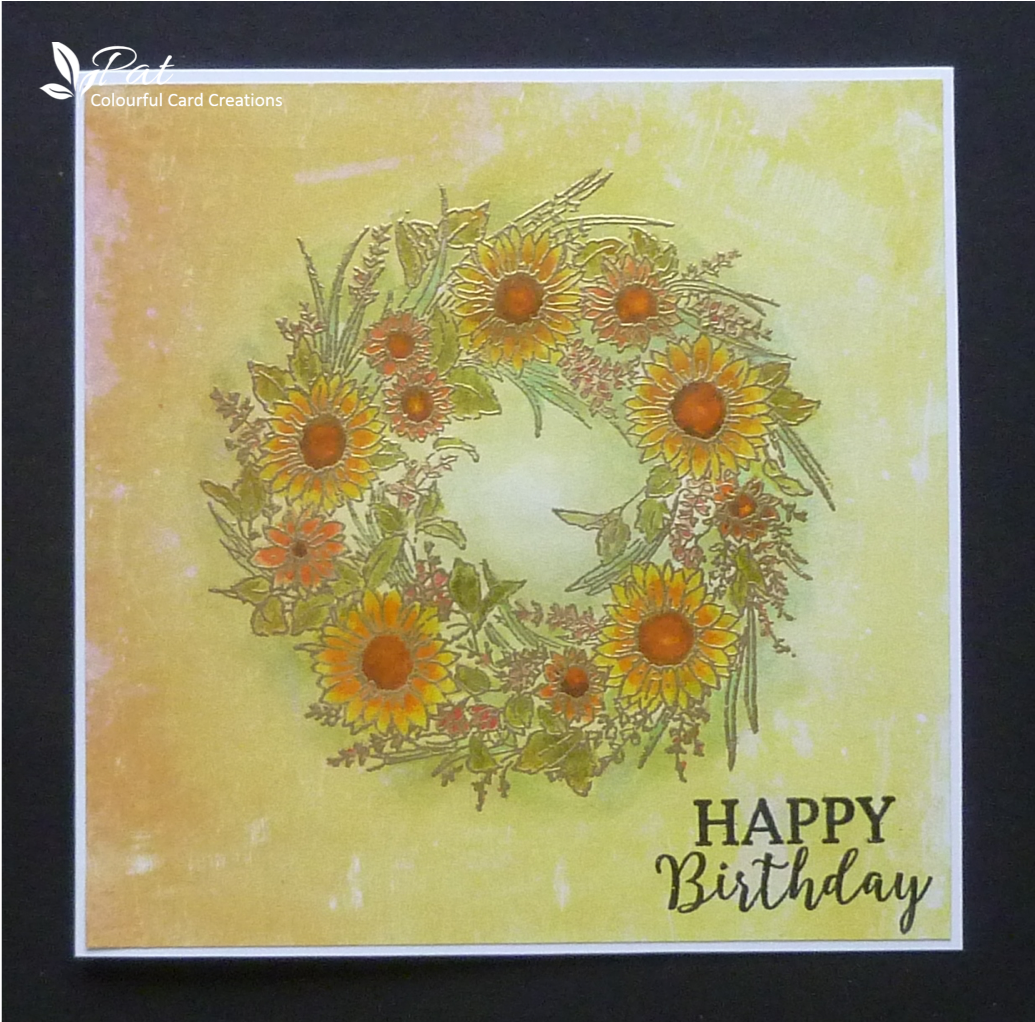
Hi there everyone. Well I suppose we have to accept that Summer is now gone though no frost yet to kill the blooms entirely, and one of the last flowers to go is the sunflower and you often see them standing tall in a garden with flowers and leaves gone brown and the seeds ripening in the centre of what is left of the flower. I have a mixture of nuts in a jar on the table and I always include sunflower and pumpkin seeds too. Anyway I digress. Here is the card I made for our next door neighbour for her recent birthday using a pretty sunflower wreath called Flowers All Around which I won as a prize on the Penny Black and More Challenge quite a while ago, and recently realised that it was a NBUS one, i.e. never before used schtuff, so I have now remedied that, but unfortunately I don't think it is available anywhere at the moment. I also used paper from a pad by Craft Consortium which I bought on my way home from holiday in Cornwall at a stall in the pannier market in Tavistock, together with a few stamps which will get used soon I'm sure.
I started by selecting a paper which I thought would go nicely with the colours that I was going to use with the wreath stamp and stamped it on to the paper using Versamark ink and WOW Metallic Gold Embossing Powder. I then coloured the stamp using my water brush and several colours of Distress Ink, namely Mustard Seed, Spiced Marmalade, Ripe Persimmon, Candied Apple, Forest Moss, Peeled Paint and Cracked Pistachio. I think this is the first time I have used a piece of paper on a card for absolutely ages, but these papers have the look of washy ink which appealed to me and nice and thick at 180 gsm so took the water beautifully. I also used a bit of the Cracked Pistachio over the background under and around the wreath and added a sentiment using Olympia Green Versafine ink which actually looks like black in the photo, and then heat embossed with some WOW Clear Gloss EP.
Thank you for your visit which I always appreciate and I hope you'll come back soon.
I am entering the following challenges:
Penny Black Saturday Challenge September - Anything Goes (Optional 'Use Something Old or Neglected'). This stamp has certainly been neglected and is one of the older stamp images.
Uniko Challenge - No. 55 Anything Goes (optional twist Autumn).
Addicted to Stamps - No. 177 For a Lady/Girl.
Stamping Sensations - Anything Goes with Flowers.
Simon Says Wednesday Challenge - Anything Goes.
Wednesday, 2 October 2019
Monday, 30 September 2019
More Beautiful Buildings
Hi there. Here are some more cards I made for the Chocolate Baroque August TV shows. The first is a moonlit scene featuring the Turret House and made using my gelli plate to make the background using Mermaid Lagoon and Chipped Sapphire Distress Inks masking the moon before adding the inks and spritzing and removing the mask before taking the print. I then stamped it using Versafine Imperial Purple Ink.
I water bleached out some of the ink on the building and then added back in the Chipped Sapphire Distress Ink to shade and I highlighted with a White Posca Pen. The Chipped Sapphire is a very dark colour and obviously a lot of the ink would not bleach out but I like the overall effect of the moonlight. I layered it on to black card before adding it to the white base card.
I decided to make a bookmark for this second one using the Bridge House and coloured a sheet of paper big enough to cover the back and front of the bookmark using Ultramarine Brusho Powder. When this was dry I used the Tagtastic stamp for the shape and cut out the two pieces and stuck them together. I then stamped the building using Versafine Imperial Purple ink and heat embossed using WOW Clear Gloss Embossing Powder. I finished by punching a hole through the top and added two different pieces of ribbon to add interest.
My last card is using the Italian House and I decided to heat emboss it using WOW Platinum Embossing Powder before putting inks on to the gelli plate and spritzing it before pulling the print. I used Scattered Straw and Dried Marigold Distress Inks at the bottom and Broken China Distress Ink over the rest but keeping the central part mainly Dried Marigold. I watercoloured the house with the Dried Marigold and Scattered Straw using a waterbrush and then added Tea Dye over the roofs, Candied Apple on the door, and with a lot of water added, round the windows. I added some bushes to each side of the house using Peeled Paint EP. I finished it with a sentiment using Versafine Olympia Green and heat embossed with WOW Clear Gloss EP.
Thanks for visiting my blog today and I hope to see you again soon.
Saturday, 21 September 2019
Silhouette Rose
Hi there. I have been having a bit of a break this last week or two. Hubby and I had a week away in Cornwall which we thoroughly enjoyed and I did manage to do some commenting and anyone I missed I think I have visited since, but if I have missed you I do apologise. Since we have been back for the last week I have done nothing so for now here is a card I made a little while ago which I haven't got around to showing here, using one of my favourite silhouette flower images by Chocolate Baroque from the Rose Set. I needed a quick card and I made a background using my gelli plate and Broken China and Dusty Concord Distress Inks brayered on to the plate and spritzed with water to help mix them before printing. I also spritzed with a bit more water to get the splattered effect, before stamping the silhouette rose over the top using my Misti and Dusty Concord Distress Ink, inking it and stamping several times to get good strong colour. All it needed then was a sentiment which I stamped on to a banner shape using Versafine Imperial Purple ink. I finished by adding this to a 6" square white card.
I adore my cardmaking, but have felt a little burned out recently, and there are challenges that I was thinking of entering this month, but time is getting short and maybe I will have to leave them this time. Thank you for taking a look at my blog today and I'll see you again soon.
I am entering the following challenges:
Stamping Sensations September Challenge - Anything Goes with Flowers.
The Flower Challenge No. 36 - Anything Goes.
Seize the Birthday No. 174 Anything Goes Birthday.
Sunday, 15 September 2019
Beautiful Buildings
Hi everybody. Here are three of the cards I made for Chocolate Baroque's August TV shows. The first features the rather exotic eastern looking minaret called Turret House I started by stamping the image on to white card using Versamark Ink and heat embossed it with WOW Platinum Metallic Embossing Powder. I then left a gap and placed the image to the right but placing it lower down, then to the left varying the height and then placing a mask on one I managed to fill the gap one side, and then the other. Luckily I managed to get away with one mask as the buildings in the gaps only went across one of the buildings.
I then coloured the images with my Distress Inks and a waterbrush using Dried Marigold, Tea Dye, Rich Mahogany, Scattered Straw, Weathered Wood and Pumice Stone, and then I added the sky with some Dried Marigold at the bottom and then Tumbled Glass, and then to darken I added some more Tumbled Glass at the top using a blending tool. I matted it on to kraft card and added a sentiment using Versafine Vintage Sepia heat embossed with WOW Clear Gloss EP.
The second card uses the Dutch House I stamped it twice using Versafine Onyx Black Ink and heat embossed it with WOW Clear Gloss Embossing Powder. I then coloured both pieces using various Distress Inks, many of the colours used on the first card, and then fussy cut both out. I then used my gelli plate to make a background, using more Distress Inks, and adhered them both on to the background. I layered it on to a piece of kraft card and then stamped one of the sentiments on to the white base card using Versafine Latte Ink and again heat embossed using the WOW Clear Gloss EP.
This third card was made with three of the buildings using my gelli plate. I started by brayering Scattered Straw and Carved Pumpkin and Abandoned Pumpkin on to the gelli plate and then using Versafine Inks in Imperial Purple, Crimson Red and Deep Lagoon using the Turret House, the Dutch House and the Italian House. I inked the stamps up in the different colours and stamped straight on to the plate. You have to use a very light touch and some stamped clearer than others but I think it adds to the charm. I took the print and then I also stencilled some different shapes on top with a Dutch Doobadoo stencil using Carved Pumpkin and Abandoned Coral and also stamped one of the sentiments using second generation ink. I finished the background by blending some Chipped Sapphire round the edges.
I decided to stamp the Italian House on to a piece of tag shaped shrink plastic using the Versafine Deep Lagoon, and added a punched hole before shrinking it. I then added a further two layers, one coloured with Mermaid Lagoon and darkened with Chipped Sapphire, and then another white layer and stuck them together with a piece of Baker's Twine through the top of the shrink plastic tag. I then added it at an angle to the front of the card. I haven't used any shrink plastic for a long time and for some reason although I placed an acrylic block over the top before it cooled down it didn't quite flatten out, but I still like it and think it adds something to the finished card.
For more inspiration using these lovely stamps go and visit the Chocolate Baroque Design Team Blog where this month these building stamps are being highlighted as well as lots of other great ideas from the DT. I would like to say how sad it was to hear that Sue Page had died. She designed for CB over a number of years and will be greatly missed, but will be remembered for her wonderful artwork and the quite unique style of her images, a very talented lady.
Thank you for visiting and I hope you drop by again soon.
Friday, 6 September 2019
By the Sea
Hi everybody. I have a masculine card to show today using a freebie stamp set I got with a magazine two or three months ago and as he lives by the sea and likes to go fishing, although sadly there are no fish here, apart from maybe in that gull's stomach...lol. I hope it will still appeal to him.
Using a piece of white card I stamped the lighthouse and the foreground rock using Versafine Vintage Sepia and coloured with my Distress Inks, and emphasised the waves and whitened the white stripes on the lighthouse using a white gel pen. I finished with the sentiment stamped with Versafine Onyx Black and heat embossed with WOW Clear Gloss Embossing Powder. I then die cut this using my Crealies Pierced Rectangle and then cut a white mat a size larger to cover the base card, also using the same dies. I then stamped the seagull on to another piece of white card with the Vintage Sepia and then coloured it, again using Distress Inks, and cut it out. After adhering this to the base card I finished by sticking the bird on to the rock using Pinflair Glue Gel to give it some dimension.
Thank you for visiting my blog today and I'll see you again soon.
I am entering:
Simon Says Wednesday Challenge - Stamp It.
Pixie's Crafty Workshop - No. 360 where we use our snippets of card and paper etc. (I used snippets of white card for both layers and an extra smaller piece for the seagull)
Addicted to Stamps and More No. 357 - Make Your Mark.
Sunday, 1 September 2019
Chocolate Baroque Cards for July TV
Hi everyone. This is the last of the cards I made using the new stamps shown on Hochanda last month. I've started with the cute and fun gnomes from the set called A Tomte Christmas which comes with some great sentiments too.
I started with the largest gnome and stamped and embossed the image three times using Smokey Gray Versafine ink and heat embossed with Papermania Clear Gloss Embossing Powder. I then coloured them using Distress Inks and fussy cut them out. The colours were Fired Brick, Peacock Feathers, Hickory Smoke, Black Soot, Lucky Clover, Cracked Pistachio, Brushed Corduroy, Blueprint Sketch and Broken China.
I next made the background using another of the new sets called Shaded Baubles using the circle with the pretty snowflakes around the edge and stamped it four times using Versamark ink and then heat embossed with WOW Opaque Bright White EP. I then inked it up with Cracked Pistachio Distress Ink around the outside and some Adirondack Sunshine Yellow in the centre. I finished by stamping one of the sentiments in Lucky Clover DI and heat embossed with the Clear Gloss EP and put it together adhering the gnomes with Pinflair Glue Gel to give them some dimension.
This second card was made again using the set of gnomes, this time two of the smaller images. I stamped the images on to a piece of white card using Versafine Smokey Gray ink and then added the sentiment. I then got a selection of Distress Inks, and coloured using a waterbrush and to vary the colours a bit I mixed some of the inks together to get some different shades of the colours. When I had finished colouring I ink blended the sky again using Distress Inks - Broken China and Stormy Sky and then added Fossilised Amber at the horizon. I didn't want too smooth a blend so the sky has some variation a little like clouds. I then used some of the same blue inks to ground the images and make some tracks in the snow. I backed it with some blue card and mounted it on a white base card.
For this last card I used the pretty candles from the Christmas Circles set and heat embossed the image using WOW Metallic Copper Embossing Powder. I then sprinkled some Orange, Lemon and Scarlet Brushos on to my glass mat and spritzed with water before laying the card into it. I did this several times until I had covered the card. I then coloured the image with the same colour Brushos and also Leaf Green and to whiten the candles I bleached them using water. I then die cut the image using my Crealies Pierced Rectangle die and then die cut a white mat using one of the dies just a bit larger, and at this stage added one of the sentiments from the Christmas Garden set using Versafine Vintage Sepia ink. I then mounted it all up on to a white base card.
Thank you for joining me today and I hope to see you again soon.
Friday, 30 August 2019
A Heart Full of Love
Hi everybody. I have another anniversary card to show you today. I decided to use this pretty floral heart from a fairly recent set of Chocolate Baroque stamps called A Heart Full of Love and ideal for this particular couple who have been married now for 51 years and I thought they would like this. It turned out to be a little busier than I initially meant it to be but they have received it and said that they liked it so all good.
I started with the background using just the group of flowers which you can also use to decoupage the main heart. I found a snippet of white card and inked it using Versafine Satin Red Ink and stamped it four times over the background. I then used Spun Sugar Distress Ink with a blending tool and covered the background leaving it a little lighter in the centre though most of that is covered by the central heart.
I stamped the heart on to another snippet of white card and coloured the flowers using a waterbrush using Spun Sugar, Shaded Lilac, Crushed Olive and Peeled Paint Distress Inks. I then cut it out and added it to a larger die cut heart and using a snippet of white card and an XCut set of dies and on which I blended some Candied Apple DI. I finished by covering it with some Wink of Stella Pen to give it a bit of sparkle though it doesn't really show up in the photo.
I finished by layering it on to a 6" square white card and added the sentiment also stamped using the Red Satin Versafine Ink and die cut it with a tag die.
As a bit of an experiment I made the tag larger by die cutting a little over half the shape and then moved the die up the cut piece and cut the other end to match. It was a bit fiddly but it worked quite well. I would have been better stamping the sentiment first and then cutting the tag evenly around the stamping rather than trying to do it the other way round, so next time that's what I will do. I inked around the edge using what I thought was a bit of Spun Sugar but it was a bit darker and I think it was the blending foam that had had the Candied Apple ink but didn't press too hard so actually it wasn't so very dark, although the photo has made it looks much darker than it does in real life which tends to make the background and sentiment merge rather.
Thanks for taking a look today and I hope you'll visit again soon.
I am entering the following challenge:
Pixie's Crafty Workshop - No. 359 where we use up our snippets of card and paper etc.
Subscribe to:
Posts (Atom)


