Pages

Friday, 31 December 2021

Puffin Christmas

Hi everybody.  Here is the card I made for my hubby.  I saw a cute puffin image with a Santa hat and thought I would do my own version of it.   Puffins are such fun little birds and the seasonal hat goes perfectly with his bright red beak, so it was meant to be..lol.

I did it in pencil and then coloured with my Inktense Pencils using a waterbrush to wet the tip for more control of the colour.  I ink blended the background using Tumbled Glass Distress Ink and then added the sentiment using Versafine Habanero with some Satin Red added over the top which I thought made a slightly more orangy red.  I decided to die cut it into an oval shape but my largest oval die didn't quite fit so I did the over the edge technique where you cut out the part to go over the top and then slide the die underneath the cut pieces so they are left over the edge.  I embossed the background card with a Crafter's Companion EF called Touch of Winter which I bought at The Range a while ago.   I then went over the raised pattern with some of the Tumbled Glass DI using a blending tool, just lightly so as not to detract from the main image too much. 

I was going to show our son's card too on this post but although it was sent on 2nd December he still hasn't received it!  Last year I sent it a few days later and he got it several days before Christmas, so I am not a happy bunny.  His to us this year arrived nearly a week before Christmas and he posted it a good few days after the one to him...random or what!  Hopefully it will arrive soon.

Thank you for visiting today and I'll see you again soon.


I am entering the following challenge:

River of Creativity Challenge - No. 8 Celebrate.


Tuesday, 28 December 2021

Sparkly Snowman

Hi everybody.  I have another tangled card today, again using something I saw on Pinterest and adding my own little touches.


I started by pencilling the snowman onto my piece of card and then went over it with gold and silver Starlight Sakura Gelli Roll Pens and finished it by adding a couple of snowflakes from Crafter's Companion which came in a four piece set from Creative Stamping in October - No. 100 and which were stamped for the first time, and a few extras of my own.  I then die cut it using a Crealies set of pierced rectangles and layered it up using some silver mirri card. 

Thank you for joining me here today and I look forward to seeing you again soon. 


I am entering the following challenges:

Christmas Kickstart Challenge - No. 57 If It's Chrismassy, Link It Up!
Merry Little Christmas Challenge - No. 41 Anything Christmas Goes.
Winter Wonderland Challenge - Anything Christmas Goes.
NBUS Challenge - No. 33 Where we use our Never Before Used Schtuff.

Saturday, 25 December 2021

Foliage Wreath

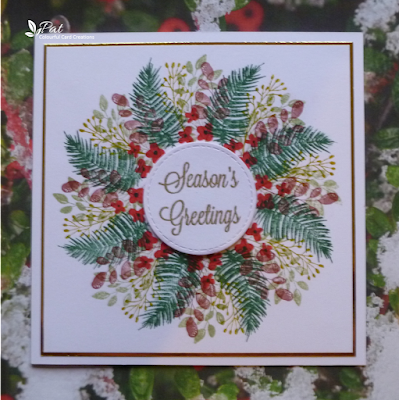
Hi everyone.  I have made another circle of foliage with the stamps from Creative Stamping Magazine 101, I just love all the looks you can get with this bumper set.  That said this is virtually the same as the last design I made here but using different Distress Inks and also one extra stamp as well as the same four on the other design.  I have been obsessed with wreaths this year and I have just one more like that to show and two or three others...not wreaths..lol which I will put up before the new year.


I used the Gina K Designs template to start it off as I did on the last and built it up using Cracked Pistachio, Stormy Sky, Broken China and Pine Needles Distress Inks.  I finished by adding some red berries with dimensional pearl drops to give it a bit more interest, and I added a red sentiment using Versafine Satin Red Ink and heat embossed it using WOW Clear Gloss Embossing Powder.  I decided to change it up by cutting round the edge of the shape and backed it with a piece of craft foam to give it dimension and added it to a 6" square card.

I would like to say a big thank you to all who have visited during the year and a special thank you to those that have been regulars and have left me some wonderful comments too which I greatly appreciate, and to those that celebrate.. 

                                       WISHING YOU A VERY MERRY CHRISTMAS
                                        AND A HAPPY AND HEALTHY NEW YEAR


Thursday, 23 December 2021

Floral Seasonal Wreath

Hi all.  I have made another card using the stamps from Creative Stamping Magazine issue 101.  There are so many pretty leaves and flowers and these were different stamps to my last circular design as these were all open shapes which I have coloured using some ancient Sakura Gelly Roll Stardust Pens with  a waterbrush for a lovely sparkly finish and I also used some dimensional pearl drops on the red and white berries.


I started by stamping the large flower and leaf branch and then added another smaller mistletoe branch and finished the wreath with a partial circle edge stamp to join it up, all stamped with Versafine Clair Nocturne Ink and then I coloured with my Sakura Pens and water to spread the colour and soften the effect whilst giving the whole thing some wonderful shimmer, unfortunately not visible here.  I didn't know until recently that you could use water with these pens but it worked a treat.  I finished by cutting it into a square to comfortably fit on a 6" square card and matted it on to gold mirri card.  I then added some 3D pearl drops in red and white opal to the different berries, and added a sentiment to the centre of the wreath using WOW Metallic Gold Embossing Powder.

Thank you for coming to visit today and I'll see you again soon.


I am entering the following challenges:

Stamping Sensations Challenge - December - Choose a Theme and Stamp It.
Sweet Stampin' Challenge - Anything Christmas. 
We Love Stamping Challenge - December - Anything Stamped/CAS Option.
Uniko Challenge - No. 68 Celebrate (Optional: Reds and Greens).
Watercooler Wednesday Challenge - Anything Goes.
Happy Little Stampers December Christmas Challenge - Anything Goes (Optional: Toys).
Happy Little Stampers December Watercolour Challenge - Anything Goes.
Country View Challenges - Christmas Anything Goes.

Friday, 17 December 2021

Hearts Zentangle

Hi there everyone.  I have been bitten by the bug...zentangle that is..lol.  I have made another card using a style of zentangle I have seen on line and I used a piece of scrap which I think must have been used to roll off my brayer during a gel printing session, and which has been sitting for a long while waiting for an occasion to be used.

I pencilled the design on to the piece of inked scrap freehand, with a bit of rubbing out and correction to get the heart shapes the way I wanted them, and then went over the lines with my 03 size Black Micron Pen.  I don't feel confident enough yet to go in with the pen from the start but being someone who likes to be as accurate as possible I find it easier with the lines established with the pencil first..not quite the idea of doodling but I will try to be more relaxed as I improve.  I then used a pink, purple and white Inktense pencil with a waterbrush to add some colour.  I finished by adding a sentiment using Versafine Clair Nocturne Ink and heat embossed with WOW Clear Gloss Embossing Powder and added it to a 7" x 5" card.

Thank you for visiting my blog today and I hope to see you again soon.


I am entering the following challenges:

Watercooler Wednesday Challenge - Anything Goes.
River of Creativity Challenge - No. 8 Celebrate.

Wednesday, 8 December 2021

Leafy Circle

Hi everybody.  Another Christmas card today using stamps from last month's Creative Stamping magazine and their first outing, and using an idea which was in the magazine with four of the silhouette leaves and also a pretty little silhouette flower stamped with Distress Inks.  I also used a sentiment which came with a bauble stamp some time ago from Creative Expressions.

I cut a piece of card to 51/2" square and in order to get an even repeat I used a Gina K Designs wreath template not quite as it was intended, but stamping in my Misti I laid the template over the top of card and by moving the stamp around I filled each of the eight slots with it using Bundled Sage, and that gave me a guide to carry on and place the other foliage.  I did the fern leaves next in between the first set of leaves using Pine Needles, then the other leaf designs to the left and right of the fern, using Crushed Olive and Rich Mahogany, and finally the little flowers around the inside edge using Versafine Satin Red.  

Finally I die cut a stitched circle to fit in the centre from a piece of white card and embossed the sentiment using WOW Metallic Gold Embossing Powder as I felt this finished it a bit more neatly than just stamping it on to the card.  I added some foam behind the circle to give it dimension cut just a bit smaller than the circle. 

Thank you for coming to visit my blog today and I'll see you again soon.


I am entering the following challenges:

NBUS Challenge - Where we use our Never Before Used Schtuff.
Simon Says Wednesday Challenge
- Happy Holidays/Christmas.
Sweet Stampin' Challenge - Anything Christmas.
Allsorts Challenge - Week 653 Use a Die.
We Love Stamping Challenge - December - Anything Goes with CAS Option.
Christmas Card Throwdown Challenge - December - Pick A Previous Challenge from This Year (I chose the March 2021 Technique Challenge with the theme of Stamping).
Crafty Hazelnut's Challenge - No. 571 Anything Christmas Goes.
Peace on Earth Christmas Challenge - No. 5 Anything Christmas Goes.

Tuesday, 30 November 2021

Tis the Season

Hi everyone.  I still have some cards to make but this is one more for the pot..lol.  It's still Rudolph's Day...just, run by the lovely Mo and I really had to join in as it's the last one of the year.  I am still loving doing a bit of tangling and I saw some Christmas designs with similar trees to this so I doodled and came up with this.  The background is an embossing folder by Crafter's Companion bought at The Range recently, so this is it's first outing.  I have been trying not to do snowflakes so much this year, but I do adore them and when I saw some of the designs they had at the range all featuring snowflakes, they just happened to fall into my basket..lol.


I started with the offcut of white card which I just had sitting on my table and did a washy background using Broken China, Dusty Concord and Picked Raspberry Distress Inks.  I then pencilled the design and when happy I went over it with a No 3 Black Micron Pen.  I added some sparkle using a Sakura silver pen on the star at the top, and also some little stars over the background, and on the circular ornamental line around the tree, highlighted the dots which is difficult to see but has a lovely sparkle.  I then embossed the piece of blue card with the Touch of Winter Embossing Folder and cut it to fit a 7'' x 5'' card and added one of the sentiments from last month's Creative Stamping magazine, so this is its first inking too.

Thank you for your visit today and I hope to see you again soon.


I am entering the following challenges:

Rudolph Days November Challenge - Anything Christmas Goes.
NBUS Challenge - Where we use our Never Before Used Schtuff.
The Holly and Ivy Challenge - Anything Christmas Goes.
Simon Says Stamp Wednesday Challenge - Anything Goes.
Peace on Earth Christmas Challenge - Anything Goes.

Friday, 26 November 2021

Chess with Tangles

Hi everyone.  I am still loving the bit of Zentangle I have been doing and this is another masculine card which I have made using a stamp set from Chocolate Baroque called The Art of Chess.  I also used an Aall and Create stamp No. 115 chess border.


I started by making a background using Brushos and sprinkled some Scarlet Red, Bright Red and Yellow on to my gelli plate, spritzed with water and pulled the print and it covered the piece of white stencil card well.  I cut it down to fit my 6" square card and added the chess border using Versafine Satin Red Ink and then added it to my card.  I managed to find a dimensional chess board and did a tracing of it on to a snippet of white card and filled in the white squares with a few tangles and then blacked the rest of the squares using a Micron Pen.  I then cut this out and added it to the background.  I then stamped some chess pieces on to more snippets of white card using Versafine Clair Nocturne Ink and fussy cut them out.  I then did a bit of tangling on each  and added them to the chess board on the card using some silicone glue to give them some dimension.  I finished by adding a sentiment again using the Nocturne Ink and heat embossed it using WOW Clear Gloss Embossing Powder.

For those that saw my last post here and want to know what the mistake was, the embossed background has a row of hearts top and bottom and unfortunately when I stamped the snowflake on it I put it upside down without realising and didn't notice until way after the whole thing was finished.  It's funny how a mistake really stands out when you know it's there, and I hope that those that said they couldn't see it were not just being kind.  I think there was one person that said they thought they knew but didn't want to say. 

Thanks for visiting my blog today and I hope I'll see you again soon.


I am entering the following challenges:

Pixie's Crafty Workshop Challenge - No. 416 Where we use up our snippets of card and paper etc.
Cardz 4 Guyz Challenge - No. 284 Gingham, Checks or Plaid (I hope my black and white chess board counts as a sort of gingham).
Simon Says Wednesday Challenge - Anything Goes.
Addicted to Stamps and More Challenge - No. 419 Any Occasion.
Seize the Birthday Challenge - No. 228 Hobbies and Pastimes.


Saturday, 20 November 2021

Let It Snow Please

Hi all.  I have a card today for the CAS Christmas Card Challenge asking for Christmas Critters, and so I decided on the cute Mo Manning digital image of a Llasa Apso and I thought the snowflake from the Colorado Craft Co. set of stamps Big & Bold - Winter Wishes Snowflake made a suitable backdrop, and as dogs are quite excited to play in the snow I thought this sentiment from the set would work too.  I also used a very old Crafter's Companion embossing folder called A Little Bit Nordic.

I started with a piece of white card embossed with the Nordic design and then I downloaded the digital image and coloured it with my Staedler Watercolour Brush Pens, scribbling the colour on my glass mat and lifting it with a waterbrush.  I was quite sparing with the water as the paper I print onto is only 120gsm because my printer does not like the thick card and this is the same make as the cards I use and nice and white.  I was going to leave the card at that with just the fussy cut image over the background embossing and with the sentiment, but I felt it needed something else so I decided to heat emboss the snowflake on to the embossed background using WOW Metallic Brass Embossing Powder.  I wasn't sure I would get a good impression over the embossing, but it did work pretty well.  You can see the dotty pattern through it a bit but I didn't think it spoilt the overall look.  I finished the card with the fun sentiment which I stamped using Versafine Satin Red Ink and embossed with WOW Clear Gloss Embossing Powder.

It wasn't until I picked it up for another look some time later that it dawned on me that I had made a bit of an error.  I won't point it out but will see who spots it..lol...actually I think it is more noticeable in the photo than in real life.  I asked hubby if he could see the mistake and it did take him a good half a minute so I'm hoping that whoever I send it to will not immediately spot it. 

Thank you for visiting my blog today and I'll see you again soon.


I am also entering the following challenges:

Mo's Digital Pencil Challenge - No. 309 Anything goes (optional: Thanks).
The Holly and Ivy Christmas Challenge - No. 105 Anything Christmas Goes.
Merry Little Christmas Challenge - No. 40 November - Anything Christmas Goes.
We Love Stamping November Challenge - Christmas.
Stamping Sensations Challenge - Christmas.

Wednesday, 17 November 2021

Going to Seed

Hi everybody.  I needed a feminine card for a cousin's birthday and also the CAS Mix Up Challenge which this time is Stencil Monoprinting and is the last one until the new year, so I combined the two and used a recently bought Woodware Stamp called Going to Seed..I have been wanting to get this for ages and this is its first inking, and made the stencil monoprint using a Lavinia stencil called Laurel.

I cut a piece of white card and covered part of the stencil with some Distress Inks - Mustard Seed, Fired Brick, Peeled Paint, Vintage Photo and Spiced Marmalade, and spritzed and turned it over and pressed on to the card using a piece of kitchen towel to mop up any excess water.   I did do this process several times to try and get a good bit of colour..brown and orange seems to have predominated in the centre but  it does have the look of autumn.  I then added the stamp over the top using Versafine Vintage Sepia ink and then heat embossed using WOW Clear Gloss Embossing Powder and then did the same with the sentiment.  I cut the piece of card down a bit and added it to my 6" square card.

Thank you for visiting my blog today and I'll see you again soon.


I am entering the following challenges:

Addicted to Stamps and More Challenge - No. 418 Birthdays.
Happy Little Stampers November Stencil Challenge - Anything Goes (so pleased to be chosen the winner of this challenge).
NBUS Challenge - Where we use our Never Before Used Schtuff (the stamp has its first outing).
Stamplorations November Stencil Challenge - Always Anything Goes.


Wednesday, 10 November 2021

Eagle Zentangle

Hi everybody.  I have been looking at zentangling for a while and up to now have only done a couple of others which I will show at some future time and have got the bug..lol.  I saw an eagle with tangled feathers and thought I would try something similar.  I found a freebie outline of one and transferred it using pencil on a piece of tissue paper and then turned it on to a piece of white card and went over the lines, and although faint I managed to ink it with a black Micron Pen and it worked pretty well.


I then did the tangling just using some fairly simple shapes...dots, lines and curved shapes varying them and breaking them up with just lines on some of the feathers in between.  I think the feathers lend themselves to this treatment and I have to say I was really pleased with the result.  It is much easier with the outline to start you off, not like the clever stuff started totally from scratch, but I may progress to something more like that.

I finished by colouring it with a couple of browns and a grey to the feathers not making it too heavy but accentuated the edges of each of the feathers to give them depth, and then added yellow and orange with some brown onto the beak.  I fussy cut it out and added it to the embossed background using some silicone gel.  I already had the background made by embossing a Lavinia stencil called Laurel used for the first time, and decided to leave it white and just added a black mat and die cut sentiment backed with Stick It for ease of applying to the card. 

Thank you for joining me here today and I'll see you again soon.


I am entering the following challenge:

NBUS Challenge - No. 32 Where we use our Never Before Used Schtuff (the stencil is new).
Allsorts Challenge - No. 649 From Boys to Men.

Wednesday, 3 November 2021

Purple Hearts Anniversary

Hi everybody.  I have an anniversary card today made with a Woodware set of stamps called Hearts Collection.  I saw this used over at Kathy K's Blog Purple Princess Diaries and I was instantly taken with the different styles of the hearts and so thank you Kathy for enabling me.  This is its first inking too.


I started by stamping and heat embossing the hearts using WOW Metallic Silver Embossing Powder on to a piece of purple inked card that I had, and then I fussy cut them out and added extra ink within the hearts using Wilted Violet Distress Ink and a waterbrush.  I then cut a mat for them using a square stitched die and added some script with a small Indigoblu stamp called French Script inked and then again heat embossed with the WOW Silver EP.  I then inked around the mat, my favourite thing to do at the moment, using the Wilted Violet and added it to my 6" square white card.  I finished by adding the Woodware sentiment stamped with Wilted Violet and heat embossed with WOW Clear Gloss Embossing Powder.

Thank you for visiting me today and I'll see you again soon.


I am entering the following challenges:

NBUS Challenge - No. 32 Where we use our Never Before Used Schtuff.
Simon Says Wednesday Challenge - Anything Goes.
613 Avenue Create Challenge - October 2021 No. 11 Anything Goes.

Friday, 29 October 2021

Holly and Bow Wreath

Hi everyone.  I have a card today for the Rudolph Days Challenge which runs from the 25th to the end of each month, and believe it or not there is only one more this year.  I got a Tattered Lace Holly Wreath and Bow die as a magazine gift and this is it's first outing.  Mo is also running the challenge this time in memory of a lovely lady called Kath of Plain and Simple Blog and there is an extra prize on offer for adding some paper piecing which was a technique which Kath loved, and I have used some snowflake dp for the top layer of my wreath.

I decided to make it dimensional so I cut it twice from black card and then once from the snowflake dp which looked black but against black is more of a grey colour.  Then did one in red and also the bow in red, all of which were snippets from my bits box.  I then cut a stitched mat in silver card, another snippet,  and adhered it to the white square card, and layered the two black layers one over the other, and cut up the top snowflake layer into several pieces and layered those up on top using silcone gel on each layer, which has given some nice dimension.  I thought there would be more shape and movement in the top layer by cutting it but not sure that this made much difference.  I finished by added the red berries cutting in between to make them look more individual and then gave them a coat of Anita's Clear Gloss, and also added the bow and gave that some of the gloss too.  Lastly I cut a sentiment from red card backed with Stick It and added that to finish.

Thank you for visiting my blog today and I'll see you again soon.


I am also entering the following challenges:

Pixie's Crafty Workshop Challenge  - No. 414 Where we use up our snippets of card and paper etc.
Happy Little Stampers October Challenge - Anything Goes With Dies.
Happy Little Stampers October Christmas Challenge - Anything Goes (no option).
The Holly and Ivy Christmas Challenge - No. 104 Anything Goes.
Christmas Crafts All Year Round Challenge - October - Something that starts with 'S' or 'T' (mine is 'S' for Snowflakes which are on the paper I have used for the top layer of my wreath.
Merry Little Christmas Challenge - No. 39 October - Anything Christmas Goes.
NBUS Challenge - Where we use our Never Before Used Schtuff.
Peace On Earth Christmas Challenge - No. 2 Using Inspiration Board.

Saturday, 23 October 2021

Ferns and Leaves Botanical Print

Hi there.  I have made a card for the CAS Mix Up October Card Challenge which finishes on the 24th, so just about in time.  The challenge this time is to use real leaves, ferns or flowers to make a Botanical Print.  I used inks, stamping, heat embossing and gelli printing.


I got out my gelli plate and put Fossilized Amber one side, Abandoned Coral the other with some Candied Apple Distress Ink down the middle and used my brayer to blend them together, I did roller them rather too much as it ended up looking more or less one colour.   I then laid down the two fern leaves with the back of the leaves touching the plate and used a piece of stencil card anchored with some washi at the top placed over  the leaves and rubbed well to get the ink as closely around them as possible. I then pulled up the card and took the leaves away and lowered the card over it again, rubbed well and pulled the print.  I didn't get a very distinct image so I decided to press the ink over the ferns using red on one and the yellow on the other and carefully laid the leaves down again rubbing them to transfer the inks on to the print.  This did give a more interesting look, but I still wasn't happy.  I then took the leaf spray and put some Brushed Corduroy DI on to the back of it and laid it down over the ferns, and did this several times.  I did spray the leaves before pressing down on one occasion too and the look was fairly good.  I then added some Ground Espresso and repeated with that, and this really showed up much better, no added water this time.

I cut the print down and flicked a little water and also some watered down Candied Apple DI for a bit more background interest, and I blended Abandoned Coral and Ground Espresso ink around the edges to darken them, and finished with a sentiment stamped with Versafine Vintage Sepia ink heat embossed with WOW Clear Gloss Embossing Powder.  I then added it to my 6" square white card.  

I was hoping to get a card done for CAS Christmas but hubby and I have had dreadful colds so I haven't been very proactive on the cardmaking front, but was glad to at least get this one done.  Hopefully in a few more days it will be much better.  Hubby had it first and did a test which was fine and I developed mine a couple of days after he started his so obviously he passed it on...very kind of him..lol. 

Thank you for your visit to my blog today and I hope to see you again soon.    


I am also entering the following challenges:

Happy Little Stampers October Watercolour Challenge - Anything Goes (some water used with the leaves and some splattering with diluted ink).
Watercooler Wednesday Challenge - October 2021 No. 11 Anything Goes.

Saturday, 9 October 2021

Pretty Birdcage

Hi everybody.  A birthday card today for a lovely friend featuring this Chocolate Baroque set called Pretty Birdcage, using the main image, and one of the smaller floral images in the background.  This is its first inking too.

I started with the background piece of white card cut to fit a 6" square card and the small floral image heat embossed on two opposite corners using WOW Bright Opaque White EP, and then I covered it with Adirondack Sunshine Yellow Ink applying it with a brush making the colour stronger in the two corners.  I then used some Fossilised Amber, Dried Marigold and Brushed Corduroy Distress Inks gradually darkening the corners even more.  

I then stamped the Pretty Birdcage stamp onto a piece of white card using Versafine Clair Nocturne Ink and heat embossed using WOW Clear Gloss EP before getting out my Inktense Pencils to colour taking the colour from them with a waterbrush which I find for me is the easiest and most controllable way to use them.  I then fussy cut out the image and used some Tea Dye DI watercoloured round the edges and dragging the colour in a little way to make it stand out against the background I created.  Finally I decided to add the Tea Dye DI to the corners too and rubbed the ink pad around all the edges of the background to make it really stand out against the white card, and finished by adding a sentiment using Versafine Toffee Ink.

Thank you for visiting me here today and I hope to see you again soon.


I am entering the following challenges:

Uniko Challenge - No. 67 Anything Goes (Optional Twist: Autumn Colours).
Stamping Sensations October Challenge - Animals, Birds and Bugs.
NBUS Challenge - No. 31 Where we use our Never Before Used Schtuff.
Make My Monday Challenge - No. 158 Embossing - Either.
Happy Little Stampers Watercolour Challenge - October - Anything Goes.
Watercooler Wednesday Challenge - WWC326 Helen's Challenge: All About Occasions.

Wednesday, 6 October 2021

Woodland Creatures Coloured Sketches

Hi everyone.  Whilst we were on holiday I went into an art shop for a look round and I found an inexpensive book on how to draw woodland animals in simple steps, so I bought it and these are my first two attempts, totally drawn using the examples in the book, but I was pleased with how they turned out.  

The squirrel I did whilst I was away and I only had some inexpensive watercolour pencils, but the mouse I did just the other day with my Intense Pencils and both were using a waterbrush to take the colour from the pencil.  I did them in my sketch book and I always intend to just colour sparingly but get carried away and the paper, especially on the mouse, did warp badly otherwise I might have turned them into cards.  Anyway here they are.


As someone has already asked the book I bought is called How to Draw Woodland Animals in Simple Steps by Susie Hodge and is published by Search Press.  There is a whole series of them..in fact I nearly bought one on trees, but thought I would try this first.  Thanks for visiting today and I'll see you again soon.


Saturday, 25 September 2021

Winter Wonderland Window

Hi everybody.  This is my card for the Rudolph Days Challenge.  I was too late for July so intended it for last month but Mo was unwell so it was cancelled.  I won the die there several months ago, and wanted the challenge to be the place I first used it.  The die is from Tutti and called Winter Wonderland Window.

I started by die cutting it twice from white and red card backing it with Stick It adhesive and cut a square of kraft card to put it on.  I then took out all the white die cut pieces and put them aside whilst I stuck the main white piece down onto the kraft card.  I then picked out all the red inner pieces..I did try to keep the whole red piece together so I could see where all the pieces went and apart from a few the adhesive backing kept it together quite well.  I have to say that the big pieces were fine to fit in but the smaller pieces were difficult to place without them dropping and disappearing on my table.  I managed pretty well with a pokey tool, but the bear's nose jumped somewhere and after a minute search I found it and stuck it down.

I mounted the kraft on to a red mat before adding it to my white card.  When I had finished I noticed that the bear's nose had disappeared and this time I could not find it..it obviously lost some stickiness when it did the disappearing act..lol.  I had to use what looked like the same piece from the white set and coloured it with a red Inktense Pencil and stuck it with glue this time so hopefully it will stay put.  

I did make this second card using the leftover red pieces but cut off the frame holding it all together leaving just the five window pieces separate and mounted on to a snippet of green card leaving spaces between.  I then mounted this onto a snippet of gold card which has an embossed pattern before attaching to my base card..a much simpler look. 

The first with the infilling does look nicer I think but I'm not sure that it is nice enough to spend so much time and effort on using this technique, so I think this will be a one-off.  I have left them both without the sentiment for now and will decide what's appropriate nearer the time.

Thanks for visiting my blog today and I'll see you again soon.


I am entering the following challenges:

Happy Little Stampers September Christmas Challenge - Anything Goes (no optional twist).
The Holly and Ivy Christmas Challenge - No. 101 Anything Christmas Goes.
Merry Little Christmas Challenge - No. 38 September Anything Christmas Goes.
Pixie's Crafty Workshop Challenge - No. 412 Where we use up snippets of paper and card etc.  (the red die cut pieces were leftover snippets from a previous card and the green and gold were also snippets)
NBUS Challenge - No. 30 Where we use our Never Before Used Schtuff.

Monday, 20 September 2021

Summer Dream Birthday

Hi everybody.  I know it's a long time since I posted but hubby and I have been away for two weeks in a cottage in Wales and I have been sorting things out since our return.  We are having a new boiler fitted which was supposed to be happening whilst we were away and preparations had to be made before we went which took extra time.  Unfortunately we saw as soon as we returned that the boiler and parts were here but no work had been done as our plumber was unwell, and so it's being done this week.   You can imagine it is complete chaos here.   I have done some commenting but I apologise to anyone that I've missed and will visit as soon as I can.  We enjoyed the time away which was much needed and the weather was mostly good.  Although it wasn't quite like a holiday in normal times we made the best of it.

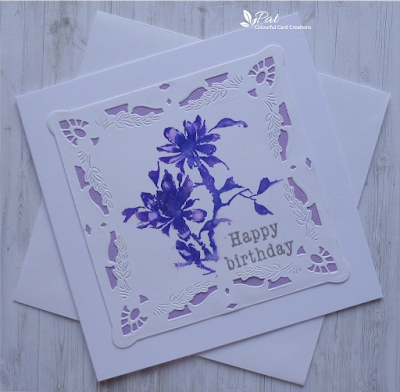
I'm showing another birthday card today using Penny Black's Summer Dream stamp quite old so not sure that you will find it now, and also using a Marianne frame die called Petra's Square, Bird and Nest which I won a long time ago and am ashamed to say have never used, mind you the trouble I had cutting it may mean that it won't come out to play again very soon...lol.
 

I started by cutting the frame and as I've said it was a difficult one.  I had to throw the first away because after a tussle with getting the pieces out it broke around one of the intricate corners and I ended up using something a little thinner and the only thing I had was Bristol Smooth watercolour card and consequently although this is one of the whitest watercolour papers it still looks a little yellow against the base card and I think I should have run it through again with the rubber mat to emphasise the pretty detail more, but perhaps I will next time, but I had lost a little patience with it by this time..lol.  I then stamped the silhouette flowers with Wilted Violet and Blueprint Sketch Distress Inks and a very litte spritzing with water to soften it a little.  I used my stamp positioner so I could go over it several times to get the right effect and I only inked part of the stamp so that it would sit well within the frame.  I finished with a sentiment heat embossed using WOW Metallic Silver Embossing Powder and matted it on to a piece of lilac card as a backing to the cut out shapes, and added it to my 6" square white card.

Before I go I would like to say thank you to two new followers - Michonne Remmers whose blog I couldn't find but if you let me know I will gladly give you a shout out, and Lesley Gillett whose blog you will find here and definitely worth a visit if you haven't seen it before.

Thank you for looking at my blog today and I'll see you again soon.


I am entering the following challenges:

NBUS Challenge - No. 30 where we use our Never Before Used Schtuff. 
Addicted to Stamps and More Challenge - No. 414 Any Occasion.
Stamping Sensations Challenge - September - Stamp of the Moment.  I have had this PB stamp for a long time but I love the beautiful stylish look of the magnolia.

Tuesday, 24 August 2021

Twofer Pugs

Hi everybody.  These cards are for the Twofer Card Challenge run by the lovely Darnell and the theme is Dog/Cat.  I have not been a good player of late and several times have made one card but run out of time to make the second, so this time it being the final challenge I was determined to get my cards in, albeit still rather late.  The idea of the challenge is to make two different cards for different occasions using the same stamps, stencils and/or dies.   Here are the two cards:


This first was made using this sweet pug couple and a Dotty Heart Embossing Folder by Leonie Pujol, and a set of heart dies by Sweet Dixie.  I decided to make a landscape slimline card and started by die cutting the hearts out of a snippet of white card just a little smaller than the base card saving the heart shapes.  I then embossed this aperture piece using the Dotty Heart EF running it through twice side by side to cover the long thin shape.  I then found another snippet of white card and stamped the pugs using Versafine Vintage Sepia Ink and coloured them using Fossilized Amber, Brushed Corduroy and Ground Espresso Distress Inks applied with a waterbrush and fussy cut them out.  I then blended some Dusty Concord Distress Ink round the edge of the embossed background and the two hearts.

Finally after mounting the background on to the card I inset the two hearts into the apertures and added the pugs over the hearts.  I finished by adding the sentiment onto a snippet of white card cut into a fishtail banner and stamped it using Versafine Imperial Purple Ink and added this to finish the card. 


I am entering this card into the following challenges:

Pixie's Crafty Workshop Challenge - Where we use up our snippets of card, paper etc (I used lots of snippets of white card for the background and hearts, pugs and fishtail sentiment banner).
Simon Says Wednesday Challenge - Add A Sentiment.

My second card is a masculine birthday card using a hexagon die set from XCut and two pugs from the above set one of which was used on the card above, also a stencil from That Special Touch called Paws for Thought.  I stamped the pugs with Versafine Vintage Sepia and coloured with Tea Dye and Pumice Stone Distress Inks and fussy cut them out.   After die cutting the seven hexagons I ink blended the four of them with Tea Dye and added the stencilling with Ground Espresso DI.  Finally I inked the other two with more of the Tea Dye but more sparingly just on the edges and added the two pugs.  Finally I added the sentiment to the remaining hexagon using the Vintage Sepia Ink heat embossed with WOW Clear Gloss Embossing Powder and assembled the card with the six in a circle and the sentiment in the middle.

 I am entering this card into the following challenges:

Stamping Sensations Challenge  - August - Any Celebration.
Country View Challenges - August - Monochromatic.
Cardz 4 Guyz Challenge - No. 278 Things with Tails.
The Male Room Challenge - No. 153 Our 8th Birthday.  


I would just like to say a big thank you to Darnell and the team for all the hard work they have put into the Twofer Challenge, and such a clever concept thought up by the lovely Darnell, and although we understand all good things must come to an end, it will be missed!  Thank you for your visit today and I hope to see you again soon. 


Wednesday, 18 August 2021

Elephant and Leaves Stencilled Birthday

Hi there.  I needed a masculine birthday card and I was looking through some of my older stash and came across this Clarity Stencil of an Elephant which I got when I belonged to the Stencil Club a few years ago, and which I have never used.  It is a large stencil and Barbara gave us a couple of tutorials showing ways of using it, but I think at that time I didn't feel I was skilled enough to do anything good enough and so I put it away and forgot about it.  Now a few years later I am more adventurous so thought I would see what I could do with it.  I also used an all over leaves stencil which was part of a set from The Range.  I decided to use my Adirondack Inks for a change and chose Sunshine Yellow, Cranberry and Stonewashed.

I started with a 6" square piece of card, the same size as the stencil and using my blending tool and Sunshine Yellow ink I lightly stencilled leaves over the whole thing.  I then place the elephant stencil over the leaves stencil, deciding I would just use part of it and then stencilled Cranberry ink through it, heavier towards the outside and lighter in the centre, and with the under layer of yellow it has more of an orange hue.  I then pencilled round the outer edge of it to make it stand out and went over the line with black micron pen.  I thought it still didn't stand out enough so I pencilled all the internal lines and used the pen over those, I wouldn't say this was very accurate but worked pretty well.  I then filled in the lines with a dark brown Inktense pencil and used a waterbrush to blend it all and went round all the outside lines in the same way.  

I finished by cutting it down a bit and laid the leaves stencil back down and added some blue ink over parts of the background which turned it green, and then put the elephant stencil back and added more yellow there.  I then removed the stencils and darkened the edges using yellow with blue over it which makes it stand out on my 6" square white card and added a sentiment using Versafine Vintage Sepia Ink heat embossed with WOW Clear Gloss Embossing Powder.

Thank you for visiting me here today and I hope I'll see you again soon.


I am entering the following challenges:

NBUS Challenge - No. 29 Where we use our Never Before Used Schtuff.
Happy Little Stampers August Stencil Challenge - Anything Goes.
Simon Says Wednesday Challenge - Add A Sentiment.
Watercooler Wednesday Challenge - No. 322 All About Occasions.
The Male Room Challenge - No. 153 Our 8th Birthday (best wishes and lots more great challenges to come!)