Pages

Friday 31 August 2018

Hark the Christmas Rose and Winter Edges

Hi everyone.  Here are the other two cards which I made for the Chocolate Baroque TV shows last month.  I made this first one using one of the new Christmas stamps from Chocolate Baroque called Hark the Christmas Rose, and the second card also has a stamp from the Winter Edges set.  The two are completely different in style and show that these stamps are very versatile and by blanking out the name of the music when you stamp, or by cutting round the outside edge of the flowers, you could even use this at any time of the year.  Perhaps I will try this in future to see what it looks like doing this.


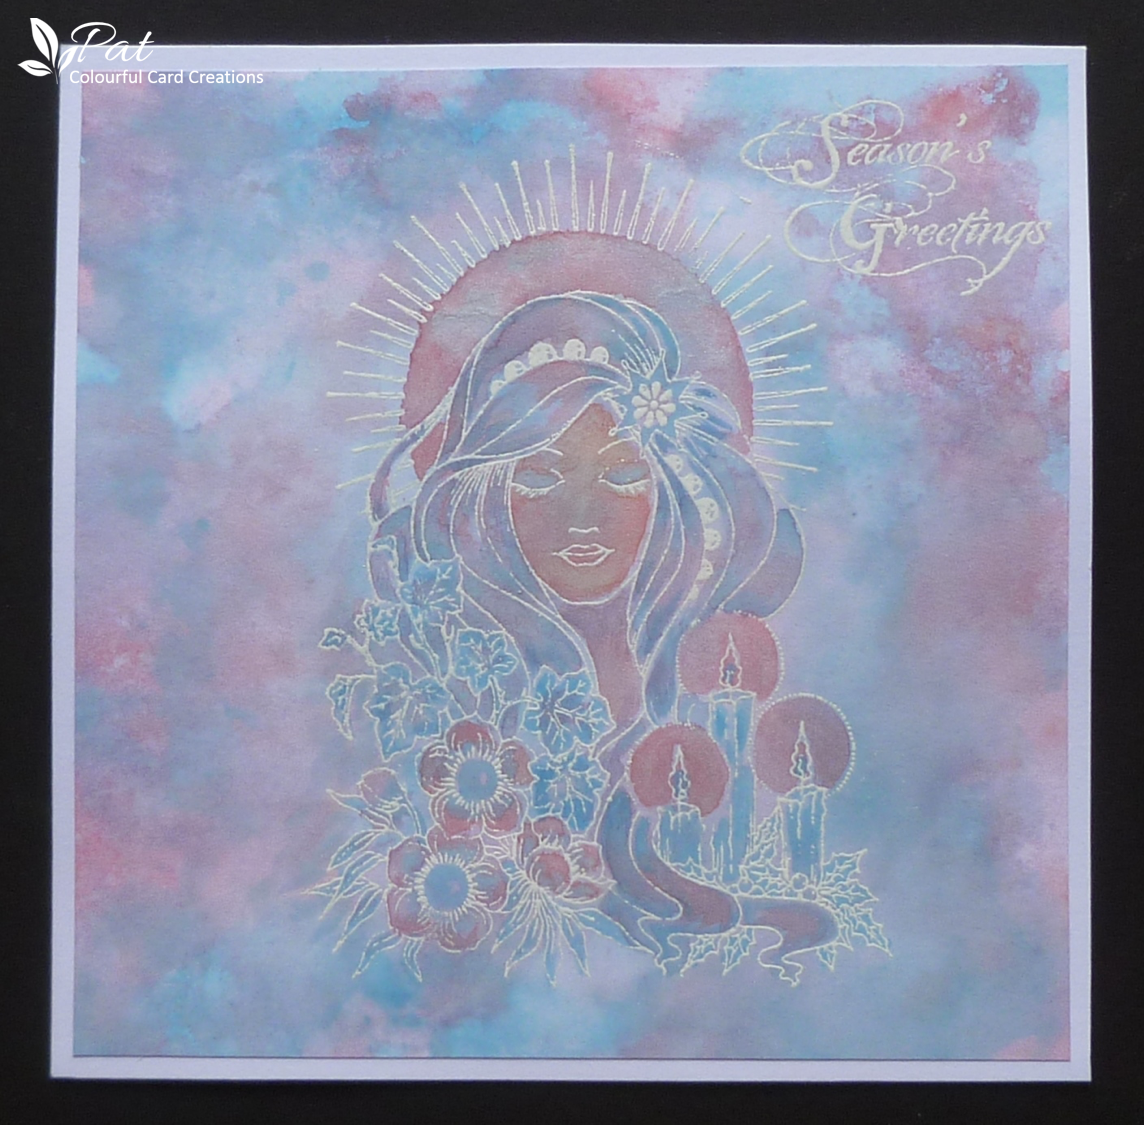
I stamped it on to a piece of white Frisk Velvet Card using Ground Espresso Distress Ink, and coloured it using a waterbrush and more Distress Inks in Fossilized Amber and some Carved Pumpkin for the flower centres,  some more of the yellow with a little Blueprint Sketch into the flower petals, and also some Candied Apple round the edges of the petals.  I then used Lucky Clover and more yellow for the leaves, and finally Ground Espresso for the stems.  The idea was to get a more vintage look with the colours as the brown DI I used to stamp with mixed with the other colours when I used the waterbrush, but in the end I decided to pull some of the colour back out of the petals because they bacame too dark, and I wanted a lighter look.  The tinge of red looks more like pink with all the water, but when dry I was happy with the result.

I finished by adding the sentiment from Let's Get Festive using Candied Apple DI and then spattered some of the brown ink over the background and layered it up on to red and then kraft card before adding it to the white approximately 7" x 5" card.


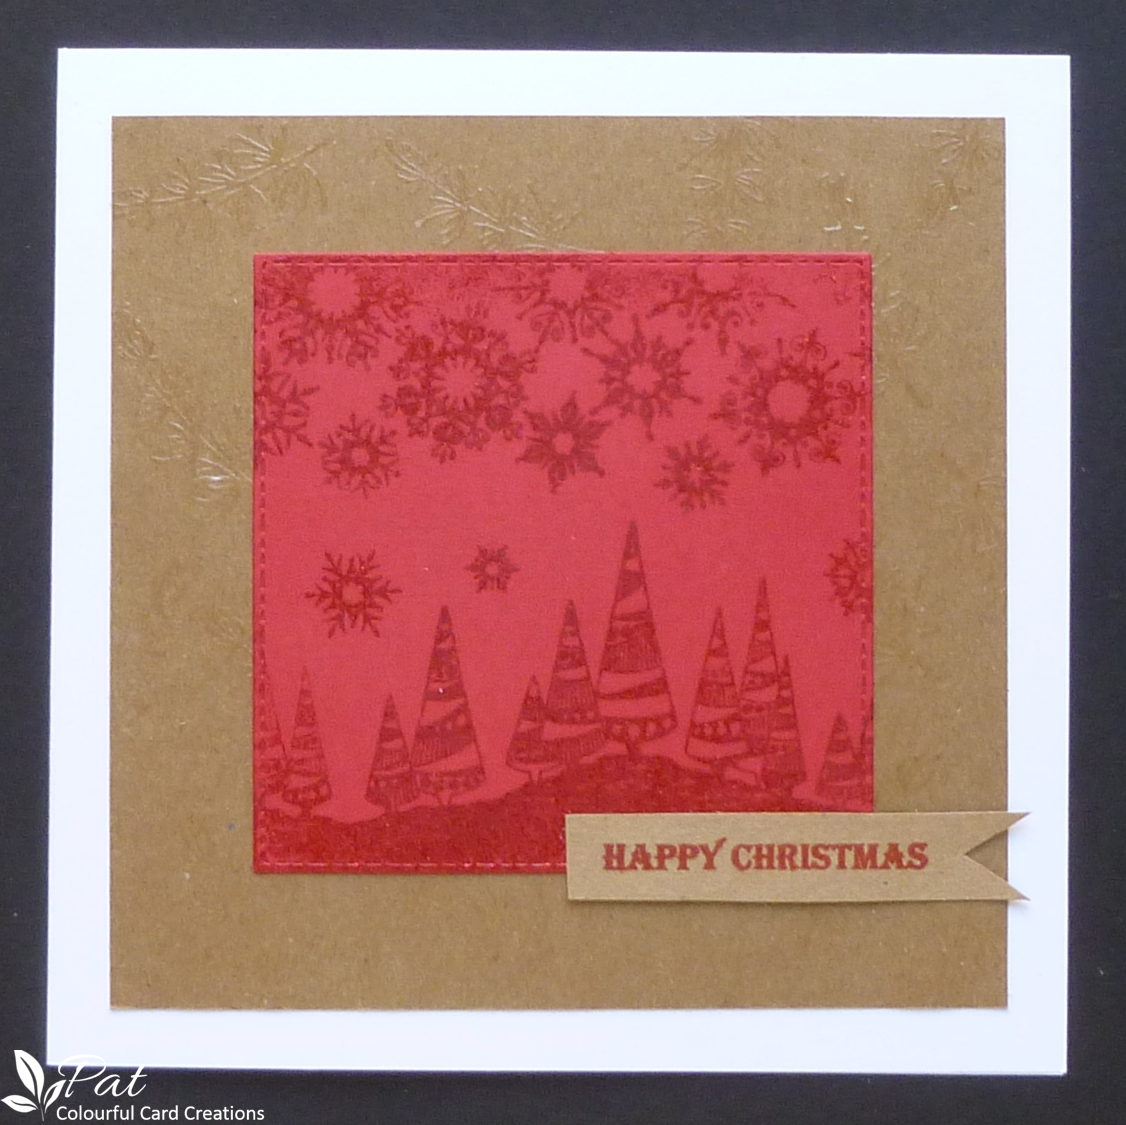
For this second card I decided to heat emboss it on to kraft card using the Red Glitter EP and it has lost none of the detail.  I like red with kraft so I backed it with some, although in the photo it does look dark pink rather than red, but it is definitely a Christmas red.

I folded back the white base card and added the embossed borders starting with the one down the side before adding bits of them to the top and bottom.   I used a piece of paper over the other piece of the fold back as obviously it had to be flat for stamping, just so that it didn't stamp on the inside of the fold back piece, though I suppose it wouldn't necessarily have mattered and with hindsight would probably have been easier to keep the card flat, stamp and then fold it back.  I then added the border down the inside of the of the right hand side as you can see so that it balanced it up, all done with the same red glitter EP.

I finished by adding the topper to the fold back piece.


Thank you for joining me here today and I hope to see you again soon.


Wednesday 29 August 2018

Robin the Spruce and Serena

Hi everybody.  It is nearly the end of another month so time to show some more of the cards I made for the July TV programmes featuring some Chocolate Baroque Christmas stamps, a new one called Robin the Spruce, and one which has been around for a while called Serena.

For this card I have used stamping on to acetate using Black Archival ink.  After stamping the image put it to one side and leave it for at least 30 minutes to make sure it is perfectly dry, ask me how I know...lol.  I then coloured it on the back using some alcohol inks and a brush, mixing them with a little of the blending solution.

It doesn't have a totally smooth finish but then I backed it with a piece of white card on which I stamped the image and lined them up, which has strengthened the line art.   I folded the acetate around the backing piece top and bottom and then added a very little glue down the sides to keep it flat.The alcohol ink colours were Stonewashed, Indigo, Watermelon and Lemonade, and I mixed Butterscotch with a bit of Watermelon to make a brown colour.   I then layered this on to another piece of white card before adding it to the white base card.


I added two more of the stamps from the set heat embossing them using Versamark Ink and WOW Silver Metallic Embossing Powder, and then added the sentiment which comes from the Let's Get Festive set, again using WOW Silver Metallic EP.


I love Serena which is such a pretty seasonal image, but actually she could be used at any time of the year with different colours, and mine aren't typical Christmas colours either.   I used Distress Oxide Inks in Salty Ocean and Worn Lipstick, and then I coloured her with them as well.


I started with a piece of the Frisk Velvet Card and stamped the two colours down on to my glass mat and spritzed with water before dragging my card through them, and I did this several times to colour the card drying in between layers of colour until I was happy with the finished result.

I then heat embossed the image using Versamark Ink and WOW Opaque Bright White Embossing Powder and also added one of the sentiments from the Festive Wishes set, and used the same white EP.  After colouring the image I added some Wink Of Stella for the area behind her head and around the candle flames which unfortunately doesn't really show up in the photo.

I finished by adding this to the white base card.

I have a couple more cards which I will try to show before the end of the month.

Thank you for visiting today, and a special thank you for all the lovely comments which I really appreciate.  


Saturday 25 August 2018

Twofer Challenge for August

Hi there.  I am rushing in with this last minute entry for the Twofer Card Challenge over at Darnell's blog.  The idea is to use the same stamp/die on both cards but they must be for different occasions.  I wasn't sure that I would get my entry done in time but have just made it by the skin of my teeth...I wonder where that saying comes from, but I bet Darnell would know, or perhaps somebody else knows its origins.  Anyway, down to business, here are my two cards.  The prompt this time was Geometric, so I have used a hexagon die cut shape on both.


The first is a floral card featuring a pretty stylised fuchsia image from Chocolate Baroque called Hanging Flowers which I coloured with Brushos by sprinkling Scarlet and Orange on the flower area and then Leaf Green and Emerald Green around the areas where the leaves are and then spritzed.

I started by stamping the image on to the piece of white card with Versamark Ink and then heat embossed using WOW Opaque Bright White Embossing Powder.  I then used the Brushos as described above and moved them around a bit more with a waterbrush and added more colour with the brush until I was happy with the result.  I then die cut using a Stitched Square die from The Works and cut this piece with two hexagon dies using a set from XCut, and then put a piece of craft foam behind the central piece to lift it up.


Here is a closer view so that you can see the hexagonal pieces with the centre raised up on foam.

I finished by adding it to a 6" square white base card and then stamped the sentiment using Versamark and heat embossed with WOW Silver Metallic EP. 

I am entering this card in the following challenges:

Happy Little Stampers August Watercolour Challenge - Anything Goes (optional twist - Flowers).
Addicted to Stamps and More - No. 306 Anything Goes.
Penny Black and More August Challenge - I Spy Something Beginning with 'B' (Brushos, Blue, Blooms and Birthday).
Watercooler Wednesday Challenge - No. 184 All About Holidays.

The second card is made with the same small hexagon making a patchwork.  I used some glossy card and alcohol inks - Indigo, Pool and Stonewashed.  I then decided to use a snowflake stamp from Chocolate Baroque called Snowflake Shadow over the top and stamped using Versamark Ink and heat embossed with WOW Silver Metallic EP.


I die cut the pieces and put them back together on to a piece of white card and then mounted that on to another slightly larger piece of white card before adhering it  to a  7" x 5" white base card (side opening).  I then added the sentiment again using the WOW Silver Metallic EP.

I am entering this card into the following challenges:

Rudolph Days August Challenge - Anything Goes Christmas.
Crafty Hazelnuts Christmas Challenge - No. 400 Anything Goes (no twist).
Happy Little Stampers August Christmas Challenge - Anything Goes (no twist).

It is the 25th here as it is after midnight, but California is a few hours behind so the challenge is still open...phew..made it, with apologies to Darnell for my very, very late entry!

Thank you for taking a look today and I hope to see you again soon.


Tuesday 21 August 2018

Concrete Jungle

Hi everyone.  I needed a masculine birthday card and I bought this set from Sheena Douglass called Concrete Jungle quite a while ago and I was encouraged to get on and use it after visiting Kathyk of Purple Princess Diaries, so thank you Kathy, and who had just bought it and made a great male card with it, but totally different to mine, which is what I love about stamping, and you can see it here.

I stupidly entered a card into the Penny Black and More Challenge which didn't have any stamping on it.  I had unusually for me used a digital image and watercoloured it, and it was several days before the penny dropped and I realised my error...definitely a senior moment..lol.  I let them know and I am assuming they will have deleted my other card, but anyway I said I would find another to put up instead, and this is it.


I found a piece of heavy weight cardstock and cut it to about 51/2" square.  I then stamped the two images using my Misti with Versafine Smokey Gray Ink and did this several times to get a good dark image, but I think it is still a little less harsh then black.  I then heat embossed it using Versamark Ink and WOW Clear Embossing Powder.

I masked out a sun/moon, as I have to say I haven't really made up my mind if it is daytime or nighttime, and the blue is not that dark, so it could be either.   I carefully sprinkled some Lemon and Orange around the buildings and using my waterbrush and also spritzing with water I made sure the powder was well dissolved.  I then used Ultramarine but instead of sprinkling them on to the paper I decided to use it with the waterbrush and paint it on as this is a very strong blue and again I wanted it to be well mixed.  I finished by adding some black to the blue to darken it and again painted it on to the scene.  I did also add some colour to the buildings and the airship to show where the sun/moonlight hits them.  I removed the mask and took the whiteness off  by adding some yellow to it.

I finished by adding it to this 6" square white card base and added a sentiment using Onyx Black and heat embossed it with some Clear EP.

Thank you for looking at the blog today and I'll see you again soon.


I am also entering the following challenge:

Penny Black and More August Challenge - I Spy (something beginning with 'B' - blue, buildings and birthday).
Sieze the Birthday - Anything Goes.

Wednesday 15 August 2018

Quick Cards Winter Edges

Hi there.  Here are my quick cards which are featured as part of the once a month 15 minute card feature over at Chocolate Baroque.


I used a piece of white Bristol Smooth card and stamped two of the images from the Winter Edges set on to it using Versamark Ink and WOW Opaque White Embossing Powder.

I then blended Distress Inks into the background using a blending tool.  I used Mustard Seed above the silhouette and then using Stormy Sky started to build up the colour.  I  then added a bit more yellow around the edges and some Seedless Preserves and Faded Jeans to darken it, and finally Black Soot just around the edges.  I decided to lay the ink on my glass mat and pick it up from there so that I would not put too much colour on at a time.  I think it would have been better if it had more blue tones, but nevertheless I was pleased with the finished result.

I finished by adding the sentiment from the Let's Get Festive set to the white base card using Versamark and heat embossed with WOW Silver Metallic EP before adhering the scene to the card.  Finally I decided to add some stars to the sky using a white gel pen.


For this card I also used two of the images from the Winter Edges set, stamped with Versamark and then heat embossed using WOW Red Glitter Embossing Powder on to a previously die cut piece of red card, cut using a stitched square die.  The two stamps didn't totally fit on the square, but I think it still works.  I then found a piece of kraft card on which I randomly stamped one of the foliage stamps from one of the new sets called Robin the Spruce again using Versamark Ink and then heat embossed with WOW Clear Gloss EP.

I finished by cutting the kraft card about 1/2" smaller than the white base card and after adhering the red topper added a banner sentiment using kraft card and the Let's Get Festive set, stamped with Festive Berries Distress Ink and heat embossed with WOW Clear Gloss EP.

Thank you for visiting today and if you would like to see more wonderful inspiration for quick cards please go and visit the Chocolate Baroque Design Team Blog.


Tuesday 14 August 2018

CAS Watercolour Sunflower

Hi there everybody.  I am a bit busier these days and I tend to run out of time to enter those challenges which I really hate to miss and this is one of them.  CAS Watercolour Challenge has the theme of Sunflower this time and I couldn't find one in my stash, so I searched on line and found this digital image which was quite pretty with its mass of rather crumpled petals, a bit more random than some..lol.


I started by cutting a mask for it and then after putting it in place I used my Brushos to create a background, and I did the stencil monoprinting technique using one of the That Special Touch of Masks called Orbit.  I sprinkled  three colours over it and spritzed using Ultramarine, Leaf Green and Turquoise, and I think the Leaf Green which has quite a lot of yellow in it mixed with blues has given a predominantly green look with very little blue, but that's the nature of Brushos which give a different finish every time.  I did add quite a lot of water to keep it fairly light as I didn't want it to dominate.  I removed the mask and then coloured using some of the Brusho powder on my glass mat and applied with a waterbrush using Yellow, Lemon, Brilliant Red and Dark Brown for the flowers, and some more of the Brown and red for the centre with a little Black.

I finished with a die cut sentiment from The Works which has two layers but leaving it white means it doesn't stand out too much.

Thank you for taking a look today.


I am also entering the following challenges:

Happy Little Stampers August Watercolour Challenge - Anything Goes - Optional Twist Flowers.


Thursday 9 August 2018

CAS Mix Up August Challenge

Hi there everyone.  I thought I would get my entry in early this month for the CAS Mix Up August Challenge, and I needed an anniversary card so made the card with the challenge in mind.  This month we have to include Stencil Monoprinting + Stamping + Our Choice, so here it is.  I used a Chocolate Baroque set called Fluttering Hearts, and the third heart flower is separate from the other two when cut out.


I chose a stencil by Sweet Dixie called Fern Flourish and inked up the stencil itself with three Distress Inks in Twisted Citron, Carved Pumpkin and Mermaid Lagoon, rubbing the inks randomly over it from the pads.  I then spritzed it (make sure you spritz until it beads...ask me how I know..lol) and then placed it face down on a snippet of Chocolate Baroque Drawing Cartridge paper allowing ten to twenty seconds before lifting it off, and at this point  I usually get a piece of kitchen towel and rub that over which gets rid of any excess liquid before lifting it.

I continued by stamping the Chocolate Baroque image on to another snippet of white card using Versafine Smokey Gray Ink and then coloured it with my Wink of Stella Pen by laying down the same three Distress Inks on to my glass mat as I used for the background, and used my WOS Pen to paint the image, which gives it a wonderful sparkle, and then fussy cut it out.  It is one image but when stamped and cut out one of the heart flowers is separate.

I finished by die cutting a white square stitched mat with another snippet of white card, using a set from The Works and layered my stencil monoprint on to it and adhered this to a white 6" square base card.  I added the cut out images and gave them some dimension with Pinflair Glue Gel.  I then stamped a sentiment on to a snippet of black card using Versamark Ink, and heat embossed with WOW Opaque Bright White Embossing Powder, and cut it into a banner shape and glued it with some of the Pinflair Glue Gel.

Thank you for visiting today and hope your week is going well.  I for one am pleased that temperatures have dropped back to a more comfortable level, but let's hope that the fine weather has not left us entirely.


I am entering the following challenges:

Pixie's Crafty Workshop - No. 332 where we use up our snippets of card and paper etc.


(I was so thrilled to be chosen as Top Pick for this challenge)

Simon Says Wednesday Challenge - Distress It.
Artistic Stamper August Challenge  - Anything Goes.

Wednesday 1 August 2018

A Christmas Snippets Creation

Hi there.  I thought instead of being the last with an entry I would try for a change to be somewhere near the top of the list for Rudolph Days Challenge this time.  It only started today and will be open until the 7th I think due to Mo, over at Scraps of Life by Scrappymo, being away.  Anyway here is my card.


I have made this entirely from snippets from my box which I haven't looked in for quite a while.  I found a die cut snippet of Silver Mirri which was made using a Crealies Pierced Rectangle and then one of the many snippets of white card, and then on top a snippet of turquoise blue parchment which I had silver heat embossed with WOW Silver Metallic EP using a snowflake stamp, but I'm not sure which one.  I am not sure why I hadn't used this but it was a bit of an offcut and not very big.  I found a Silver Mirri die cut sentiment which I think might have been part of a Sue Wilson die, I think the Framed Noel which has several sentiments within it, but this unfortunately is quite old and doesn't seem to be available any longer.  This one was a vertical one so I cut the letters apart so I could put it along the bottom.   I have to say that they don't look totally uniform but OK I think.

Thank you for stopping by today, and your comments are always much appreciated.


I am entering the following challenges:

Rudolph Days July Challenge - Anything Goes.
Pixie's Crafty Workshop - No. 331 where we use our snippets of paper and card etc.
Crafty Hazelnut's Christmas Challenge - No. 397 Anything Goes.