Pages

Friday 25 March 2022

Seasonal Baubles

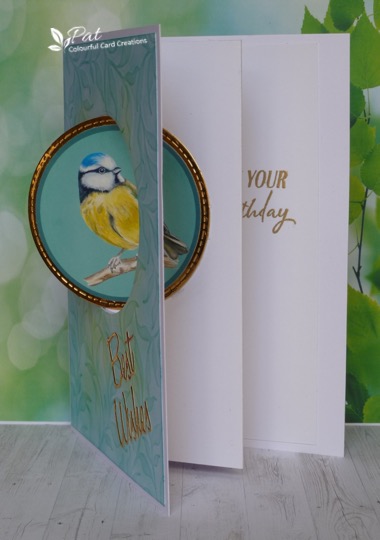
Hi everybody.  I have a Christmas card made with a cut and emboss folder which came free with Papercraft Essentials Magazine No. 192, not normally one that I buy but hubby bought it for me when he had been shopping as a surprise as it was my birthday and we were in lockdown.  It has been sitting in a box in which I keep those things which are waiting to be used and it has been waiting for a long time, so thought now was the time to make a card with it.

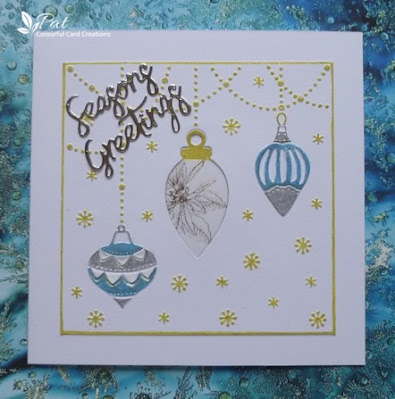
I embossed it on to a piece of white card and decided to colour the two outer baubles with my Sakura Stardust Pens just very carefully going over the raised parts which worked well using a blue, gold and silver pen and then found a piece of pretty gold embossed vellum with poinsettia images on and cut a piece just a bit bigger than the the white bauble which was the cut part of folder.  I placed this over the underside of the aperture and stuck it around the edges, and after colouring the top of the bauble piece gold placed the cut out piece back in the hole behind the vellum and stuck it in place with a couple of pieces of double sided tape to stop it from moving (I left the top covering of the tape in place).  I then cut down the piece a bit and used the gold pen round the edges before sticking it to the 6" square card.  I finished it with a silver mirri die cut sentiment backed with Stick It adhesive.  There is lots of shimmer from the pens which doesn't show up much in the photo but in real life it twinkles very prettily.

Thank you for coming to visit my blog today and I hope to see you again soon.


I am entering the following challenges:

Rudolph Days March Challenge - Anything Christmas Goes.
ABC Christmas Challenge - E for Embossing, F for Fussy and Fancy, and G for Glitter.
The Holly and Ivy Christmas Challenge - No. 112 Anything Christmas Goes.
Merry Little Christmas Challenge - No. 43 Anything Christmas Goes.
NBUS Challenge - No. 36 Where we use our Never Before Used Schtuff.
Happy Little Stampers March Christmas Challenge - Anything Christmas Goes (Optional:Twine).

Wednesday 23 March 2022

Rose Anniversary

Hi everyone.  I have an anniversary card which I found when looking through my drafts which was for an aniversary way back last October, so thought it was about time I showed it.  I used Chocolate Baroque's Rose and Thistle stamp set and a Sheena Douglass Embossing Folder which I have had for a long time and don't know the name of, but I suspect unfortunately that it probably isn't available now, but is a useful one to add a bit of texture to a background.

I stamped and heat embossed the image using WOW Metallic Platinum Embossing Powder and coloured it with Inktense Pencils and a waterbrush.  I did use a light and a dark green but the shading on the leaves doesn't seem to show up much.  I decided that the embossing, which made a metallic frame around the flowers, was a bit too much so I fussy cut around the outside of the flowers.  I die cut the rectangular background using a Crealies Pierced Die and then ran it through the embossing folder.  I finished by adding the sentiment also heat embossed with the Platinum EP and then layered it up adhering the flowers using silicone glue to give more dimension.

Thank you for looking at my blog today and I'll see you again soon.


I am entering the following challenges:

We Love Stamping March Challenge - Anything (stamped) Spring (I hope that roses count as they just about start flowering towards the end of Spring).
Can You Handle The Pressure? - Anything Goes Embossing.
Happy Little Stampers March Watercolour Challenge - Anything Goes.
Simon Says Wednesday Challenge - Favourite Things (I love flowers and the colours pink and purple).
Simon Says Monday Challenge - Bright and Cheerful.

Saturday 19 March 2022

Swing Fold Card

Hi all.  I have just got myself a proper scoreboard, don't know why I haven't bought a decent one before but after struggling to make good creases and accurate measurements with the freebie one I have used for the last few years, and also it's not big enough to score A4, I decided to buy a new one.  I must thank Liz who is the doyen of card shapes and folds who pointed me in the right direction as to what board was probably the best buy around at the moment, and so I ended up with the 12 '' x 12" Hunkydory scoreboard.  To celebrate this I had a look on line and found a swing fold card here which didn't look too daunting.  I did make the aperture circular instead of square though as I had something in mind which came with a fairly recent magazine, in fact the first issue of this Papercraft Special with some stamps, dies, an embossing folder and toppers and papers all with a bird theme, and a donation to the RSPB with every issue sold.  I used one of the toppers for this card with a sweet little Blue Tit on it and I backed it with gold mirri using a stitched die.

I used a  5" x 7" white card and I then worked out the size of the mechanism piece inside the card as I wanted a larger card than on the video.  The mechanism worked out to be about an inch shorter in length than the opened out width of the card and about  the same amount shorter than the depth, although I decided to make it just 1/2" shorter than the depth of the card..i.e 61/2" x 9".  You make three scores with equal spacing across the piece to give you four panels..two mountain folds and one valley.


I decided to make the front of the card using a Lavinia Laurel stencil and dry embossed it and then ink blended over it using Peacock Feathers and Twisted Citron Distress Inks.  I then attached it to the card front.  I used the same die which I cut the gold mirri with and cut the aperture..I had to run it through a couple of times to cut out both layers of card.  


I finished by attaching the mechanism and then the circular topper to the aperture..it explains how to do it in the video, and then die cut a gold mirri sentiment and added a gold embossed sentiment to the inside of the card.

Thank you for visiting me here today and I hope to see you again soon.


I am entering the following challenges:

Happy Little Stampers March Anything Goes with Dies Challenge.
Happy Little Stampers March Stencil Challenge - Anything Goes.
Colour Hues Challenge - No. 37 Yellow and Pale Teal.
Shopping Our Stash Challenge - No. 466 Spread Your Wings.
Seize the Birthday Challenge - No. 234 Green and White/Anything Goes.


Friday 11 March 2022

Fun Feline

Hi everyone.  I have a CAS card today featuring this tangled cat..I hope you are not getting bored with my doodles, I am still doing other cards too..lol.  I was going through a box and found a very ancient set of outline stencil shapes which came as a gift with a magazine and one was of a cat and knowing that there is a challenge over at Addicted to CAS where the theme is 'Feline' I decided to do something with it.  At first I thought I would just do a silhouette but then I had the idea to use the outline and make a tangle of it..I'm not sure whether it works but I'll leave you to decide.  

I started by pencilling the shape and deciding how I would fill it in before getting out a Docraft set of fineliners which I got recently, and I used a few different bright colours and tangled away.  I did the outline and face of the cat in a brown.  I then got out some coloured pencils and with similar colours I added some shading and filled in some of the tangle backgrounds.  I  masked the cat and used this Creative Expressions Paw Print Lattice stamp with Adirondack Stonewashed Ink to ground it, and I also blended some softly around the edges and I added some darker pencil colour beneath it, and finished with a stamped sentiment using Versafine Majestic Blue Ink. 

Before I go I have a new follower called Dunja whose blog you will find here, and thank you for becoming my new follower.  Thank you for visiting me here today and I'll see you again soon.


Saturday 5 March 2022

Fun Fishes

Hi there.  I don't usually make cards for the younger members of the family as I don't really have any suitable images and also I am not good at putting them together, but I had seen an example of these fun fishes and had already started tangling it on to a piece of white card, although it looks cream in the photo, having first marked it out in pencil, and then hubby said that he was going out to buy a card for his great nephew, and it struck me that these fish might make a fun card for him.  


I decided to use my Sakura Starlight pens to colour them in six bright colours, and I had already made the waves using a blue pen from a set of four CD markers..I used the red one here, and I coloured the eyes of the fish with Clear Wink of Stella and I also used this on the bubbles.  I finished by die cutting it using a stitched square die, and also added the die cut name, age and birthday sentiment using some scraps of gold mirri card, and then mounted on to this blue card before adding it to my usual 6" square white card.

Thank you for coming to visit my blog today and I'll see you again soon.


I am entering the following challenges:

Simon Says Wednesday Challenge -  Add a Die Cut.