Pages

Friday 30 December 2022

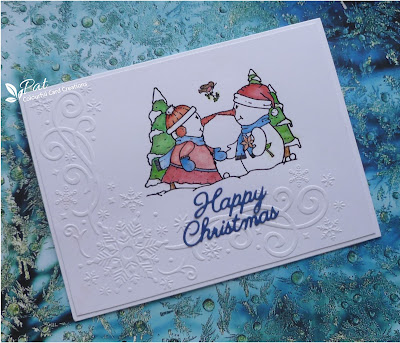
Snowy Kisses

Hi there.  This is my final card before I set Christmas aside for a while.  It is the card for my hubby using a Sweet Dixie stamp called Snowy Kisses which I was lucky enough to win earlier in the year, and I saved it with the idea of using it on his card as I thought the kissing snow couple were so sweet, and also an embossing folder called Touch of Winter.  


I started by cutting a piece of white card to fit inside the 7" x 5" folder and I did my usual trick of spritzing it to stretch the fibres before running it through my machine.  I then stamped the image onto this embossed background using my Versafine Clair Nocturne Ink and heat embossed using WOW Clear Gloss Embossing Powder.  I coloured it using my Inktense Pencils taking the colour from the tip with a waterbrush, and then I attached it to the white 7" x 5" base card.  I did cut the topper down slightly to leave just a small border of white around the edge.  I finished by adding a die cut sentiment cut from mid blue card first backing it with some Stick It adhesive so that it is easy to attach.

Thank you for visiting me here today and although Christmas can be a difficult time for some people,  I hope everyone managed to enjoy it in some way or other.   Hubby and I are always busy before Christmas with various things we belong to, and so when it arrives we are quite happy to relax for a few days.

Anyway, thank you for visiting me here today and I'll see you again soon.


I am entering the following challenges:

NBUS Challenge - No. 45 Where we use our Never Before Used Schtuff.
Allsorts Challenge Week 708/9 CAS - Clean and Simple.
Country View Challenges - December - Christmas.
Let's Squash It! Challenge - No. 27 Snowflakes and Stars.  (Sadly this is their last challenge)
Can You Handle The Pressure? Challenge - Anything Goes using an Embossing Folder/Snow.

Sunday 25 December 2022

Snowy Cabin by the Lake

Hi there.  I have a Christmas card for our son in Australia, which I sent him on the 25th November and he received it on the 21st December, which is an improvement on last year as he never received it at all. I love the scene with the trees and cabin, by Stampscape called Nature Sheet 6, and it comes with a few images which you can mix and match.  I just used the cabin being used for the first time, and the larger trees which I used on this card here.


I did some work with Brushos and had some left over in Sea Green mixed with water on my glass mat, so I picked it up on to a piece of card and put it aside.  I suddenly spotted it and decided that it would make a good base to start building a scene.  So I added the cabin image, and then some trees to the foreground on either side of it using Versafine Olympia Green ink.  I then decided to make it night time, so I darkened around the edges using Pine Needles and then Chipped Sapphire Distress Inks using a brush to blend them, and I added some White Brilliance Ink around the cabin and also some Fosselized Amber DI, and then some white gel pen on the roof of the cabin and on the stones in front of it.  I also added some brown to the cabin and some yellow and orange for light coming through the windows using my Inktense Pencils, and then spattered some white gesso which was a partial success but I finished by adding some more dots with the gel pen which could be stars as well as falling snow, and then decided to stop as I'm always afraid of overdoing it and spoiling the effect.  I added it to a 7" x 5" white card and then finished with the sentiment also using the Olympia Ink and heat embossed with WOW Clear Gloss Embossing Powder.

I hope that you have an enjoyable Christmas and a happy and creative 2023.  I would like to thank all of you that visit including those that leave me comments as well as those that just take a look from time to time, as it really does make doing this worthwhile, and I hope you will continue to visit throughout the coming year.  

I will see you again soon as I will have one more card to post here before I set Christmas aside for at least a few weeks. 


I am entering the following challenges:

NBUS Challenge - No. 45 Where we use our Never Before Used Schtuff.
Stamping Sensations Challenge - December - Anything Stamped/Winter Wonderland.
Happy Little Stampers December Christmas Challenge - Anything Goes/Stencil.
Happy Little Stampers December Watercolour Challenge - Anything Goes.
Country View Challenges - December - Christmas.


Wednesday 21 December 2022

Christmas Lantern

Hi everyone.  I have another Beccy's Place freebie image called Christmas Lantern, and I also used an embossing folder which was another freebie with a magazine, but can't remember which one as it was a long time ago.

I printed the image in a soft grey colour this time and used my brush markers to colour with a waterbrush to apply them and fussy cut and backed it with some foam.  I found a piece of white card and using the embossing folder then did what I did last time and sprayed it with a little water before sending it through my machine, and it definitely makes the embossing more pronounced.  I then added the sentiment using Versafine Satin Red and heat embossed it with WOW Clear Gloss Embossing Powder before adding the topper to the card.  I decided to add some yellow to give the glow of the lamp around it and using a brush I applied some Fosselized Amber Distress Ink and then adhered the lantern over it.

Thank you for visiting me here today and I'll see you again soon.


I am entering the following challenges:

Beccy's Place December Challenge - Anything Goes using one of Beccy's images/Bingo Grid.
Sparkles Christmas Challenge - No. 143 Non-Traditional Christmas Colours.
Happy Little Stampers December Watercolour Challenge - Anything Goes.
Happy Little Stampers December Christmas Challenge
- Anything Goes/Stencil.
Country View Challenges - December: Christmas.

Tuesday 13 December 2022

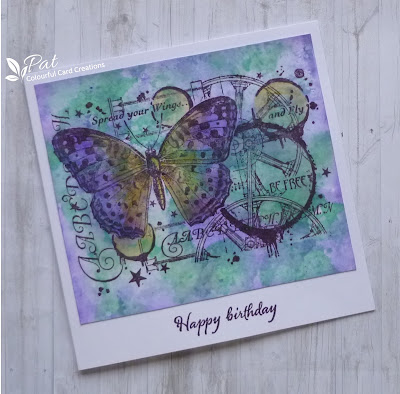
Fly and Be Free Butterfly

Hi everyone.  A birthday card today using the Creative Individuals stamp Fly and Be Free.  I used Brushos and a bit of added Inktense Pencil and blending with some Distress Inks.

I started with the Brushos in Violet and Sea Green on my glass mat with water and applied to the card using a piece of acrylic as I find this makes them easier to use.  I did each colour separately and dried in between.  I then stamped using Versafine Imperial Purple Ink and added some extra colour on the circles and the butterfly using the Mustard Yellow Inktense Pencil, taking the colour from the tip with the waterbrush.  I also added some white pencil here and there and I used some Clear Wink of Stella on the butterfly wings.  I cut the piece down a bit leaving room for the sentiment to be added at the bottom of the 6" square card, again using the Imperial Purple Ink and heat embossed it with WOW Clear Embossing Powder.   I then blended some Wilted Violet Distress Ink around the edges and also blended a little more on to the wings as I felt they needed to be darkened a bit so that they stood out better.

Thank you for visiting my blog today and I'll see you again soon.


I am entering the following challenges:

We Love Stamping Challenge - December - ' I love.....' (I love stamping and inking and making my own backgrounds).
Stamping Sensations Challenge - December - Anything Stamped/Winter Wonderland.
Simon Says Wednesday Challenge - Add Some Sparkle (Wink of Stella on the butterfly wings).
Allsorts Challenge - Week 706 Anything Goes/Let it Snow.
Crafty Calendar Challenge - December - Anything Goes.
We Love to Create Mixed Media Challenge - No 12 Anything Mixed Media Goes.
Creative Artiste Mixed Media Challenge - No. 89 Anything Mixed Media Goes.

Thursday 8 December 2022

Poinsettia Wreath

Hi everybody.  I have one of Beccy Muir's digital images another of the freebie ones, and unsurprisingly another wreath too, as I do love the wreath shape.   I decided to use alcohol markers which I haven't used for I don't know how long.  I felt as though I had lost the knack of using them and wasn't totally happy with the result and nearly threw it away, but the next day on looking at it again I decided it wasn't as bad as I thought.  I only have a dozen of the Promarkers and the two tones of green are not terribly close in colour to get very natural shading, and there is only one brown which is a little darker for the background wreath than I would have liked, but since I finished the card it has grown on me.


I did the palest possible printing colour which is the equivalent of no line colouring and I used the same paper to print on.  This time I checked and it is only 120gsm so thinner than I was thinking.  I decided to cut it out to place it over the embossed background which is a Crafter's Companion embossing folder called Frosted Elegance.  I decided as my card is 300gsm to spray it with a little water before dry embossing to see if it would etch it a little more deeply and I think that it does look more pronounced, so a success.  I added the wreath backed with a bit of foam for dimension, and then die cut a sentiment from red card to add beneath.

Thank you for coming to visit my blog today and I'll see you again soon.


I am entering the following challenges:

Beccy's Place December Challenge - Anything Goes/optional: Bingo Grid.
Allsorts Challenge - Week 705 It's beginning to look a lot like Christmas.
Christmas Kickstart Challenge - No. 69 If It's Christmassy, Link It Up!
The Holly and Ivy Challenge - Anything Christmas Goes.
Merry Little Christmas Challenge - No. 47 Anything Christmas Goes.
Peace on Earth Challenge - No. 29 Anything Christmas Goes.
Crafty Hazelnuts Christmas Challenge - No. 623 Anything Christmas Goes. (Sadly after 12 years Hazel has decided to make it the last challenge at the end of the year)
Winter Wonderland Challenge - Anything Christmas Goes.
Country View Challenges - December - Christmas.

Wednesday 7 December 2022

Navy and Cream Anniversary

Hi everybody.  I have an anniversary card to show you today, actually the last family anniversary until April.  I decided to use the colours of the latest Color Hues Challenge which appealed to me as something a bit different when making an anniversary card.

I started with the topper using some cream pearlised card and decided to use some lines scored down the middle of the square shape, about 3 1/4" square, and decided on the negative, going into the card.  I then die cut a heart from the centre and backed it with a piece of the navy to frame.  I used this heart and die cut it one size smaller.  I then backed this with a piece of foam and placed it in the centre and added three little self drawn hearts using a dark blue Sakura Starlight gel pen for a bit of sparkle and also ran the pen down the lines on the cream heart, and finished with a sentiment using Versafine Majestic Blue ink below the topper on the 6" square white base card.

Thank you for visiting me here today and I hope you'll visit again soon.


I am also entering the following challenges:

Simon Says Wednesday Challenge - Anything Goes.
Crafty Calendar Challenge - December Anything Goes.
Alphabet Challenge - R is for Reduce (CAS).
CAS on Friday Challenge - No. 245 Greeting Card.
Color Hues Challenge - No. 54 Navy and Cream.