Pages

Wednesday 23 August 2023

Feed the Birds

Hi everybody.  I have a masculine card today featuring some RSPB stamps which came with a magazine a few months ago and which had not been used..tut tut!  It features garden birds and some accompanying images and also an EF with a branch on it and four dies including two which cut out two of the different birds.  I was a little disappointed as there was another sheet of stamps with a lovely background scene and waders and ducks which I thought came with it but it came with another version of it...drat!  I also used another one of my crushed flower/foliage backgrounds, a snippet cut from one of the original A4 pieces, and this has a much better leaf pattern to the righthand side.  The first card is here.

I started by adding some foliage on the background using a couple of silhouette stamps from another freebie set which is a couple of years old but these two particular stamps hadn't been inked before, and I stamped these using Distress Inks - Peeled Paint for those at the top and Forest Moss for the fern type leaves at the bottom.  I then added the blue using Tumbled Glass DI and a blending brush, and then used the two greens to add more depth at the edges where there is green.  I then stamped the bird table and flying sparrow from some snippets of white card using Versafine Vintage Sepia Ink and coloured them with a waterbrush using Brushed Corduroy on the bird table, and then also added Scattered Straw and a tiny bit of Aged Mahogany and Hickory Smoke -  all Distress Inks, on the flying bird.  I accentuated the bird's eye and the lines of the wing feathers using a very fine Black Micron Pen.

I finished by cutting them out and adhered them to the background scene and then added the sentiment to the white card using a stamp from this same set, stamped using Versafine Clair Nocturne Ink heat embossed with WOW Clear Gloss Embossing Powder before adding the finished scene to the card.

Before I go I have a new follower called Donna whose blog you will find here, thank you for becoming a follower Donna, and I'm sure she would love you to pay her a visit. 

Thank you for visiting my blog today and I'll see you again soon.


I am entering the following challenges:

NBUS Challenge - No. 53 Where we use our Never Before Used Schtuff.
Try it on Tuesday Challenge - Let's Go Outside.
Simon Says Wednesday Challenge - Clean and Simple.
Happy Little Stampers August Watercolour Challenge - Anything Goes.
Happy Little Stampers August Birthday Challenge - Anything Goes.
AAA Birthday Challenge - No. 52 Anything Birthday Goes.
Snippets Playground Challenge - No. 461 Where we use our snippets of card and paper etc.

Friday 18 August 2023

Floral Silhouette Best Wishes

Hi everyone.  Here's a card I made recently using a technique, demonstrated by Chrissie Stokes on YouTube, for making backgrounds using flowers and/or leaves placed between two pieces of absorbent card and put through the die cutting machine, and the resulting moisture leaves some pretty colours and patterns on the pieces of card.  I filled up an A4 sheet and started to roll it through my machine and it was a bit difficult to turn the handle but I managed to do a few turns.  I turned the sheets round and started from the opposite end, but the problem seemed to be in the centre so I cut it in half and put just half through at a time, and this worked better.  I also lined the card above and below with a piece of kitchen towel which stopped it making too much of a mess.  It worked fairly well and there were some areas where you could pick out the shapes of the leaves and stems, but also some bits, especially the buddliea flower I used, left big blobs of intense colour which were not particularly attractive, so I cut these off and am left with a few pieces which I thought would look nice as backgrounds, and this is one of them.


This piece was mostly areas of green and a little light purple and I decided to add a bit of script to the background using a stamp from a freebie set being used for the first time, which came with Simply Cards and Papercraft Magazine No. 239.  I stamped it with Vintage Photo Distress Ink, but I thought it needed pushing back a bit so I sprayed it with water and softened the look.  I also stamped one of the flower images from the set in the top left and bottom right corners using Carved Pumpkin Distress Ink, and just left it as is.  I then stamped the Crafty Individuals Flower Silhouette stamp called Wild Flowers and Ferns using Versafine Clair Nocturne Ink heat embossed with WOW Clear Gloss Embossing Powder.  I finished by adding some colour behind the flowers and around the edges using Fossilized Amber and Carved Pumpkin, and further darkened the edges with a bit of Vintage Photo.  I then added this to a white card 7" x 5", but ended up cutting a little off the length to give it better proportions.  

Not a lot of the original card with the crushed foliage technique can be seen as it is fairly well covered with inks, but I think it gives a good starting point, and maybe the next piece I use I will do a bit less inking to show it off better.  For those of you that might be interested you will find the You Tube video here.

Thank you for coming to visit the blog today and I'll see you again soon.


I am entering the following challenges:

NBUS Challenge - No. 53 where we use our Never Before Used Schtuff.
Stamping Sensations August Challenge - Mood Board/Anything Goes.
Simon Says Monday Challenge - Use Your Favourite Technique - Mine is Stamping.
Triple B August Challenge - Anything Goes using Birds, Butterflies, Blooms (any one, two or all three).
Beautiful Blossoms Challenge - Anything Goes/Optional Mood Board No. 8.

Wednesday 9 August 2023

Gold Encased Heart Anniversary

Hi everybody.  I have an anniversary card to show today using a Sweet Dixie Heart die and also a corner die which came as part of a box set No. 1 by Sheena Douglass which also included floral and sentiment stamps, a stencil, this die and also a sentiment die and some pretty papers and toppers.  I have used one or two of the floral stamps but this is being used for the first time here.


I started by making the heart which I die cut from a Sweet Dixie set and then using some alcohol inks on my gelli plate I laid a piece of white card on the plate to pick up the inks.  I used watermelon, indigo and Terracotta with also a Rose Gold Mixative and some blending solution to move it around a bit.  I used ordinary card and did this process a couple of times to cover a piece big enough to die cut the heart from, as the card absorbs the ink unlike Yupo where it lays on the surface.  When cut I also added a bit of shimmery pink and lilac eyeshadow using a sponge blender which came with the set of eyeshadows.  This was a tip I got over at You Tube in videos by Chrissie Stokes here and here, if you don't have any pigment powders, and I have to say if you watch the videos you will see that they work really well.  I also added some small bits of glue using a glue pen and added some gilding flakes, but after adding the bits of eyeshadow and buffing a bit they unfortunately disappeared..I don't think I used enough glue although they did seem to be adhering well.

I then added a heart aperture to a piece of white card 5" square, a size larger than my inked heart, and then thought about what I could do to pretty it up and found this corner die from the Sheena Douglass box set.  I cut three and experimented with them as a border around the heart tucking them inside the edge.  I decided to make them gold and used a Brilliance Galaxy Gold ink coating them with it and then heat embossed using WOW Clear Gloss Embossing Powder.  At this point I added the gold sentiment using the same Galaxy Gold ink and Clear Gloss EP, and then added this layer to the 6" square white card.  I didn't think this through properly and I had rather a job manoevring the heart behind the gold border as I had already glued the aperture itself down.  It would have been better to place the heart behind the aperture in the front section held in place with a bit of removable tape and added some wet glue on the back of the heart before removing the temporary tape and glueing it down..anyway I did eventually manage it, but the air was a little blue...lol.

Thank you for visiting my blog today and I hope to see you again soon.


I am entering the following challenges:

NBUS Challenge - Where we use our Never Before Used Schtuff.
Happy Little Stampers August Anything Goes with Dies Challenge.
Addicted to CAS Challenge - No. 243 Shapes.  (I hope this is considered to be CAS enough).
Unicorn Challenge - No. 90 CAS.
613 Avenue Create Challenge - August Anything Goes/CAS (I'm playing the option).
Simply Clean and Simple August Challenge - Anything Goes/Outdoors.

Thursday 3 August 2023

Underwater Fun

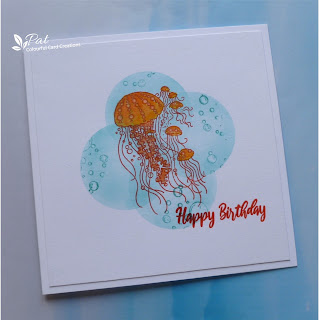
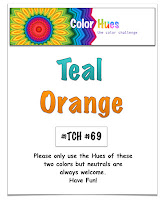
Hi all.  I need a few birthday cards and this could be masculine or feminine I think, and got out a set of stamps which came with Issue 97 of Creative Stamping, and these particular stamps have not been inked before, and in fact very few of the stamps have seen any ink...tut!  I decided it would be a CAS card to fit in with the challenge at Less is More which is Under the Sea, and also the challenge over at Addicted to CAS which asks for Shapes, and the circles in the background fit with that I think.  The colours also fit with Color Hues where the challenge is Teal and Orange.


I started by making a circle mask and using a brush I blended Peacock Feathers Distress Ink through it making four circles big enough to fit the jellyfish into using a piece of white card cut to fit a 6" square card.  I then stamped the jellyfish using Versafine Habanero Ink and  then added some stamped bubbles using the Peacock Feathers DI.  I then coloured it using Spiced Marmalade and Ripe Persimmon DI's having first bleached out the blue from the image which helps to keep the colour clean and bright.  I coloured and then decided to add some white pencil over the little markings on the jellyfish and also water bleached the bubbles.  I finished by adding the sentiment using the Versafine Habanero Ink and heat embossed using WOW Clear Gloss Embossing Powder.

Thank you for visiting me here today and I'll see you again soon.


I am also entering the following challenges:

AAA Birthday Challenge - No. 52 Anything Birthday Goes.
NBUS Challenge - No. 53 Where we use our Never Before Used Schtuff.