Pages

Tuesday 31 May 2022

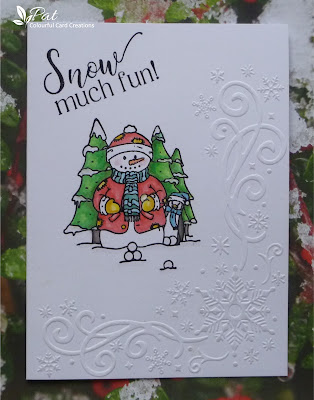
Snow Much Fun

Hi everybody.  It's that time of the month again for the Rudolph Days Challenge  hosted by the lovely Mo, and I have chosen to use a Sweet Dixie Stamp called Best Friends which was one of two stamps I won over at Pixie's Playground and it has been inked up for the first time.  I also used a Crafter's Companion embossing folder called Touch of Winter which I bought at The Range before last Christmas.

I decided to make a one layer card so I embossed the EF straight on to the 7" x 5" base card and then stamped the cute snowman and penguin using Versafine Clair Nocturne Ink and heat embossed with WOW Clear Gloss Embossing Powder.  I then coloured it with my Inktense Pencils taking the ink from the pencil with a waterbrush and added some Clear Wink of Stella to the snowballs and on the snow just to hightlight it, and also to the snowflakes on the embossing which looks really sparkly and pretty but unfortunately it doesn't show up in the photo.  I finished with the fun sentiment from a freebie set of stamps which came with a Creative Stamping Magazine..funnily enough these were a bumper set of Christmas stamps by Crafter's Companion and I thought this sentiment fitted on the card perfectly.  

Thank you for visiting my blog today and I'll see you again soon.


I am entering the following challenges:

Merry Little Christmas Challenge - No. 44 Anything Christmas Goes.
Crafty Hazelnut's Christmas Challenge - No. 596 Anything Christmas Goes/Use Some Silver.
Happy Little Stampers May Christmas Challenge - Anything Goes/House.
Simon Says Wednesday Challenge - Anything Goes.
Allsorts Challenge - Week 678 Anything But Birthdays.

Tuesday 24 May 2022

Tangled Leafy Circle

Hi there everybody.  I have done a bit more tangling and with more colour this time.  I used the three tangles...Inaflux, Flux and Printemps.

I started with a piece of card a little smaller than my 6" square card and used a circle die cut of around about 4" diameter, and pencilled around it to give me the starting shape.  I did the pod shaped Inaflux mapping out with a pencil where to put them around the circle for reasonably equal spacing before putting them in with my black 0.1 Micron pen.   Once those were done I infilled with the leafy shapes of Flux, and then to the outside of the circle shape I infilled with Printemps using a gold fine line pen from a set by Emott, and then coloured the rest with my Inktense Pencils adding the colour and then used a waterbrush to move it around.  I waited until the first layer was dry and then added some more of each of the colours to darken and create shadows, and then added more of a darker colour..could have been darker I think although in real life there is more contrast.  I finished by using a pencil and a paper stump/tortillion to add shadows around the images and added a sentiment to the centre using Versafine Toffee Ink and heat embossed it with WOW Clear Gloss Embossing Powder.  

Like with lots of tangles there are variations for the shapes and my pods would be better a bit more open and more like flower buds but then I have seen some which do resemble more the ones I have drawn though perhaps with a slightly bigger space in the centre, but nevertheless I like them.  Not sure where this would be better as a masculine or a feminine card..let me know what you think.  

Thank you for visiting me today and I hope to see you here again soon.


I am entering the following challenges:

Allsorts Challenge - Week 677 - 13th Birthday Celebrations.
613 Avenue Create Challenge - No. 202205 Anything Goes/Mother's Day.
The Creative Crafters Challenge - No. 52 Anything Goes.
Happy Little Stampers May Watercolour Challenge - Anything Goes.

Saturday 21 May 2022

Ornate Edger Celebration Card

Hi all.  I have a 21st birthday card to share today for the daughter of some neighbours who live across the road from us and they have invited us to a celebration barbecue this evening so let's hope it doesn't rain.  I have used a die by Creative Expressions called Teasel Edger which is having it's first outing, and a piece of floral paper from a freebie pad which I got eons ago.

I started with a 7" x 5" card as this die is a long slender shape and it fits nicely on this size card.  I cut the die along the edge and then gave it some blended colour using Spun Sugar Distress ink, as I think they look like flower buds when coloured in this way, and I masked off the inside of the card to just beyond the die and ink blended that using the same colour, giving it a bit of a pattern using a stencil from a set which I got at The Range.  I cut the piece of patterned paper so it was a little longer and wider than I needed and then laid the die so it overlapped just to cut into the edge of it.  When I had die cut it I line it up on to the card and then marked where to cut it down to, just a little smaller than the card..luckily this worked well.  Finally I coloured a piece of card using the same pink ink and backed it with a piece of Stick It adhesive before die cutting the sentiment and numbers.  I decided to use my Wink of Stella Clear Gloss pen over the top to give them a lovely shimmer but it doesn't show up well on the photo.

Before I go I would like to introduce my new follower, and thank you Uschi, whose blog you will find here and I'm sure she would love you to pay her a visit.  

Thank you for visiting my blog today and I'll see you again soon.


I am entering the following challenges:

NBUS Challenge - No. 38 Where we use our Never Before Used Schtuff.
Allsorts Challenge - Week 677 Allsorts 13th Birthday (congratulations on this 13th year).
Simon Says Wednesday Challenge - Layer it up.
Happy Little Stampers May Challenge - Anything Goes with Dies.
Happy Little Stampers May Stencil Challenge
- Anything Goes.
Alphabet Challenge Blog - D is for Die Cuts.
Creative Moments Challenge - No. 234 Summers Here/Anything Goes.


Tuesday 10 May 2022

See the Flowers Smiling

Hi All.  I love these teasels by Art Journey Stamps from their set called Nature Flowers and decided to use them for a friend's birthday and it was a fairly quick card to come together. 

I started with the washy background and by just flapping the paper into the ink with added water on my glass mat you get small areas of coverage of the colours, drying in between layers until you get the look you want.  I used Peacock Feathers, Salty Ocean and Blueprint Sketch Distress Inks.  I then used a Kaisercraft stamp called Background Postmarks, to make a pattern and to fill in the gaps.  I have had this for a long time, and naughty me have only used it for the first time now.  I used the Salty Ocean DI to stamp so it would just be part of the overall background.  I then cut it down and added the teasels and the words up the side of the tallest of the two stems, and then added a sentiment, using my Versafine Clair Nocturne Ink.

Finally I added it on to a white mat and then added this to the 7" x 5" white card.

Thank you for visiting my blog today and I hope to see you again soon.


I am entering the following challenges:

NBUS Challenge - No. 38 Where we use our Never Before Used Schtuff.  (The background stamp is NBUS).
We Love Stamping May Challenge - For a Lady (or Girl).
Stamping Sensations May Challenge - Anything Stamped with option of Flora and Fauna.
Addicted to Stamps and More Challenge - No. 428 Birthdays.
Allsorts Challenge - Week 675 Favourite Stamps and/or Dies.  (I find it impossible to choose a favourite but I do love the sculptural look of teasels and this Art Journey Stamp is so detailed and beautiful).

Wednesday 4 May 2022

Message in a Bottle

Hi everyone.  I have a card for my BIL today and for a change I decided to make a pop up shadow box card using a set of stamps and a stencil from Creative Stamping Magazine Issue 95 designed by Lisa Horton.  It's a pop up because you can retract the outer bars within the frame to fit flat into an envelope (mine fitted in a 6" square one) and obviously they will pop back out when you take it out.  I also used some Brushos for the background and to colour with.

I made the shadow box frame using a piece of A4 card cut in half for the back and front and scored two equal lines for the box sides and the pieces which form the handle, and cut the aperture from the front using a rectangular die.  I made the background using Brushos..Aquamarine, Turquoise and Emerald and made the wave pattern using Blueprint Sketch Distress Ink, and added the shoals of fish in Versafine Clair Nocturne Ink, and decided where to put the seabed and added it to the bottom.


I then stamped the bottle, anchor, starfish and shells using a couple of snippets of white card and more Nocturne Ink, and coloured them using the colours from above, plus Brilliant Red, Orange, Yellow and Dark Brown.  I fussy cut and added these to the background using some silicone glue and shaded across the bottle to give the effect of the seabed as seen through it, and also continued the stencilled pattern very faintly over the bottle too.  I should have added a bit of shading under the shells but forgot unfortunately, and finished by stamping the sentiment on to the bottle and finally the birthday sentiment on to the front of the box frame again using the Nocturne Ink and heat set using WOW Clear Gloss Embossing Powder.

 
Thank you for coming to see my blog today and I hope to see you again soon.


I am entering the following challenges:

Pixie's Snippets Playground Challenge - Where we use our snippets of card and paper etc.  (I used white snippets for the background and also the bottle, anchor, starfish and shells).
Stamping Sensations May Challenge - Anything stamped with the option of Floral or Fauna.
Allsorts Challenge - Week 674 - Anything Goes with the option of Scenic.
Addicted to Stamps and More Challenge - No. 428 Birthdays.
Happy Little Stampers May Watercolour Challenge - Anything Goes.
Sisterhood of Snarky Stampers Challenge - No. 209 U is for Underwater.
Simon Says Monday Challenge - Masculine.
NBUS Challenge - Where we use our Never Before Used Schtuff.  (I have not used any of these stamps before).