Pages

Friday 30 September 2022

Peaceful Night

Hi everyone.  I have a rather late entry for the September Rudolph Days Challenge using this new Woodware stamp called Peaceful Night, bought recently from a local craft fair and having its first outing. The challenge is run by Mo over at Scraps of Life by Scrappymo, and it opens on the 25th and runs to the end of the month, and I had forgotten that this is a shorter month, so a bit of a scramble to get a card in..I do need to get on with them so I'm not making them until the last possible moment..lol.


I decided to stamp this Bethlehem scene on to black card and used WOW Metallic Gold Rich Embossing Powder.  I got out my Sakura Starlight pens and having coloured one or two of the houses realised that they looked a bit pale so I used a little white gesso with a water brush over each to lighten then added the colours which then looked a bit too bright, so I dabbed it with some tissue whilst wet to remove a little of the colour so that they looked softer, not a terribly realistic look but very bright and shimmery using shades of red, orange, blue and purple and also silver and gold.  I finished by adding a sentiment using the same embossing powder and also ran the gold Sakura pen around the edge of the piece before adding it to a DL card.

Thank you for joining me here today and I hope you can visit again soon.


I am also entering the following challenges:

The Holly and Ivy Christmas Challenge - No. 124 Anything Christmas Goes.
Merry Little Christmas Challenge - No. 45 Anything Christmas Goes.
NBUS Challenge - No. 42 Where we use our Never Before Used Schtuff.
Craftyhazelnut's Christmas Challenge No. 613 Anything Christmas Goes.
Addicted to Stamps and More Challenge - No. 439 Any Occasion.

Saturday 24 September 2022

Fly and be Free

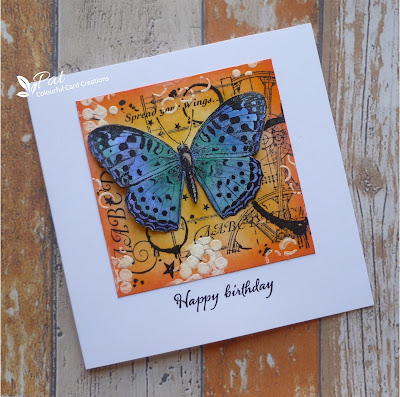
Hi all.  I have an extremely late entry for the CAS Mix Up Card Challenge and the technique this time is to use a stencil and gesso.  I decided to use a Crafty Individuals stamp called Fly and be Free which is having it's first outing, and I also used some Brushos to paint the butterfly which was added over the stamped one, and also some Distress Inks which I applied with a brush, and of course the white gesso through a Dutch Doobadoo stencil called Geometric Tiles, although as you can see there are all sorts of circles and some lines and ink type blot shapes on the stencil.

I started by stamping the image with Versafine Clair Nocturne Ink and heat embossed with WOW Clear Gloss Embossing Powder.  I then cut it down to 4"square and added the the grungy dots and open circles around the edges of the image mat using the white gesso.  I haven't used it before and this Pebeo gesso was quite runny and I found it a challenge to get it through the stencil cleanly, but decided to go with the more grungy finish.  I then added the Distress inks using a brush with Fossilized Amber to the centre and Carved Pumpkin to the edges and darkened with Ripe Persimmon.

I continued by stamping and heat embossing just the butterfly and used some Brushos with a waterbrush in colours Sea Green, Ost. Blue and Violet which is much more purple than it looks in the photo, and Pumice Stone DI on the body.  I then fussy cut it and added it using Pinflair Glue Gel and finished by adding a sentiment to the base 6" square card again using the Nocturne Ink and Clear Gloss EP.

Thank you for visiting my blog today and I hope you will visit again soon.


I am also entering the following challenges:

NBUS Challenge - where we use our Never Before Used Schtuff (the butterfly and the gesso are being used for the first time.
We Love Stamping Challenge - Anything Goes with Stamping.
Stamping Sensations September Challenge - Feminine.
Addicted to Stamps and More Challenge - Birthdays.
Allsorts Challenge - Week 695 Anything Goes with option Spots and/or Stripes.

Tuesday 20 September 2022

Rose and Lily Silver Celebration

Hi everybody.  Sorry not to have posted recently but I have been away for over a week on holiday in the Derbyshire Dales which was lovely and a bit of a last minute decision.  Luckily the weather was pretty good and we had a lovely time.  

I have a silver wedding card to show today made just before we went away, and I had a yen to use some vellum as I haven't used any for ages, and it does seem to be a lot more popular at the moment.  I used a very old Cuttlebug embossing folder called Divine Swirl and inked the swirl pattern with Versamark Ink and ran it through my machine, and then added the silver embossing powder and heat set it, so it embossed within the pattern grooves.  There were a few places where it didn't pick up the Versamark enough so I used the Versamark pen to fill them in and added more powder and this worked well.   I then cut a piece of white card to fit a 6" square card and die cut the heart using one of a set of Sweet Dixie Heart dies.

                                   
I then found some free digital colouring images and played around to get them the right size to fit around the side of the heart I coloured them using a set of  Koh-I-Noor  Polycolour Pencils which I bought fairly recently, and I fussy cut the rose buds separately, but the lilies came as a twosome and I kept them together.  I then added the sentiment on to the front of the topper layer using Versamark and heat set with WOW Silver Metallic Embossing Powder and added the numbers which I had cut from silver mirri, and I found some little hearts which came out of a die and which I had kept just in case, and coloured them using a sparkly silver Sakura Gelly Roll pen and added them around the sentiment after I had added it to the base card.  

Thank you for dropping by today, and I hope you come back soon.


I am entering the following challenges:

Simon Says Monday Challenge  - Sparkle and Shine.
The Flower Challenge
- No. 72 Add Sparkle.


Wednesday 7 September 2022

Heart Collection Anniversary

Hi there.  I made this anniversary card using a snippet of card which I used when gelli printing to brayer the spare ink onto, and I made this the background and also used two stamps from a set by Woodware just called Heart Collection.  I also used a Sweet Dixie Hearts die for the aperture.

I cut the snippet to fit a 6" square base card and then die cut the heart fairly centrally.  I used one of the Woodware heart stamps in the centre of the aperture having first marked where the aperture would be on the base card, and used Staedler purple and blue brush markers straight to stamp with also a fine mist of water.  I wasn't totally happy with the way it had stamped so I stamped it again on a snippet of white card and then cut it out.  I decided that I wanted to make the background around the heart pink and I used some Spun Sugar Distress Ink.  I then stamped some little hearts onto the background itself using the same Hearts Collection set and a Staedler brush marker in a fairly light pink, and finally I added the sentiment using my Misti stamp positioner.  I tried using Dusty Concord DI but  it didn't show up well enough so I went over it with Versafine Clair Nocturne ink and heat embossed it with WOW Clear Gloss Embossing Powder.  Finally I placed the aperture background onto the card, and decided to darken the area around and within the aperture so I used Picked Raspberry DI with a blending tool.

Thank you for visiting my blog today and I'll see you again soon. 


I am entering the following challenges:

Snippets Playground Challenge - Where we use our snippets of card and paper etc.
We Love Stamping September Challenge - Anything Goes with Stamping.
Crafty Calendar Challenge - September: Anything Goes.

Friday 2 September 2022

Coastal Trawler

Hi everybody.  I have a masculine card today made using one of the stamps that came with the Creative Stamping Magazine Issue 110 with stamps from Hunkydory and the set is called Coastal Scenes and is having its first outing.  I chose this boat and after looking inside the magazine got the idea for this front stepper card.   I'm not one for making shaped cards very often but this appealed to me as something a bit different. 


I started with the base card shape scoring a piece of A4 card at 1.75" and 3.50" which makes the front step and then by taking a small piece away until the rest of the piece measures 8" then scoring that in half for the main tent shaped card this will give you your finished 6" x 4" card.  It is best to try it out on a piece of copy paper first to make sure it is correct..ask me how I know..lol.

I then used a snippet of card for the piece at the front with the boat stamped on to it in Versafine Clair Nocturne ink heat embossed with WOW Clear Gloss Embossing Powder.  I used a piece a bit larger and placed the stamped boat in the centre allowing for it to be cut down to fit the front step.  I watercoloured it using a water brush and Distress Inks - Blueprint Sketch, Scattered Straw and Pumice Stone and added some Pine Needles with the Blueprint Sketch for the sea and some shadows with a little of the Pumice Stone.  For the background on the front of the tent shaped area behind, I brayered the inks on my gelli plate using some stencil card and a little light spritzing of water, and three colours...Chipped Sapphire, Scattered Straw and at the bottom a little Wilted Violet, which when the card is stood up you don't really see.  I finished by adding three little birds which I did myself with a Black Micron Pen. 

Thank you for visiting me here today and I hope I'll see you again soon.


I am entering the following challenges:

Simon Says Wednesday Challenge - Anything Goes.
Happy Little Stampers September Watercolour Challenge - Anything Goes.
NBUS Challenge - Where we use our Never Before Used Schtuff.
Dare 2b Artzy August Challenge - Shaped or Fun Fold Cards.
Simon Says Monday Challenge - Make Your Own Background.