Pages

Wednesday 29 June 2022

Musical 80th

Hi there everyone.  I have an 80th birthday card today made for a lovely friend from hubby's choir and as he sings and plays the guitar I thought this would work well.  He had a celebration party which was lovely.  I used the acoustic guitar image from an old set of stamps from Creative Stamping Magazine from a few years back, and I added a clock face and cogs stencil in the background as he was an engineer who sorted the overhead wires out so as the song says he was 'a lineman for the county' here in Somerset, and I did use a countryside scene too, but that doesn't really show through.  Sadly there is a white mark on the guitar which I only noticed after I had taken the photos (I need new glasses..lol).  I think the card backing the neck of the guitar was a little short of the body and it developed a crease which I didn't notice and I did fix it with a bit of pencil before we went to the party but didn't have time to retake the photos.

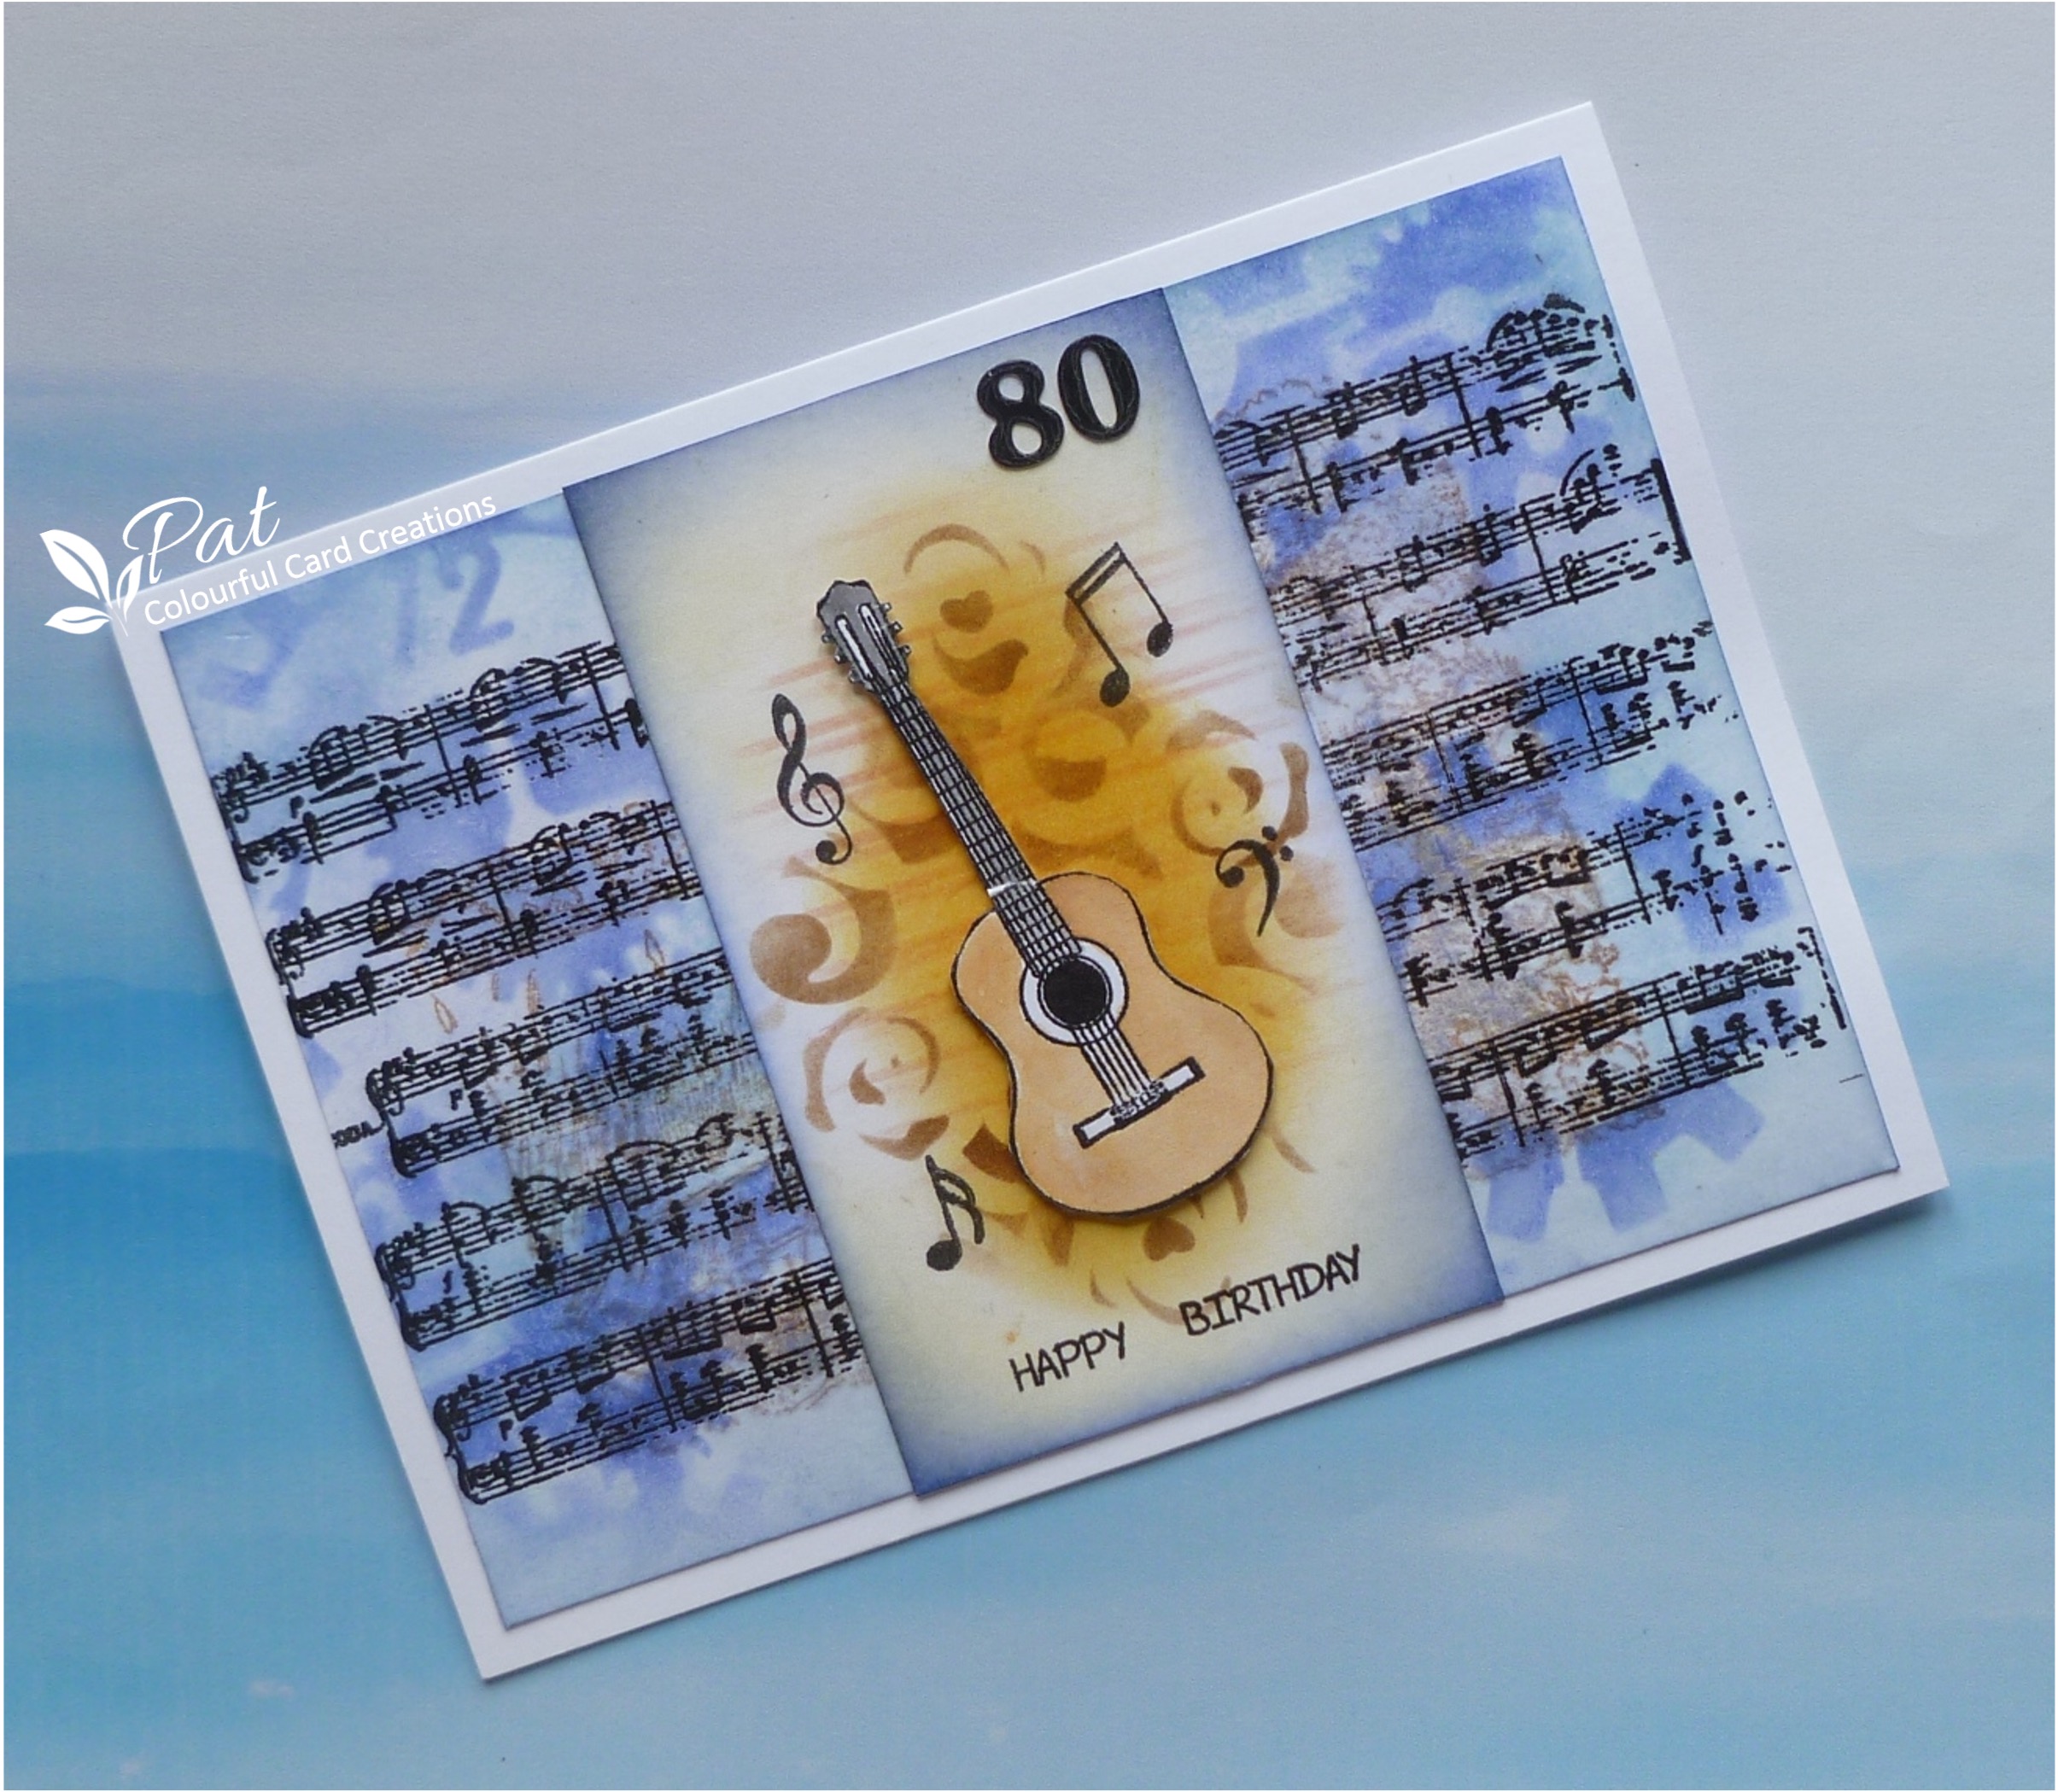
I started with a piece of white card to fit a 7" x 5" card and added the countryside scene from a very old set of stamp by Sheena Douglass using Vintage Photo Distress Ink and I thought it was too prominent as I wanted to add other things over the top so  I spritzed it with water and dulled it down.  I then added an Artistic Stamper Music Background stamp using Versafine Clair Nocturne Ink and heat embossed with WOW Clear Gloss Embossing Powder and blended some Adirondack Stonewashed  Ink over the top, and then added the cogs from a set of stencils bought at The Range quite a while ago using BluePrint Sketch DI. To be honest other than to add a bit of brown in the background the scene was more or less totally obliterated but the overall look was pleasing to the eye.  I did finish the background layer with some more BluePrint Sketch using the pad to ink along the edges.

I next stamped the guitar with the Nocturne ink onto a snippet of white card and heat embossed with the Clear EP and watercoloured with some Distress Inks and a waterbrush using Black Soot, Brushed Corduroy and Vintage Photo, and then fussy cut it out.  

I found another snippet for a panel to go down the middle of the card and used another stencil from the sets I bought at The Range using a blending tool and Ground Coffee DI and added some blended Fossilized Amber DI over the central area and more softly over the rest of the strip, and finally some music signs and notes stamped around the edges again using the Nocturne ink and heat embossed with the Clear Gloss EP, before backing the guitar with a double layer of pieces of card to give it dimension, and then added it over the top (I don't usually do this but my silicone glue would not come out of the tube..drat!)  To finish I cut the strip to size and darkened the edges with Blueprint Sketch DI before mounting the background and the strip on to the card.  I also die cut the numbers from a piece of card which I  first covered in Black Soot DI straight from the pad and heat embossed with the Clear EP.

Thank you for dropping by today and I hope to see you again soon.


I am entering the following challenges:

Snippets Playground Challenge - No. 431 Where we use our snippets of card, paper etc.
Happy Little Stampers June Watercolour Challenge - Anything Goes.
Happy Little Stampers June Stencil Challenge - Anything Goes.


Friday 24 June 2022

CAS Mix Up Challenge

Hi there.  I am as usual quite late with my card for the CAS Mix Up Challenge which this time is Stencils with Pastes/Gels...really lovely to see it back after several months absence.  I don't use this technique very often and I had to search a bit to actually find something to use.  I found some Cosmic Shimmer Multi-Tex which is a bit like polyfilla and you mix it with water.  I added some colour with Pixie Powders in a blue and green to make a sort of turquoise colour, and I have a new die which I used for the card on my last post here which I used as a stencil.  I also used a set of stamps by Creative Expressions called Waterlily.

I started with a piece of card just a little smaller than my 6"square card and placed the die cut stencil, which I cut from card, centrally, and using an old plastic store card I created the texture paste background.  I am not very skilled at this technique and some of it went underneath the stencil and wasn't very tidy, so I decided to cut that down and then add a die cut piece of card using the same die to go over the top, and I left a bit of extra space round the edge to make it easier to get it to fit properly on the card, and before doing this I used a bit of Glossy Accents over the paste to give it a bit of a shine applied using a piece of kitchen towel dabbing it on, and in real life it is quite shiny.

I then stamped the flowers and dragonfly on to a piece of white card using Versafine Clair Nocturne Ink and heat embossed with WOW Clear Gloss Embossing Powder and coloured with Distress Inks and a waterbrush using Scattered Straw and Fossilized Amber for the flowers, and with just a little bit of Abandoned Coral to stengthen the colour in the centre of the flower, and then for the leaf I used Twisted Citron and Lucky Clover.  I coloured the dragonfly with a bit of Peacock Feathers for the body to match the tone of the background, but it looks more blue than turquoise in the photo, and Adirondack Sunshine Yellow on the wings with some added Wink of Stellar for a little sparkle.   I think maybe the black embossed outlines are a bit heavy for the dragonfly but I wanted it to match the waterlily flowers and leaves.

I finished with a sentiment from the same set stamped with the Nocturne Ink and heat embossed with the Clear EP.  

Before I go I would like to introduce and also thank Marja for becoming a follower, whose blog you will find here, and I'm sure she would love you to go and visit her.  Thank you for dropping by today and I hope to see you again soon.


I am also entering the following challenges:

We Love Stamping Challenge - June - Anything Stamped with the Option of Roses.
The Flower Challenge - No. 69 Colour Blue and Yellow.
AAA Birthday Challenge - No. 38 Flowers.


Thursday 23 June 2022

CAS Christmas Card Challenge

Hi everyone.  This is an extremely quick card for the CAS Christmas Challenge and it is lovely to see it back after several months absence, it has definitely been missed.  The theme this time is Wreath, and I have used a stamp from a small company in the US called Sweet Manhattan Stamps.  

I made a square card using kraft card and then stamped the wreath into the centre using Satin Red Versafine Ink and heat embossed it with WOW Clear Gloss Embossing Powder, and to finish it off I framed it with some scored lines, and I didn't even have to put a sentiment on it as the sentiment is in the centre.  Probably the quickest card I have ever made..lol.

Thank you for your visit here today and I'll see you again soon.


I also entering the following challenges:

Happy Little Stampers June Christmas Challenge - Anything Goes/Snow Globe.
The Holly and Ivy Christmas Challenge - No. 117 Anything Christmas Goes. 
Peace on Earth Christmas Challenge - Anything Goes.
Simon Says Wednesday Challenge - Clean and Simple.
Addicted to Stamps and More Challenge - Christmas.

Tuesday 21 June 2022

I Love Paris

Hi everybody.  I have a card featuring some stamps from Crafter's Companion called French Chic which came with the Creative Stamping Magazine No. 107, and two of the stamps were of course the Eiffel Tower and also a wonderful spray of roses.  It also included an embossing folder which I have used here too and also a Sue Wilson Joanie - Frames and Tags die which I bought at The Range which had been reduced to half price, so a real bargain.  All the items on the card were used for the first time.                                             

I started with a snippet of white card cut to size to fit my 6" square card and embossed using the folder..I had to extend it to fit the card.  I then brayered Black Soot Distress Ink on to it to bring out the pattern.  I used the central die from the set to cut the pattern into the background and I backed it with a snippet of black card as a matted layer.  I then stamped the tower and the flowers on to a couple of snippets of white card with Versafine Clair Nocturne Ink and heat embossed using WOW Clear Gloss Embossing Powder.  I think unfortunately the tower stamp has several bad spots which would not stamp just leaving bare patches but I managed to fill them in using a Black Micron Pen which worked well, and  I then fussy cut it out.  This is the first time I have had a faulty stamp in any of the sets from Creative Stamping and I have quite a few now, and I think that generally speaking the quality is good.  I may try getting in touch with the magazine to see if they could send me a replacemet stamp as I must say it was this particular image which made me buy the magazine as I don't have any other Eiffel Tower stamps, although that saying there are other great images to use too.

I decided to watercolour the roses and used a few colours of Distress Inks and a waterbrush, which were Festive Berries, Twisted Citron and Lucky Clover, I did also use a little Wilted Violet mixed with the red for a bit of extra shading especially in the centres of the flowers, and I lifted out some of the colour to highlight, and I then fussy cut these too.  I finished with the sentiment strip again stamping with the Nocturne Ink and heat embossed with the Clear EP, and used the pad around the edges to make it stand out better against the background.

Thank you for visiting my blog today and I'll see you again soon.


I am entering the following challenges:

Pixie's Playground Challenge - No. 430 Where we use our snippets of paper and card etc.
We Love Stamping Challenge - June Challenge - Anything Stamped with the option of Roses.
Allsorts Challenge - Week 681 Summer Flowers.
Happy Little Stampers June Watercolour Challenge - Anything Goes.
Can You Handle The Pressure? - Anything Goes With A Twist of Birds.
NBUS Challenge - No. 39 Where we use our Never Before Used Schtuff.
AAA Birthday Challenge - No. 38 Flowers.


Friday 17 June 2022

A Marvellous Bird is the Pelican!

Hi there everyone.  I have this Pink Ink Pelican stamp which is getting it's first outing on a card for our son and I have made it the Australian species as that's where he lives.  That saying about it's beak holding more that it's belly can is apparently accurate as they say it can hold three gallons the equivalent of 24lbs, but it's stomach just one gallon or 8lbs.  For the card I also used some leaves from Nature 1 and Autumn Poppy by Chocolate Baroque stamps and also a Lavinia Stencil called Crackle.

I started with the background using some white card which I smooshed with Distress Inks, Salty Ocean, Peeled Paint round the edges and Brushed Corduroy and Dried Marigold along the bottom.  I managed to target the ink fairly well.  I then added the leaves with the Peeled Paint and also some Mowed Lawn, and then added the stones using the stencil and some Vintage Photo and a bit of Walnut Stain.  I also added some more of the greens around the edges and over the leaves using a blending tool and also round the edges of the bottom half and some more of the browns over the stones.  

I then stamped the pelican and the fish on to a piece of white card using Versafine Smokey Gray Ink and heat embossed with WOW Clear Gloss Embossing Powder, and coloured with the waterbrush using Abandoned Coral and Fossilized Amber on the beak and for the around the eye, and Black Soot for the feathers and more watered down on the legs and feet.  I emphasised the feathers with a Black Micron pen as although I had embossed they had disappeared a bit under the ink.  I also shaded the white feathers with very watered down black.  I fussy cut it out and added it to the background using silicone glue, and added the fish which is in two pieces, glued behind its beak.  I then finished with the sentiment stamped using Versafine Clair Nocturne Ink heat embossed with WOW Clear Gloss Embossing Powder and used some Glossy Accents on both his and the fish's eye.

Fortunately the card did arrive in time for his birthday which I was pleased about as he never did receive the Christmas card I sent him.  Thank you for coming to visit my blog today and I'll see you again soon.


I am entering the following challenges:

Stamping Sensations Challenge - June - Make It Masculine.
Allsorts Challenge - Week 680 Any Stamped Image.
Addicted to Stamps and More Challenge - No. 431 Our 10th Birthday.
Happy Little Stampers June Watercolour Challenge - Anything Goes.
Seize the Birthday Challenge - No. 240 Favourite Technique (stamping and watercolouring).


Tuesday 14 June 2022

Let Your Heart Sing

Hi there.  I have a card today using a set of stamps by Sheena Douglass which came with a March Paper Crafter Magazine as an extra, but originally came with a Crafts Beautiful Magazine sometime last year and so a great bonus freebie.  I have used one of the mandala stamps from that set and a Chocolate Baroque bird stamp from a set called Let Your Heart Sing which since I made the card has been taken off the catalogue in common with some others which they have phased out.  I also used a Tim Holtz stencil called Crackle which I got from one of the local craft outlets, can't remember which one now.

I must admit this did start off with the intention of it being a sympathy card, but after I started it I decided that I wasn't sure it worked as that so it just got left on my table.  I kept looking at it and decided to carry on where I had left off.  I had stamped the two mandalas on a piece of white card cut just a little smaller than the 6" square card using Brilliance Starlight Silver Ink and I had stamped the bird on top of the bottom right hand corner mandala using Versafine Clair Nocturne Ink and that is where I left it.  I decided to add the Crackle stencilling around the mandalas to cover the background using Fossilized Amber Distress Ink, and then thought I would outline the mandalas using a Black Micron Pen 0.3.  I went just around the edges then decided to pick out more areas to outline and finished up as you can see it.  I then coloured these sections in using a yellow Inktense Pencil just as is without any added water.  I finished with the sentiment also stamped using the Nocturne Ink and then heat embossed using Clear Embossing Powder, and it is now a birthday card. 

Thank you for visiting my blog today and I hope to see you again soon. 


I am entering the following challenges:

Colour Hues Challenge - No. 42 Black and Yellow.
Happy Little Stampers June Challenge - Anything Goes.
Stamping Sensations Challenge - June - Make It Masculine.
We Love Stamping June Challenge - Anything Stamped/option Roses.
Allsorts Challenge - Week 680 Any Stamped Image.


Wednesday 1 June 2022

June Guest Designer at the NBUS Challenge

Hi there everyone.  I was so thrilled when Darnell asked me to be this month's Guest Designer for the NBUS Challenge, and most of us already know that it stands for 'Never Before Used Schtuff' as coined by the lovely Darnell, and I know that we all have lots of crafty goodies just waiting to be used, or sitting in a drawer or cupboard in need of some love, and this challenge gives us the perfect opportunity to do just that.  

I decided to make a card using an old Sheena Douglass Iris stamp from her A Little Bit Floral range which doesn't seem to be available now.  It came as part of one of a few sets of different flower stamps which I bought together and I only recently discovered that this one has never been inked..how rude..lol!   I also used the largest of a set of three dies from Poppystamps Scalloped Stitch Frames (2478) bought recently, and getting it's first outing, and also a Lavinia stencil called Laurel.  I coloured with Distress Inks - Shaded Lilac, Seedless Preserves, Wilted Violet, Mowed Lawn, Forest Moss, Mustard Seed, Ripe Persimmon and Twisted Citron.

I used a piece of white card and stamped the Iris using the Seedless Preserves and heat embossed with WOW Clear Gloss Embossing Powder, then coloured with the Distress Inks using a waterbrush with the colours mentioned above, and fussy cut.  I then found another piece of white card  and cut the largest frame.  The die cuts the scalloped and the stitched straight edge frames together in each size, but you can use them separately.. I put the two of them together for a wider frame.  I then worked out where I would place the frame on the 7" x 5" white card and pencilled lightly in places around the inner frame.  I then used the Shaded Lilac and Twisted Citron through the Lavinia Laurel stencil, with the Shaded Lilac at the bottom, changing to the Twisted Citron just over halfway up, and taking the ink a little beyond the marks I made.  

I finished by adding the double frame, and to add some dimension I used silicone glue to stick the Iris onto it, and as it was a little large I cut a piece off the stem level with the edge of the straight edge stitched rectangle.  I decided to leave the sentiment for now as although it may well end up being a birthday card it could be for any of several occasions.  

The challenge runs for the whole month so plenty of opportunity to join in the fun, and I look forward to seeing you there.  Thank you for dropping by today and I hope to see you again soon.