Pages

Friday 30 December 2022

Snowy Kisses

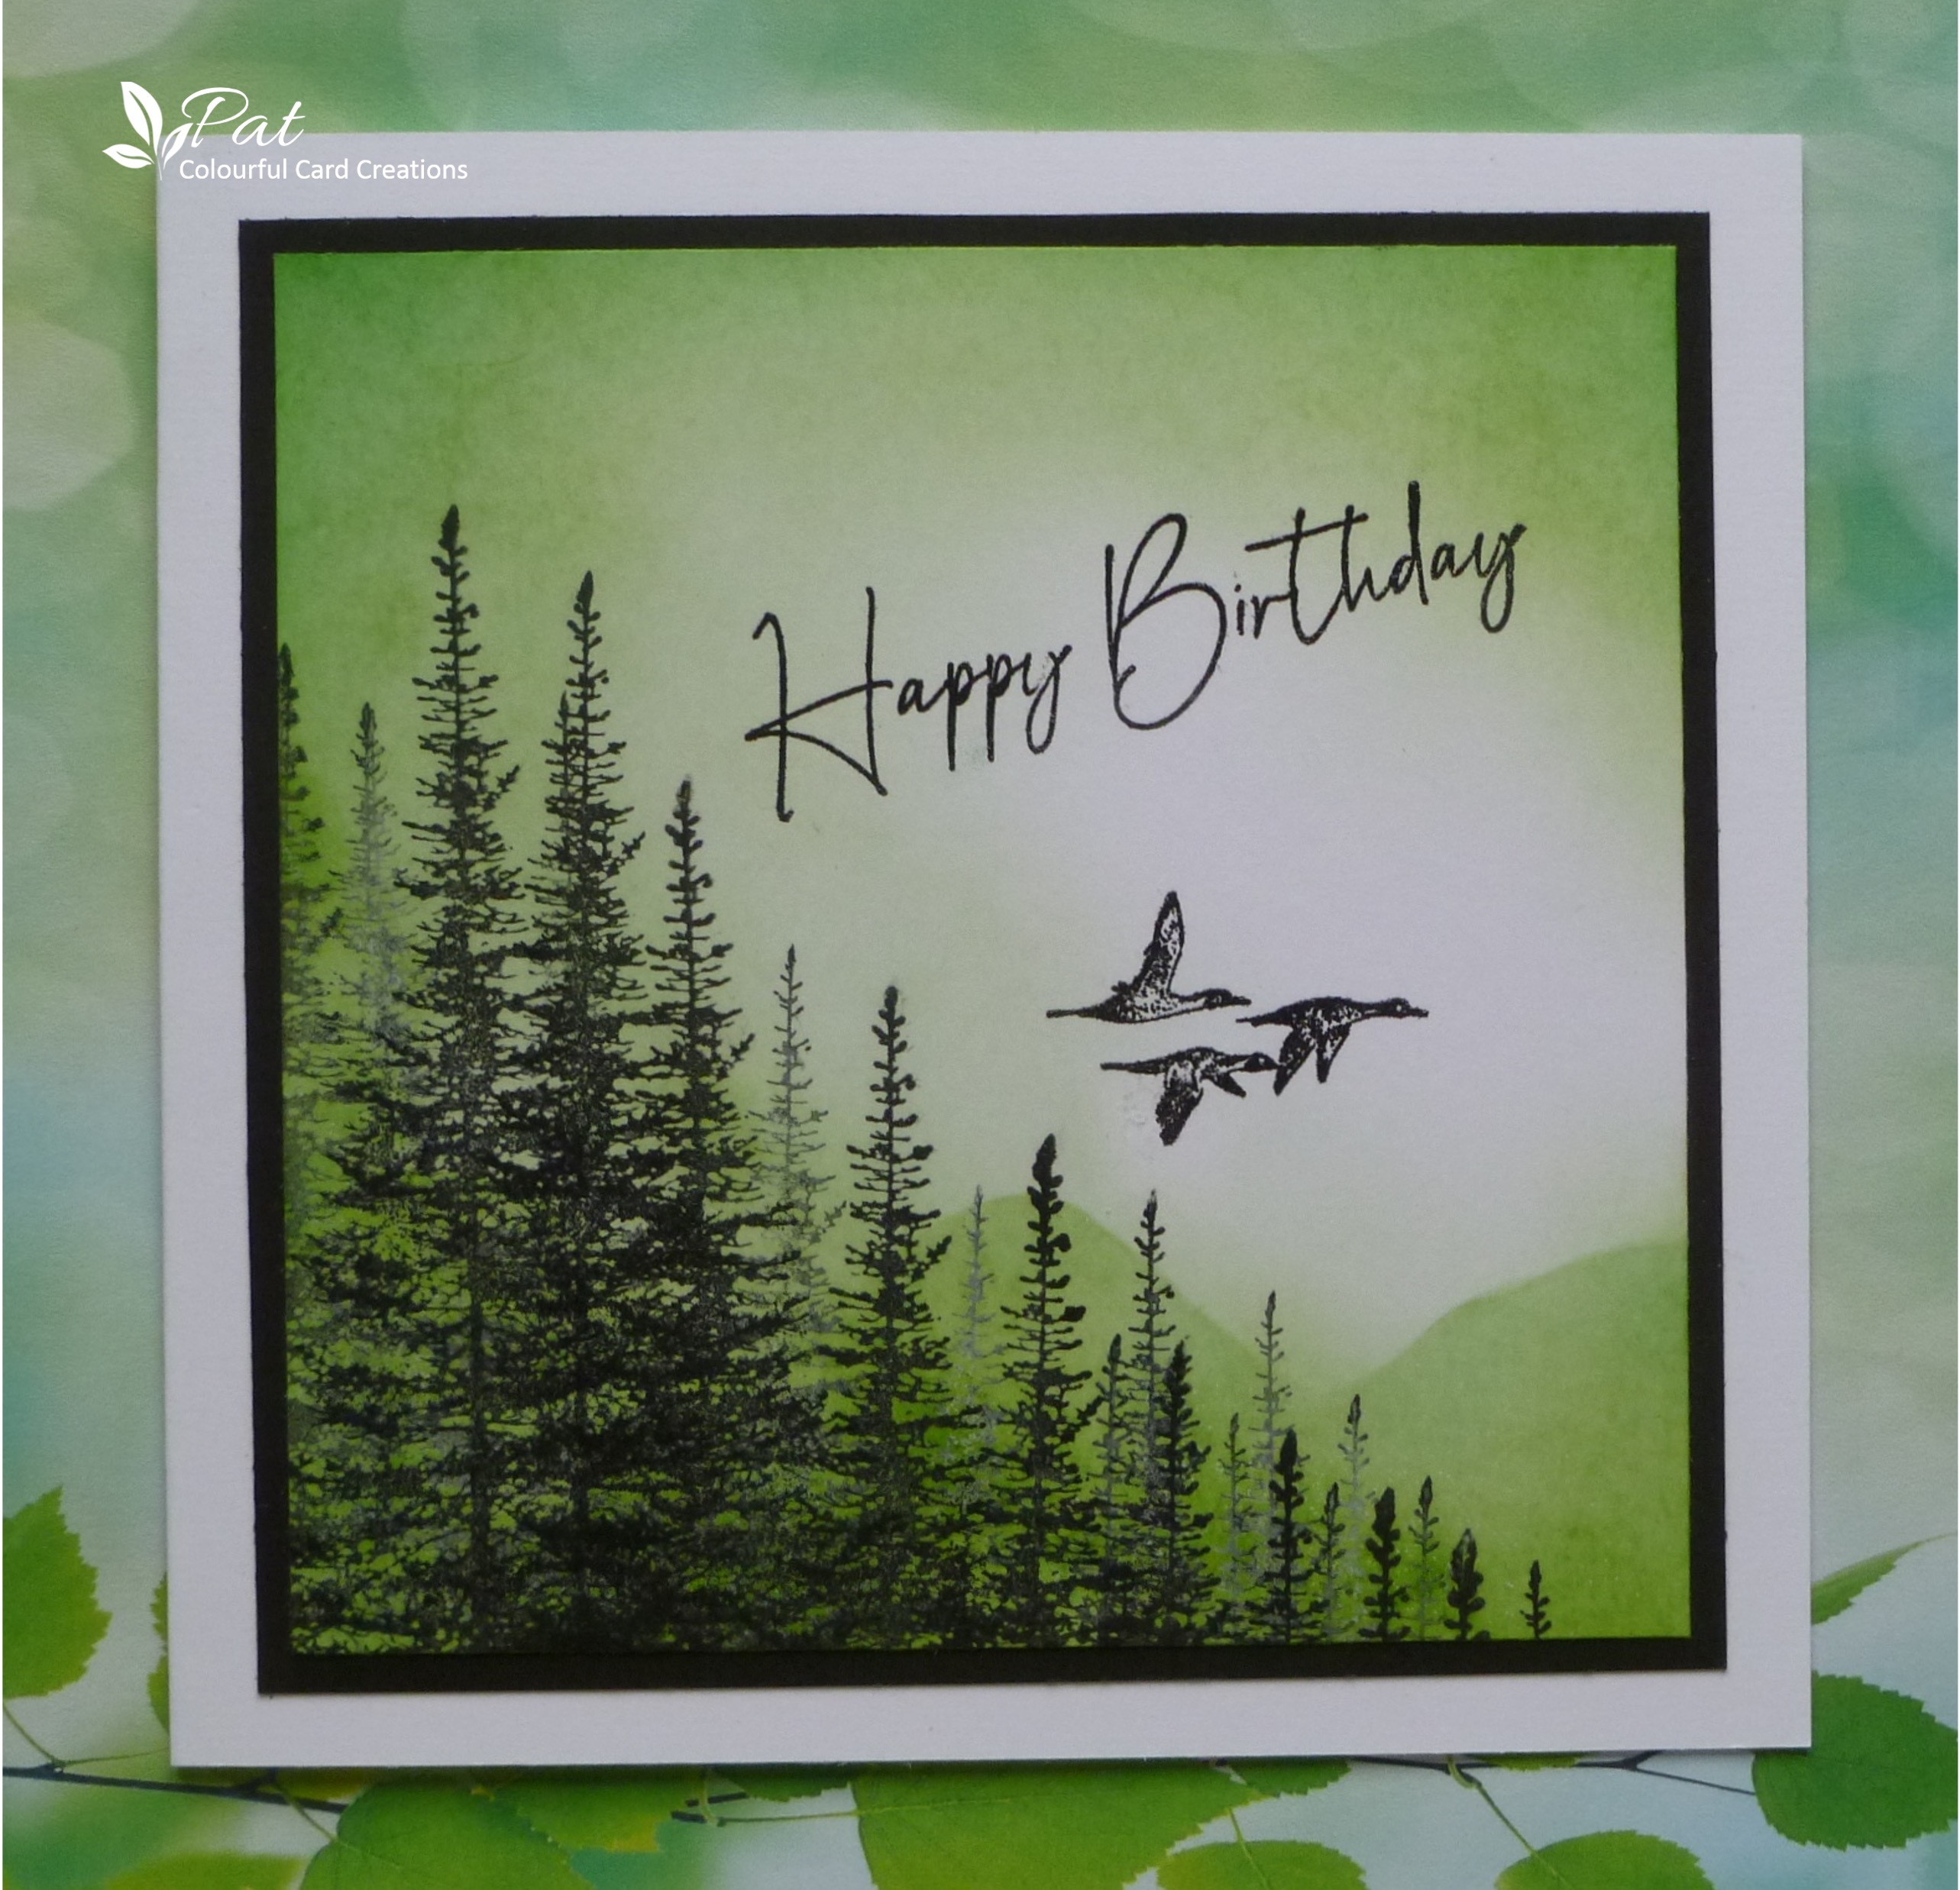
Hi there.  This is my final card before I set Christmas aside for a while.  It is the card for my hubby using a Sweet Dixie stamp called Snowy Kisses which I was lucky enough to win earlier in the year, and I saved it with the idea of using it on his card as I thought the kissing snow couple were so sweet, and also an embossing folder called Touch of Winter.  


I started by cutting a piece of white card to fit inside the 7" x 5" folder and I did my usual trick of spritzing it to stretch the fibres before running it through my machine.  I then stamped the image onto this embossed background using my Versafine Clair Nocturne Ink and heat embossed using WOW Clear Gloss Embossing Powder.  I coloured it using my Inktense Pencils taking the colour from the tip with a waterbrush, and then I attached it to the white 7" x 5" base card.  I did cut the topper down slightly to leave just a small border of white around the edge.  I finished by adding a die cut sentiment cut from mid blue card first backing it with some Stick It adhesive so that it is easy to attach.

Thank you for visiting me here today and although Christmas can be a difficult time for some people,  I hope everyone managed to enjoy it in some way or other.   Hubby and I are always busy before Christmas with various things we belong to, and so when it arrives we are quite happy to relax for a few days.

Anyway, thank you for visiting me here today and I'll see you again soon.


I am entering the following challenges:

NBUS Challenge - No. 45 Where we use our Never Before Used Schtuff.
Allsorts Challenge Week 708/9 CAS - Clean and Simple.
Country View Challenges - December - Christmas.
Let's Squash It! Challenge - No. 27 Snowflakes and Stars.  (Sadly this is their last challenge)
Can You Handle The Pressure? Challenge - Anything Goes using an Embossing Folder/Snow.

Sunday 25 December 2022

Snowy Cabin by the Lake

Hi there.  I have a Christmas card for our son in Australia, which I sent him on the 25th November and he received it on the 21st December, which is an improvement on last year as he never received it at all. I love the scene with the trees and cabin, by Stampscape called Nature Sheet 6, and it comes with a few images which you can mix and match.  I just used the cabin being used for the first time, and the larger trees which I used on this card here.


I did some work with Brushos and had some left over in Sea Green mixed with water on my glass mat, so I picked it up on to a piece of card and put it aside.  I suddenly spotted it and decided that it would make a good base to start building a scene.  So I added the cabin image, and then some trees to the foreground on either side of it using Versafine Olympia Green ink.  I then decided to make it night time, so I darkened around the edges using Pine Needles and then Chipped Sapphire Distress Inks using a brush to blend them, and I added some White Brilliance Ink around the cabin and also some Fosselized Amber DI, and then some white gel pen on the roof of the cabin and on the stones in front of it.  I also added some brown to the cabin and some yellow and orange for light coming through the windows using my Inktense Pencils, and then spattered some white gesso which was a partial success but I finished by adding some more dots with the gel pen which could be stars as well as falling snow, and then decided to stop as I'm always afraid of overdoing it and spoiling the effect.  I added it to a 7" x 5" white card and then finished with the sentiment also using the Olympia Ink and heat embossed with WOW Clear Gloss Embossing Powder.

I hope that you have an enjoyable Christmas and a happy and creative 2023.  I would like to thank all of you that visit including those that leave me comments as well as those that just take a look from time to time, as it really does make doing this worthwhile, and I hope you will continue to visit throughout the coming year.  

I will see you again soon as I will have one more card to post here before I set Christmas aside for at least a few weeks. 


I am entering the following challenges:

NBUS Challenge - No. 45 Where we use our Never Before Used Schtuff.
Stamping Sensations Challenge - December - Anything Stamped/Winter Wonderland.
Happy Little Stampers December Christmas Challenge - Anything Goes/Stencil.
Happy Little Stampers December Watercolour Challenge - Anything Goes.
Country View Challenges - December - Christmas.


Wednesday 21 December 2022

Christmas Lantern

Hi everyone.  I have another Beccy's Place freebie image called Christmas Lantern, and I also used an embossing folder which was another freebie with a magazine, but can't remember which one as it was a long time ago.

I printed the image in a soft grey colour this time and used my brush markers to colour with a waterbrush to apply them and fussy cut and backed it with some foam.  I found a piece of white card and using the embossing folder then did what I did last time and sprayed it with a little water before sending it through my machine, and it definitely makes the embossing more pronounced.  I then added the sentiment using Versafine Satin Red and heat embossed it with WOW Clear Gloss Embossing Powder before adding the topper to the card.  I decided to add some yellow to give the glow of the lamp around it and using a brush I applied some Fosselized Amber Distress Ink and then adhered the lantern over it.

Thank you for visiting me here today and I'll see you again soon.


I am entering the following challenges:

Beccy's Place December Challenge - Anything Goes using one of Beccy's images/Bingo Grid.
Sparkles Christmas Challenge - No. 143 Non-Traditional Christmas Colours.
Happy Little Stampers December Watercolour Challenge - Anything Goes.
Happy Little Stampers December Christmas Challenge
- Anything Goes/Stencil.
Country View Challenges - December: Christmas.

Tuesday 13 December 2022

Fly and Be Free Butterfly

Hi everyone.  A birthday card today using the Creative Individuals stamp Fly and Be Free.  I used Brushos and a bit of added Inktense Pencil and blending with some Distress Inks.

I started with the Brushos in Violet and Sea Green on my glass mat with water and applied to the card using a piece of acrylic as I find this makes them easier to use.  I did each colour separately and dried in between.  I then stamped using Versafine Imperial Purple Ink and added some extra colour on the circles and the butterfly using the Mustard Yellow Inktense Pencil, taking the colour from the tip with the waterbrush.  I also added some white pencil here and there and I used some Clear Wink of Stella on the butterfly wings.  I cut the piece down a bit leaving room for the sentiment to be added at the bottom of the 6" square card, again using the Imperial Purple Ink and heat embossed it with WOW Clear Embossing Powder.   I then blended some Wilted Violet Distress Ink around the edges and also blended a little more on to the wings as I felt they needed to be darkened a bit so that they stood out better.

Thank you for visiting my blog today and I'll see you again soon.


I am entering the following challenges:

We Love Stamping Challenge - December - ' I love.....' (I love stamping and inking and making my own backgrounds).
Stamping Sensations Challenge - December - Anything Stamped/Winter Wonderland.
Simon Says Wednesday Challenge - Add Some Sparkle (Wink of Stella on the butterfly wings).
Allsorts Challenge - Week 706 Anything Goes/Let it Snow.
Crafty Calendar Challenge - December - Anything Goes.
We Love to Create Mixed Media Challenge - No 12 Anything Mixed Media Goes.
Creative Artiste Mixed Media Challenge - No. 89 Anything Mixed Media Goes.

Thursday 8 December 2022

Poinsettia Wreath

Hi everybody.  I have one of Beccy Muir's digital images another of the freebie ones, and unsurprisingly another wreath too, as I do love the wreath shape.   I decided to use alcohol markers which I haven't used for I don't know how long.  I felt as though I had lost the knack of using them and wasn't totally happy with the result and nearly threw it away, but the next day on looking at it again I decided it wasn't as bad as I thought.  I only have a dozen of the Promarkers and the two tones of green are not terribly close in colour to get very natural shading, and there is only one brown which is a little darker for the background wreath than I would have liked, but since I finished the card it has grown on me.


I did the palest possible printing colour which is the equivalent of no line colouring and I used the same paper to print on.  This time I checked and it is only 120gsm so thinner than I was thinking.  I decided to cut it out to place it over the embossed background which is a Crafter's Companion embossing folder called Frosted Elegance.  I decided as my card is 300gsm to spray it with a little water before dry embossing to see if it would etch it a little more deeply and I think that it does look more pronounced, so a success.  I added the wreath backed with a bit of foam for dimension, and then die cut a sentiment from red card to add beneath.

Thank you for coming to visit my blog today and I'll see you again soon.


I am entering the following challenges:

Beccy's Place December Challenge - Anything Goes/optional: Bingo Grid.
Allsorts Challenge - Week 705 It's beginning to look a lot like Christmas.
Christmas Kickstart Challenge - No. 69 If It's Christmassy, Link It Up!
The Holly and Ivy Challenge - Anything Christmas Goes.
Merry Little Christmas Challenge - No. 47 Anything Christmas Goes.
Peace on Earth Challenge - No. 29 Anything Christmas Goes.
Crafty Hazelnuts Christmas Challenge - No. 623 Anything Christmas Goes. (Sadly after 12 years Hazel has decided to make it the last challenge at the end of the year)
Winter Wonderland Challenge - Anything Christmas Goes.
Country View Challenges - December - Christmas.

Wednesday 7 December 2022

Navy and Cream Anniversary

Hi everybody.  I have an anniversary card to show you today, actually the last family anniversary until April.  I decided to use the colours of the latest Color Hues Challenge which appealed to me as something a bit different when making an anniversary card.

I started with the topper using some cream pearlised card and decided to use some lines scored down the middle of the square shape, about 3 1/4" square, and decided on the negative, going into the card.  I then die cut a heart from the centre and backed it with a piece of the navy to frame.  I used this heart and die cut it one size smaller.  I then backed this with a piece of foam and placed it in the centre and added three little self drawn hearts using a dark blue Sakura Starlight gel pen for a bit of sparkle and also ran the pen down the lines on the cream heart, and finished with a sentiment using Versafine Majestic Blue ink below the topper on the 6" square white base card.

Thank you for visiting me here today and I hope you'll visit again soon.


I am also entering the following challenges:

Simon Says Wednesday Challenge - Anything Goes.
Crafty Calendar Challenge - December Anything Goes.
Alphabet Challenge - R is for Reduce (CAS).
CAS on Friday Challenge - No. 245 Greeting Card.
Color Hues Challenge - No. 54 Navy and Cream.


Tuesday 29 November 2022

Berry Wreath

Hi there.  Here is another card made for the A Month of Holiday Cards Challenge over at Beccy's Place and another freebie from her site.  This time I coloured it with my Inktense Pencils but without any water.

I coloured the image which I again printed on the 160gsm paper and used two of the browns, greens and reds and an orange to colour it.  I then fussy cut it out and placed it over a white stitched circle mounted on to a red one using a couple of snippets of card from my box, and just added a sentiment using Versafine Satin Red heat embossed with WOW Clear Gloss Embossing Powder, and I also added some Clear Wink of Stella to the berries which I like, but unfortunately it being a water reactive medium it did make the berries look a rather dense red instead of their being more variation in tone, but they do have a lovely shimmer and shine.  I decided as it nicely filled the card it didn't need anything else.

Before I go I have to introduce Beccy  whose beautiful wreath image I have used in this post..thank you so much for becoming my latest follower.  For those who don't know her just press the link at the top of the post and go and see her wonderful digital images.

Thank you for coming to visit today and I'll see you again soon.


I am also entering the following challenges:

Snippets Playground Challenge - No. 442 Where we use our snippets of card and paper etc.
Happy Little Stampers November Christmas Challenge - Anything Goes/Santa.
Merry Little Christmas Challenge - No. 47 Anything Christmas Goes.

Friday 25 November 2022

Berry Branch

There is a Christmas Challenge run by Beccy Muir from Beccy's Place called A Month of Holiday Cards Challenge and I am rather late to the party but thought I would try and at least make a few cards before the end of the month.  I was going to start sooner but have had a busy month with birthdays to make for and also unfortuately hubby had to have an emergency hernia operation four weeks ago and so the start of the month was when he came home so didn't have so much time for a week or two, but thankfully he is much better now.  I used one of Beccy's freebie images called Berry Branch.


I started with the digital image on some 160gsm paper, as my printer does not like thicker card.  I read somewhere that if you use white gesso over the paper you can use watercolour techniques without it buckling too much.  I maybe should have used it straight out of the tube but I did water it down a bit so it didn't obscure the digital image lines too much, and this did make it warp a little, but after drying it wasn't bad and I did find the colour went on better without going through to the other side, but I did end up fussy cutting it out as it wasn't completely unwrinkled.  I used some Lyra Water Brush Pens in a light and dark brown and also a red, orange and a bit of purple for shading, applied to my mat and then using a waterbrush to paint with.  I also used some 3D Clear Gloss Pen over the top of the whole thing which gave it a bit more strength and a lovely gloss finish.  I used a black and white plaid paper as a background and adhered the berry branch to a piece of white card, both layers cut with a rectangular stitched die, and backed with red card.  I finished with a Versafine Satin Red Ink for the sentiment heat embossed with WOW Clear Gloss Embossing Powder.

Thank you for visiting my blog today and I'll see you again soon.


I am also entering the following challenges:

Rudolph Days November Challenge - Anything Christmas Goes.
The Holly and Ivy Christmas Challenge - Anything Christmas Goes.
Happy Little Stampers November Christmas Challenge - Anything Goes/Santa.

Wednesday 23 November 2022

Floral Delight

Hi there.  It is a friend's birthday and I have recently been lucky enough to win a set of delightful florals by Highlight Crafts called Crown and Glory Set 3 and so I thought I would open them and dive in.  I also used a stencil which was a freebie with a magazine a few years ago which I thought would make a good background for the flowers.


I started by stamping the flowers in Versafine Clair Nocturne Ink and heat embossed with WOW Clear Gloss Embossing Powder, and then coloured using a set of Lyra waterbrush pens which I scribbled onto my glass mat and picked up with a waterbrush, and then I fussy cut them out.  

I decided to dry emboss the stencil and then I put the stencil over the embossing and used my Versamark Ink with a blending tool to add it to the stencil piece and then heat embossed with WOW Silver Metallic EP.  I made the silly error of not dusting with an anti static bag first, and inevitably some of the powder clung to the card where I didn't want it to, and I did manage to remove most of it, but in the end I went ahead with the heat tool and it was I thought acceptable...I was short of time as I have had a lot going on at home recently and got behind with my cardmaking and unfortunately November is a busy month for me with lots of cards to make.  

I finished by adding the sentiment in the Nocturne Ink and heat embossed with the Clear Gloss EP and arranged the flowers above using some pieces of foam underneath them to give a bit of dimension.   The stencil is quite large and the card is my usual 6" square.  I did decide to chop the corners off the stencil layer to give a bit of a different look. 

Thank you for visiting my blog and I hope you drop by again soon.


I am entering the following challenges:

Happy Little Stampers November Watercolour Challenge - Anything Goes.
Happy Little Stampers November Birthday Challenge - Anything Goes.
Happy Little Stampers November Stencil Challenge - Anything Goes.
Simon Says Wednesday Challenge - Stencil It.
Crazy is our fame - Stencils are our game - November Challenge -  Anything Goes/Fall Colors.
NBUS Challenge - No. 44 Where we use our Never Before Used Schtuff.
Cards 4 Galz Challenge - No. 186 Use A Stencil.

Thursday 17 November 2022

As Lovely as a Tree

Hi everybody.  Another masculine card today using the Lavinia Laurel stencil for the background and a Chocolate Baroque set of stamps called Trees a Crowd, the same two items I used on the card here but using a different tree image from the set.

I started with the background and dry embossed the stencil onto a snippet of white card and then coloured it with Distress Inks using Mowed Lawn and darkened it around the edges with Peeled Paint.  I then stamped the tree scene with Versafine Vintage Sepia Ink using another white snippet of card and heat embossed it with WOW Clear Gloss Embossing Powder.  I coloured with the two greens mentioned above and also some Ground Espresso, Tumbled Glass and Ripe Persimmon DI's.  I also added a couple of little birds using a Black Micron Pen.  I then layered it on to snippets of kraft and white card and stamped the sentiment on a further snippet of kraft card again using the Vintage Sepia heat embossed with the Clear Gloss EP.

Thank you for visiting my blog today and I'll see you again soon.


I am entering the following challenges:

The Snippets Playground Challenge - No. 441 Where we use our snippets of card and paper etc.
Simon Says Wednesday Challenge - Stencil It.  (I opted to dry emboss and then ink blend with the stencil).
Crafting Happiness Challenge - Thanksgiving or Anything Fall.
Ellibelle's Crafty Wednesday November Challenge - Anything Goes.
Allsorts Challenge - Week 702 Anything Goes/Add Numbers.
Crazy is our fame - Stencils are our game November Challenge - Anything Goes/Fall Colours.

Tuesday 15 November 2022

Circle of Trees

Hi everyone.  I needed a quick birthday card for a family member and I used this Chocolate Baroque set called Trees a Crowd which has a lovely selection of tree images to choose from and which I am using for the first time.  I do love a wreath shape and so I got out my Gina K Wreath builder used with my Misti stamping tool to give me the positioning for the eight repeats, and I stamped with Versafine Deep Lagoon ink and used the same ink for the sentiment which I placed in the middle, and which I also heat embossed with WOW Clear Gloss Embossing Powder.  I did stamp several times to get a good dark image and I have to say the blue has come out very dark, so that it looks more black than blue.

I decided to also stamp the trees again in the middle so the trunks butted up give the look of a reflection and for this I used Tumbled Glass Distress Ink for a softer look.  Obviously they all overlapped and it just makes a pattern in the middle.  I also used a Lavinia stencil called Laurel, and I also added some blended ink around the edges with this same blue ink.

Thank you for joining me here today and I will see you again soon.


I am entering the following challenges:

Happy Little Stampers November Birthday Challenge - Anything Goes.
Happy Little Stampers November Stencil Challenge - Anything Goes.
AAA Birthday Challenge - No. 43 Monochrome.
Allsorts Challenge - Week 702 Anything Goes/Add Numbers. 
NBUS Challenge - No. 44 Where we use our Never Before Used Schtuff.

Thursday 10 November 2022

Patterned Hearts Anniversary

Hi everybody.  I needed an anniversarty card and I decided to use a freebie set of stamps which came with Creative Stamper No 109 and the set is called Versa-Tiles and having its first outing here.  It has different shapes of images to build up a patchwork.  This time I just wanted to use it for the patterns, and I also used a set of hearts by Sweet Dixie and also a Sweet Poppy Stencil called Plaid.

I started by stamping out the tiles I needed for five different hearts using some snippets of which card, and using aVersafine Satin Red ink pad, and I heat embossed with my usual WOW Clear Gloss Embossing Powder.  I then cut the hearts out and put them aside.  I continued with the plaid stencil using another snippet of white card, and decided to try and ink it up using Versamark and embossing with WOW Opaque Bright White EP.  I wasn't sure that it would work very well because there are a lot of small areas to get the sticky ink into.  I used a blending tool to apply the ink and went over it very many times to hopefully get a good image.  I then heat embossed and blended the Satin Red ink over the top...as this is a DL shape I had to do it a couple of times to cover the card.  I decided to use this because it is a good strong red and the DI's do tend to come out more pink than red.  There is a new red in the range now which is a stronger colour but I don't have that.  It is a permanent ink and it did make the white rather pink and there were areas where it didn't totally cover.  I decided when it was dry to do another layer of the Versamark and white embossing powder and heat set again to try to whiten it up, and it was reasonably successful.

As you can see I cut the strip down and left a gap in the middle for the hearts and added the red embossed sentiment.   I added the hearts backed with some foam to give more dimension, and I overlapped them a bit for a more random look.

Thank you for visiting my blog today and I'll see you again soon.


I am entering the following challenges:

NBUS Challenge - Where we use our Never Before Used Schtuff.
Snippets Playground Challenge - No. 440 Where we use our snippets of card and paper etc.
Allsorts Challenge - Week 701 Sparkle and Shine (no sparkle but lots of shine from all the glossy embossing).
Happy Little Stampers November Stencil Challenge - Anything Goes.
Creative Artiste Mixed Media Challenge - No. 88 Anything Mixed Media Goes.
Simon Says Wednesday Challenge - Thinking of You.

Thursday 3 November 2022

Camo Sneakers

Hi all.  I have used the sneakers again for another youngster in the family but decided to paper piece using some camouflage paper as I thought he would like the look.  The stamp is by Woodware, bought at a recent craft fair from The Stamp Hut and just called Sneakers, and used for the first time here.

I started with the background using a Brusho powder called Moss mixed with a little water on a piece of acrylic and then dabbed on to the white card and followed this with some Dried Marigold Distress Ink again added using the piece of acrylic to apply it, also mixed with water.  

I then stamped the sneakers on to a piece of white card and also on the camo paper with Versafine Clair Nocturne Ink, and heat embossed the main image with WOW Clear Gloss Embossing Powder.  I coloured the front piece of each shoe with Brushed Corduroy DI using a waterbrush, and the laces with a black Inktense Pencil taking the ink from the tip with the waterbrush..I also added this to the edge of the soles and toe caps, and I added a shadow to the soles with a some but well watered down.  I then cut them out as well as cutting the pieces of camo paper to fit the areas of the shoes.  I decided to add the glue to the image rather than to the paper and this worked well.

I finished by stamping the circles and stars, which are part of the set, around the shoes using the Brushed Corduroy, and stamped twice more, second and third generation ink, for a softer effect, around the three original circles, and added the stars in the centre of each of the main circles using Peeled Paint DI and then the sentiment using the Nocturne Ink again heat embossing with the Clear Gloss EP.  I also found a piece of card in a coordinating shade of green and added this to the 6" square card  and then the topper and sneakers using Pinflair Glue Gel for a bit of dimension.  I suddenly realised I hadn't coloured the studs on the sides of the shoes so just used a lead pencil to highlight them.

I have two new followers...the first Birgit whose blog I couldn't find, so if you read this Birgit let me know where you are and I will add the name for people to visit.  The second is Aussie Annie whose blog you will find here.  So thank you for becoming my latest followers.

Thank you for visiting my blog today and I'll see you again soon.


I am entering the following challenges:

Happy Little Stampers November Watercolour Challenge - Anything Goes.
Addicted to Stamps and More Challenge - No. 441 Make Your Mark.
Allsorts Challenge - Week 700 - Let's Celebrate - Any Special Occasion.  Congratulations to them for reaching their 700th challenge and long may they continue!
Happy Little Stampers November Birthday Challenge - Anything Goes.
Krafty Chicks Challenge - No. 636 Wk 1 - (Stamp Act).
We Love 2 Create Challenge - No. 11 Anything Mixed Media Goes.

Friday 28 October 2022

Autumn Leaves

Hi all.  I have an autumnal card today made for one of our friends, and I decided to use a set of leaves which I got a while ago but have not got round to using until now.  It is by Chocolate Baroque and called From Nature 1, and I used four of the leaves for my card.  I also used a bird and a sentiment from a freebie set called British Garden Birds which came with a magazine a few months ago and included some dies, an embossing folder of some branches to sit the birds on, and also some toppers and papers.

I decided to make a 7" x 5" card, though in the end I did cut it down a bit to fit the snippet of white card I had in mind, and decided to make a frame of leaves above and below the central sentiment strip.  I used my Misti stamp positioner and randomly stamped the leaves to the top and bottom of the card.  I used quite a few different Distress Inks mixing them on the stamps and spritzing with a little water  to give them the autumn tints.  I also used a waterbrush to add extra ink and also to mix and soften the colours in some places.  When I had finished this I used some Adirondack Stonewashed Ink to blend around the leaves and over the whole background.  

I finished by stamping the bird and the sentiment on to another snippet of white card using Versamark and heat set with WOW Metallic Gold Rich Embossing Powder.  I then ink blended around the edges of the strip with the blue ink and added it to the leafy background, and finally mounted it on to the white card. 

Thank you for dropping by today and I'll see you again soon.


I am entering the following challenges:

The Snippets Playground Challenge - No. 439 Where we use our snippets of card and paper etc.
Allsorts Challenge - No. 699 Colours of Autumn.
We Love Stamping October Challenge - Autumn Colours.
Stamping Sensations October Challenge - All Things Autumn.
Cardz 4 Guyz Challenge - No. 307  Autumnal Colours.
NBUS Challenge - No. 43 Where we use our Never Before Used Schtuff.
Simon Says Wednesday Challenge - Anything Goes.
Happy Little Stampers October Watercolour Challenge - Anything Goes.

Wednesday 19 October 2022

Crazy Birds

Hi there.  I have a masculine card today for a friend who is 60 and I was very lucky recently to win this fun set of Pink Ink stamps called Crazy Birds so I decided to christen it for this card.


As I don't use kraft card very often I thought I would today, and I stamped the three bird images using Versamark and heat embossed with WOW Metallic Copper Embossing Powder.  I then coloured the images using my Inktense Pencils without any added water, and added some ink blending around the edges using Distress Inks - Tea Dye and then Ground Espresso, and I also added more blue around the bird with Salty Ocean DI, to add to the pencil colouring I had already done.  Just a tip which I expect a lot of you will know that by colouring with white first before adding the colour it helps to neutralise the brown and allows the true colour to come through.  I finished by adding the sentiment and the die cut number using Versafine Vintage Sepia Ink and then I heat embossed with WOW Clear Gloss EP.  I also added a blue mat before adhering it to a 7" x 5" kraft card base.

Thank you for visiting me here today and I hope you'll come back again soon.


I am entering the following challenges:

Happy Little Stampers October Birthday Challenge - Anything Goes.
Critter Crazy Challenge - Anything Goes with a Featured Critter.

Friday 14 October 2022

Plaid with Ornamental Grasses

Hi everybody.  I needed a quick birthday card for a friend whose birthday I nearly forgot and I needed to post it asap.  I decided to make a background with a new stencil, bought at the recent craft fair I went to, from Sweet Poppy called Plaid Back Plate and which is getting its first outing, and a Crafty Individuals stamp called Ornamental Grasses Silhouette which I have had for a while.


I started with a piece of white card cut to fit my 6" square card and masked off an 8cm square and then ink blended with the plaid stencil using three Distress Inks - Lucky Clover, Peacock Feathers and Salty Ocean, starting from the bottom left in a diagonal and fading out a bit towards the righthand side.  I decided to set the  stamp below and to the right of the square and then to balance it I placed the sentiment across the top left hand corner and stamped with my usual Versafine Clair Nocturne Ink and heat embossed with WOW Clear Gloss Embossing Powder.  A very quick card and I hope she likes it and that it arrives on time.

Thank you for coming to see my blog today and I hope you'll visit again soon. 


I am entering the following challenges:

NBUS Challenge - No. 43 Where we use our Never Before Used Schtuff.
Happy Little Stampers October Stencil Challenge - Anything Goes.
Happy Little Stampers October Birthday Challenge - Anything Goes.
Addicted to Stamps and More Challenge - No. 440 Die Cuts and/or Stencils.
Stencil Fun Challenge - October: Anything Goes using a Stencil (Optional Theme: Halloween).

Monday 10 October 2022

Pine Forest

Hi all.  I went to a craft fair recently and spotted some Stampscapes stamps and couldn't resist this Nature No. 6 set including the tree which I have used here repeat stamped to build the scene.   I also bought the Ducks in Flight, the larger size stamp, as I thought it went well with the other set and both being used for the first time.  I did see the tree used in a similar way online and as I needed a card which was fairly quick to make I thought this fitted the bill.

I cut a 5" square piece of white card and inked the tree stamp with Versafine Clair Nocturne ink and added the trees and made them shorter as though on a slope, and then I filled in with some second generation ones, and I heat embossed them with WOW Clear Gloss Embossing Powder.  I then inked around them leaving a lighter space to the righthand side using Mowed Lawn and Lucky Clover Distress Inks blended with a brush making the edges darker and I then added the hills bottom right using a set of acrylic masks by Sweet Poppy Stencils, also bought at the craft fair, and finished with the sentiment and the flying ducks also using the Nocturne ink and Clear Gloss EP.

I finished by mounting it on to a piece of black card and attached it to the 6" square card.

Thank you for joining me here today and I hope you visit me here again soon.


I am entering the following challenges:

Alphabet Challenge - 'N' is for Nature.
Addicted to Stamps and More Challenge - No. 439 Any Occasion.
AAA Birthday Challenge - A Favourite Technique (stamping and heat embossing).
NBUS Challenge - Where we use our Never Before Used Schtuff.


Monday 3 October 2022

Jeepers Creepers...Sneakers!

Hi everybody.  Today's card is for hubby's 12 year old great nephew using this stamp from Woodware called Sneakers  and with a nod in the added sentiment to the song Jeepers Creepers which is where I got the title for the post from, although I didn't use it on this card.  I found this stamp at a craft fair I went to recently and am using it for the first time, and as his birthday was approaching I thought this would work well, and I can see it working well for a few others in the family approaching a similar age although.  I also used a That Special Touch mask called Splats which I have had for a very long time.

I started by stamping the sneakers using Versafine Clair Nocturne ink and then heat embossed with WOW Clear Gloss Embossing Powder.  I the coloured them using Faded Jeans and Black Soot Distress inks using a waterbrush, and fussy cut them out.  I realise that I should have continued the blue on the upright shoe on the left and added another lace, must have had a senior moment and too late now as it has been posted...I'll get it right next time.    

I then cut a piece of card to fit a 6" square card and used some Brushos to colour the background with Ost. Blue and a little Turquoise.  I continued with the stencilled splats using the Faded Jeans DI applied with a brush and placed so they surrounded the sneakers.  I picked out the main large one to do top right and bottom left and then filled in with a couple of smaller ones top left and bottom right, and I finished with the sentiment using the Nocturne ink and the Clear Gloss EP.

Thank you for visiting my blog today and I'll see you again soon.


I am entering the following challenges:

Addicted to Stamps and More Challenge - No. 439 Any Occasion.
NBUS Challenge - No. 43 Where we use our Never Before Used Schtuff.
Happy Little Stampers October Birthday Challenge - Anything Goes.
Happy Little Stampers October Watercolour Challenge - Anything Goes.
Simon Says Wednesday Challenge - Anything Goes.
AAA Birthday Challenge - No. 42 A Favourite Technique (I love anything with inks..stamping, watercolouring, inkblending, stencilling etc.).


Friday 30 September 2022

Peaceful Night

Hi everyone.  I have a rather late entry for the September Rudolph Days Challenge using this new Woodware stamp called Peaceful Night, bought recently from a local craft fair and having its first outing. The challenge is run by Mo over at Scraps of Life by Scrappymo, and it opens on the 25th and runs to the end of the month, and I had forgotten that this is a shorter month, so a bit of a scramble to get a card in..I do need to get on with them so I'm not making them until the last possible moment..lol.


I decided to stamp this Bethlehem scene on to black card and used WOW Metallic Gold Rich Embossing Powder.  I got out my Sakura Starlight pens and having coloured one or two of the houses realised that they looked a bit pale so I used a little white gesso with a water brush over each to lighten then added the colours which then looked a bit too bright, so I dabbed it with some tissue whilst wet to remove a little of the colour so that they looked softer, not a terribly realistic look but very bright and shimmery using shades of red, orange, blue and purple and also silver and gold.  I finished by adding a sentiment using the same embossing powder and also ran the gold Sakura pen around the edge of the piece before adding it to a DL card.

Thank you for joining me here today and I hope you can visit again soon.


I am also entering the following challenges:

The Holly and Ivy Christmas Challenge - No. 124 Anything Christmas Goes.
Merry Little Christmas Challenge - No. 45 Anything Christmas Goes.
NBUS Challenge - No. 42 Where we use our Never Before Used Schtuff.
Craftyhazelnut's Christmas Challenge No. 613 Anything Christmas Goes.
Addicted to Stamps and More Challenge - No. 439 Any Occasion.

Saturday 24 September 2022

Fly and be Free

Hi all.  I have an extremely late entry for the CAS Mix Up Card Challenge and the technique this time is to use a stencil and gesso.  I decided to use a Crafty Individuals stamp called Fly and be Free which is having it's first outing, and I also used some Brushos to paint the butterfly which was added over the stamped one, and also some Distress Inks which I applied with a brush, and of course the white gesso through a Dutch Doobadoo stencil called Geometric Tiles, although as you can see there are all sorts of circles and some lines and ink type blot shapes on the stencil.

I started by stamping the image with Versafine Clair Nocturne Ink and heat embossed with WOW Clear Gloss Embossing Powder.  I then cut it down to 4"square and added the the grungy dots and open circles around the edges of the image mat using the white gesso.  I haven't used it before and this Pebeo gesso was quite runny and I found it a challenge to get it through the stencil cleanly, but decided to go with the more grungy finish.  I then added the Distress inks using a brush with Fossilized Amber to the centre and Carved Pumpkin to the edges and darkened with Ripe Persimmon.

I continued by stamping and heat embossing just the butterfly and used some Brushos with a waterbrush in colours Sea Green, Ost. Blue and Violet which is much more purple than it looks in the photo, and Pumice Stone DI on the body.  I then fussy cut it and added it using Pinflair Glue Gel and finished by adding a sentiment to the base 6" square card again using the Nocturne Ink and Clear Gloss EP.

Thank you for visiting my blog today and I hope you will visit again soon.


I am also entering the following challenges:

NBUS Challenge - where we use our Never Before Used Schtuff (the butterfly and the gesso are being used for the first time.
We Love Stamping Challenge - Anything Goes with Stamping.
Stamping Sensations September Challenge - Feminine.
Addicted to Stamps and More Challenge - Birthdays.
Allsorts Challenge - Week 695 Anything Goes with option Spots and/or Stripes.

Tuesday 20 September 2022

Rose and Lily Silver Celebration

Hi everybody.  Sorry not to have posted recently but I have been away for over a week on holiday in the Derbyshire Dales which was lovely and a bit of a last minute decision.  Luckily the weather was pretty good and we had a lovely time.  

I have a silver wedding card to show today made just before we went away, and I had a yen to use some vellum as I haven't used any for ages, and it does seem to be a lot more popular at the moment.  I used a very old Cuttlebug embossing folder called Divine Swirl and inked the swirl pattern with Versamark Ink and ran it through my machine, and then added the silver embossing powder and heat set it, so it embossed within the pattern grooves.  There were a few places where it didn't pick up the Versamark enough so I used the Versamark pen to fill them in and added more powder and this worked well.   I then cut a piece of white card to fit a 6" square card and die cut the heart using one of a set of Sweet Dixie Heart dies.

                                   
I then found some free digital colouring images and played around to get them the right size to fit around the side of the heart I coloured them using a set of  Koh-I-Noor  Polycolour Pencils which I bought fairly recently, and I fussy cut the rose buds separately, but the lilies came as a twosome and I kept them together.  I then added the sentiment on to the front of the topper layer using Versamark and heat set with WOW Silver Metallic Embossing Powder and added the numbers which I had cut from silver mirri, and I found some little hearts which came out of a die and which I had kept just in case, and coloured them using a sparkly silver Sakura Gelly Roll pen and added them around the sentiment after I had added it to the base card.  

Thank you for dropping by today, and I hope you come back soon.


I am entering the following challenges:

Simon Says Monday Challenge  - Sparkle and Shine.
The Flower Challenge
- No. 72 Add Sparkle.


Wednesday 7 September 2022

Heart Collection Anniversary

Hi there.  I made this anniversary card using a snippet of card which I used when gelli printing to brayer the spare ink onto, and I made this the background and also used two stamps from a set by Woodware just called Heart Collection.  I also used a Sweet Dixie Hearts die for the aperture.

I cut the snippet to fit a 6" square base card and then die cut the heart fairly centrally.  I used one of the Woodware heart stamps in the centre of the aperture having first marked where the aperture would be on the base card, and used Staedler purple and blue brush markers straight to stamp with also a fine mist of water.  I wasn't totally happy with the way it had stamped so I stamped it again on a snippet of white card and then cut it out.  I decided that I wanted to make the background around the heart pink and I used some Spun Sugar Distress Ink.  I then stamped some little hearts onto the background itself using the same Hearts Collection set and a Staedler brush marker in a fairly light pink, and finally I added the sentiment using my Misti stamp positioner.  I tried using Dusty Concord DI but  it didn't show up well enough so I went over it with Versafine Clair Nocturne ink and heat embossed it with WOW Clear Gloss Embossing Powder.  Finally I placed the aperture background onto the card, and decided to darken the area around and within the aperture so I used Picked Raspberry DI with a blending tool.

Thank you for visiting my blog today and I'll see you again soon. 


I am entering the following challenges:

Snippets Playground Challenge - Where we use our snippets of card and paper etc.
We Love Stamping September Challenge - Anything Goes with Stamping.
Crafty Calendar Challenge - September: Anything Goes.

Friday 2 September 2022

Coastal Trawler

Hi everybody.  I have a masculine card today made using one of the stamps that came with the Creative Stamping Magazine Issue 110 with stamps from Hunkydory and the set is called Coastal Scenes and is having its first outing.  I chose this boat and after looking inside the magazine got the idea for this front stepper card.   I'm not one for making shaped cards very often but this appealed to me as something a bit different. 


I started with the base card shape scoring a piece of A4 card at 1.75" and 3.50" which makes the front step and then by taking a small piece away until the rest of the piece measures 8" then scoring that in half for the main tent shaped card this will give you your finished 6" x 4" card.  It is best to try it out on a piece of copy paper first to make sure it is correct..ask me how I know..lol.

I then used a snippet of card for the piece at the front with the boat stamped on to it in Versafine Clair Nocturne ink heat embossed with WOW Clear Gloss Embossing Powder.  I used a piece a bit larger and placed the stamped boat in the centre allowing for it to be cut down to fit the front step.  I watercoloured it using a water brush and Distress Inks - Blueprint Sketch, Scattered Straw and Pumice Stone and added some Pine Needles with the Blueprint Sketch for the sea and some shadows with a little of the Pumice Stone.  For the background on the front of the tent shaped area behind, I brayered the inks on my gelli plate using some stencil card and a little light spritzing of water, and three colours...Chipped Sapphire, Scattered Straw and at the bottom a little Wilted Violet, which when the card is stood up you don't really see.  I finished by adding three little birds which I did myself with a Black Micron Pen. 

Thank you for visiting me here today and I hope I'll see you again soon.


I am entering the following challenges:

Simon Says Wednesday Challenge - Anything Goes.
Happy Little Stampers September Watercolour Challenge - Anything Goes.
NBUS Challenge - Where we use our Never Before Used Schtuff.
Dare 2b Artzy August Challenge - Shaped or Fun Fold Cards.
Simon Says Monday Challenge - Make Your Own Background.