Pages

Friday, 27 October 2023

Shine a Light at Christmas

Hi there.  I have at last started my Christmas cards, although I have already made a few throughout the year, but there is still a way to go.  I decided to enter the Color Hues Challenge which this time is Yellow and Kraft and I thought that the lantern stamps, and stars and rays of light stencil (there are three different stencils on it) being used for the first time, and which came with the latest Creative Stamping Magazine No. 127 might work with the colour theme.  I also used an embossing folder which was a freebie a goodly time ago with a poinsettia and holly frame.

I stamped one of the lantern images onto a piece of white card and also separately stamped the smallest candle, using Versafine Vintage Sepia Ink and then coloured them using Distress Inks - Brushed Corduroy and Mustard Seed, and also a little Scattered Straw to give the candle a little colour.   I then fussy cut them out and stuck the candle inside the lantern.  I also cut off the hanging ring from the top and finished by adding some Glossy Accents to the glass parts.  I added a circle of blended Mustard Seed ink behind where I was going to add the lantern and then also the rays of light part of the stencil, which I added using Ground Espresso DI.  I then added the Poinsettia and Holly embossed frame and decided to colour it with a deep gold/brown Sakura Starlight pen which I thought had a similar tone to the lantern and hopefully fits the colour challenge, and I also used it to add some stars using the stencil, and over the rays of light behind the lantern and a few little dots as well..maybe I overdid it a bit but it looks nice and sparkly.  I then added the lamp using some Pinflair Glue gel down the centre to give it a bit more shape, and also some ordinary glue around the edges.  I finished with a sentiment from the set stamped using the Vintage Sepia Ink and heat embossed with WOW Clear Glose Embossing Powder.

Thank you for visiting my blog today and I hope to see you again soon.


I am also entering the following challenges:

Rudolph Days October Challenge - Anything Christmas Goes.
The Holly and Ivy Christmas Challenge - No. 150 - Anything Christmas Goes.
Happy Little Stampers October Christmas Challenge - Anything Goes/Stencil.
NBUS Challenge - No. 55 Where we use our Never Before Used Schtuff.


Monday, 23 October 2023

Musical Birthday

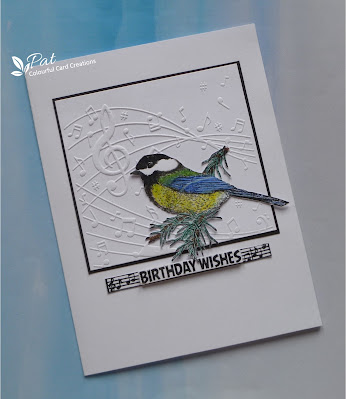
Hi everyone.  I have a masculine card to show today for a friend who loves his music and sings in a choir with my hubby using a set of stamps and an embossing folder with a musical theme from Stamps By Me which came with a recent edition of Creative Stamping, and naturally I just couldn't resist...lol.  I used part of the embossing folder and two of the stamps on this card.  The bird was in a sale over at Dies to Die For and I do love bird stamps.


I started with the embossing folder using a snippet of white card.  I only used the top part of it as the bottom has flowers which I didn't feel were quite right.  I always lightly spray the card with some water on both sides as I think it does help to enhance the embossing, and I backed it with a snippet of black card.  I then stamped the bird on another snippet of white card using Versafine Clair Nocturne Ink and heat embossed it with WOW Clear Gloss Embossing Powder.   It is actually a Chickadee, but as it has a similar shape with the dark head I made it into a Great Tit, and coloured it with my new Lyra Pencils.  I wanted to add it over the embossed background so I fussy cut it out, which took quite a time snipping round the pine branches, and it did end up with a few less needles than it started with...lol, and I added some Glossy Accents to the bird's eye.  I decided to add a strip of music from the set of stamps using more snippets of white card, but it had a lot of flourishes so I cut them off and then used a sentiment from the set to sit on top of the music backed with a piece of foam to raise it up a bit.  This was also stamped with the Nocturne Ink and heat embossed with the Clear Gloss EP.  

Thank you for visiting my blog today and I'll see you again soon.


I am entering the following challenges:

Snippets Playground Challenge - No. 465 Where we use our snippets of card and paper etc.
Cardz 4 Guyz Challenge - No. 333 Spookyscary or Birds.
Can You Handle The Pressure Challenge - Anything Goes/Spooky.
The Crafty Addicts Challenge - Anything Goes.
Triple B Challenge - October - Birds, Butterflies & Blooms (any 1, 2 or all 3).

Friday, 20 October 2023

Sending You Sunshine

Hi everybody.  I have made a card for the Less is More Challenge which this time is a one layer card with the theme of Sunshine.   I used two stamps from the Creative Stamping Magazine called Summer Vibes..i.e a textured strip which works as a background and a seagull, and then a stencil called Rays of Light which came along with stamps for this most recent issue with a Christmas theme.


I started by using the strip texture stamp a couple of time in Adirondack Stonewashed and Sunshine Yellow trying to be fairly random over the sea area with it so it wasn't too solid, and then added the stamped rays of light filling in the area of it above the see for the setting sun.  I also blended some yellow over the sand to fill it in more fully, and then more softly around the sun and over the sea area, and also added a bit of Distress Ink in Brushed Corduroy over the sand and around the added seagull which I stamped using Versafine Clair Nocturne Ink.  I also added some pencil colouring in various places including on the bird and under it's feet, and also some black micron pen over the sand to look like small pebbles and also added three little birds in the sky.  I finished with the sentiment also inked using the Nocturne Ink and heat embossed with WOW Clear Gloss Embossing Powder.  

Thank you for coming to visit me here today and I'll see you again soon.


I am also entering the following challenges:

Allsorts Challenge Week 750 - Anything Goes/Add Some Texture.
We Love Stamping October Challenge - Anything Goes/Mood Board.
Stamping Sensations October Challenge - Anything Goes/Autumn Colours.
Krafty Chicks Challenge - No. 686 CAS.

Tuesday, 17 October 2023

Owl Carrying Heart Anniversary

Hi all.  I recently bought this fun Stamping Bella image of a cute owl with a heart in his beak and a heart shaped present in his talons which I thought would work well for anniversaries, and so I used it on this card.  I also bought an Impression Obsession square Heart Frame die (249-Y) and both are being used for the first time here.

I made a simple card by dry embossing the heart die using a piece of white card and cut it out before adding it to my 6" square card.  I then stamped the owl using Versafine Clair Nocturne Ink, and coloured it with my Lyra Graduate Pencils and fussy cut it and added  it over the top using Pinflair Glue Gel for a bit of dimension.  I finished by stamping the sentiment using Versafine Clair Nocturne Ink and heat embossed it with WOW Clear Gloss Embossing Powder.  

Thank you for dropping by my blog today and I'll see you again soon.


I am entering the following challenges:

We Love Stamping October Challenge - Mood Board/Anything Goes (I do have a bit of orange and a bird, albeit not a robin).
Stamping Sensations October Challenge - Autumn Colours/Anything Goes ( Not exactly an autumn subject but have used brown orange and red).
Simply Clean & Simple Challenge - October - Anything Goes/Autumn.
Triple B Challenge - October - Birds, Butterflies and Blooms (any one, two or all three).
Allsorts Challenge - Week 750 - Add Some Texture.

Saturday, 14 October 2023

Poppy Corner

Hi everybody.  I had been thinking about getting myself some new coloured pencils and whilst hubby and I were out with friends several weeks ago I came across a stationery shop which had some artist materials and they had some Lyra Graduate Coloured Pencils, a cheaper range that they do, which was a tin of 36 and looked like a nice variety of colours.  The friend who was in the shop with me was encouraging me to buy them, so I decided I would.  I said I would show her the results, so I decided to make a card and send her my first try with them, but when I realised it was her birthday shortly I decided to keep it and send it then, which is right now..lol.


I used a digi image which was a freebie colouring page I think, and I used three shades of red and two shades of green as well as grey and black for the flowers centres, and a light brown for the seed head.  I did watch someone on line using these pencils and he said it was best to build up the colour slowly moving from light to medium tone and then dark which is what I did on the flowers, but for the leaves I just used two greens.  I am very happy with the pencils which were reasonably priced and in my opinion good for the money with some lovely colours across the 36 pencils.  I cut it with a Crealies pierced die and layered onto another pierced layer and added the sentiment using Versafine Clair Nocturne Ink but this time I didn't heat emboss as I had already put the card together and didn't want to warp the layers with the heat from the heat gun.  

Thank you for joining me here today and I'll see you again soon.


I am entering the following challenges:

NBUS Challenge - No. 55 Where we use our Never Before Used Schtuff.
Happy Little Stampers October Birthday Challenge - Anything Goes.
Triple B Challenge - October - Use 1, 2 or 3 of Birds, Butterflies or Blooms.
Alphabet Challenge - 'N' is for Nature.
Simply Clean & Simple Challenge - October - Anything CAS Goes/Autumn
Colouring with Pencils Challenge - October - Anything Goes.
The Flower Challenge - No. 85 Anything Goes and a celebration of their 7th Birthday.


Monday, 9 October 2023

Dragonfly Aperture

Hi everyone.  I made this card using these Crafter's Companion Dies which came with Die Cutting Essentials Issue 104 and this is it's first outing.  It consists of the ornate dragonfly portion and a second die which has three cut out sections and you can mix and match, and there is also a sentiment die.  I also used a piece of patterned floral paper which was a freebie set which came with another magazine fairly recently, but am not sure which one.  I'm afraid papers get a bit neglected by me as I am not in the habit of using them, and they would have been an extra on top of any stamps or stencils etc. which were the main items of the gift.  This one I thought would go well and I did need to make a relatively quick card for an upcoming birthday.


I started with a 6" square card and cut the aperture layer to allow for the paper to extend beyond it.  I cut the dragonfly part twice so I could cut them out and layer them for a bit of added interest and dimension.  I decided to add colour to the three flower sprays which were visible through the aperture using a new set of colouring pencils by Lyra, their Graduate set of 36 and which I have found to be really pretty colours and very good to use, and also reasonably priced.  I finished the card with a sentiment stamped using Versafine Majestic Blue and heat embossed with WOW Clear Gloss Embossing Powder.

Thank you for visiting me here today and I'll see you again soon.


I am entering the following challenges:-

NBUS Challenge - No. 55 Where we use our Never Before Used Schtuff.
Happy Little Stampers October Birthday Challenge - Anything Goes.
AAA Birthday Challenge - No. 54 Favourite Colours (blue is one of my favourites).
The Flower Challenge - No. 85 Anything Goes with Flowers (celebrating their 7th Birthday).


Wednesday, 4 October 2023

Stencilled Birches

Hi there.  I needed a quick masculine card for a family member and remembered seeing a card which Hannelie - Desert Diva had created using trees with a masked curvy edge, and so decided to make my own version of it.  She did the stencilling straight onto the card but I matted mine onto a 7" x 5" card, and I used slightly different colours of Distress Ink - Salty Ocean, Mustard Seed, Spiced Marmalade and Peeled Paint.  I used a Dutch Doobadoo Birch Trees stencil and made a mask using a piece of copy paper.


It didn't take long to do, but there was a bit of movement of the stencil which I don't quite understand as I did tape everything down well, but anyway it was not that noticeable and I did not have time to start again as it needed posting.  I added this stencilled layer to my base card and stamped a sentiment onto a strip of white card using Versafine Clair Nocturne Ink heat embossed with WOW Clear Gloss Embossing Powder.

Thank you Hannelie for the inspiration, and thank you all who visit my blog, I really do appreciate it.


I am entering the following challenges;

Stencil Fun Challenge - October - Anything Goes/Orange.
AAA Cards Challenge - No. 250 Colourful Ink Blending.
Allsorts Challenge - Week 748 Autumn Trees, Leaves and Berries/Anything Goes.