Pages

Saturday, 31 August 2024

French Braid and Foliage

Hi everyone.  Whilst browsing on the computer I saw a set of dies by Spellbinders which I thought would be great to use up all those scraps of paper that we all have..one called French Braid and the other Hexagon and there are two dies for each.  I think they actually came out about a year ago and were a series of dies with a quilting theme.  I found a set of these and they were much reduced from the original price, so that sealed the deal..lol.   I also used a Crafters Companion 3D Poinsettia Embossing Folder and some leftover pieces of holly and a poinsettia from my last Christmas card, and some other bits of die cut foliage I found in a pot, as well as some ancient Christmas paper snippets.

I began with the background and I used the Poinsettia EF and cut it to fit a 5" x 7" card.  I then die cut the French Braid Die from the snippets of Christmas paper, two different designs, holly and a green tartan, and then cut the squares down the centre of the die from gold mirri card.  Finally I cut the whole thing from a snippet of white card to get the die frame, and finally cut the back plate layer from another snippet of gold card.  When I had assembled that I added the die cut poinsettia and bits of foliage which I had coloured with my alcohol pens as a centrepiece, and added the 'joy' which I received from a lovely blogger tucked in a card at Christmas and which had been sitting in a pot waiting to be used.  It was white so I heat embossed it with WOW Metallic Gold Rich Embossing Powder, doing a couple of layers to build it up a bit, also added a bit of gloss and sparkle with some clear Wink of Stella.  Actually after I had added it I noticed the gold mirri was a much brighter colour than the embossing powder, and actually I had debated using a Metallic Brass EP which does have a slightly redder gold tint, but I won't try to change it now.  

Thank you for visiting me here today and I'll see you again soon.


I am entering the following challenges:

Rudolph Days Challenge - Aug. 24 Anything Christmas Goes.
Snippets Playground Challenge - No. 487 Where we use our snippets of card and paper etc.
Allsorts Challenge - Week 796 Getting Sentimental/Anything Goes.
The Holly and Ivy Christmas Challenge - No. 168 Anything Christmas Goes.
52 Christmas Card Throwdown Challenge - Aug. Technique - Embossing.
Can You Handle The Pressure Challenge - Anything Goes Embossing/Leaves.
Love Those Pretty Papers Challenge - Aug. 24 - Anything Goes/Summertime.
NBUS Challenge - No. 65 Where we use our Never Before Used Schtuff.

I am also joining in with Darnell's I.D.E.A.S., a challenge she has set herself but has said that anyone can join in.  This is Week 4: Anything Goes

Sunday, 25 August 2024

Terry Toucan

Hi there.  I was lucky enough to win this Aall & Create stamp set No. 563 Follow Your Own Path over at Stamping Sensations and this is its first outing.  I also used some Brushos and Distress Inks.  I find it difficult to find interesting post titles, and the name of the set to me doesn't seem to go with it terribly well, so I decided to give him a name and Terry just popped into my head, so that is my name for this funny little chap.


I decided to do a DL card and I cut a mat just a little smaller then the card and got out a couple of Brushos, haven't used them much lately, and chose Sea Green and Orange, and added them trying to keep the colour in different areas of the background, and then added water to spread them out, blotting to keep the colours from mixing too much as inevitably that leads to a 'muddy' look, not nice...lol.  I then added some of the words stamps using Distress Inks in similar tones to the Brusho colours, and chose Lucky Clover, Ripe Persimmon and Spiced Marmalade using first, second and in some areas third generation stamping, and then also one of the hearts in several places.

There are a couple of large bird images and the one I thought I would use was this Toucan and the chevron shaped accompanying images with some postmarks, numbers and words.  I decided to stamp them with Versafine Nocturne Ink and heat embossed with WOW Clear Gloss Embossing Powder, and then I cut them out.  I coloured them with the same three DI colours as I used on the background using a waterbrush, and the Toucan is obviously a bit of a fantasy bird as not normally this colour..orange beak, yes, but let's just call it artistic licence.  

I put it together and finished with a sentiment again stamped and embossed with the Nocturne Ink and Clear Gloss EP.

Thanks for visiting me here today and I'll see you again soon. 


I am entering the following challenges:

Stamping Sensations Challenge - Aug. '24 Anything Goes/Out in the Garden.
We Love Stamping Challenge - Aug. "24 Anything Goes/Focal Sentiment or Quote.
Allsorts Challenge - Week 795 Delightful Animals/Anything Goes.
AAA Birthday Challenge - No. 64 Critters.
Triple B Challenge - Aug. '24 Using one or more Birds, Butterflies and Blooms.
NBUS Challenge - No. 65 Where we use our Never Before Used Schtuff.

I am also joining in with Darnell's I.D.E.A.S., a challenge she has set herself but she has said that anyone can join in with it.  This week the theme is Embossing/Wet or Dry.

Saturday, 17 August 2024

A Slice of Pie

Hi everybody.  I saw a Spellbinders Serve A Slice die used somewhere on Pinterest recently, and as I hadn't seen it before although it has been out for a while, I found it at a reduced price and I thought it would be something a bit different for a masculine card, or prettied up feminine too and I certainly don't have anything like this already in my stash, and this is its first outing.  I also used a Sweet Poppy stencil called Plaid Back Plate and an Xcut oval die.


I started by cutting it from white card and I did use most of the pieces in the set to make this cherry pie.  I used alcohol pens and made the crust and latticed top first, it ended up looking quite dark...been in the oven a bit too long...lol.  I then did the filling with a couple of colours but decided to take some of the ink away with the blender to give a bit more variation of tone and this is how it ended up.  I finished the top with the cream and highlighted it a little as cream is not dead white, but it does look a bit orange.  The colour I used was called raw silk but I think a soft yellow would have been better, but did use the blender over it which bleached out some of the rather peachy colour, and I finished with the cherry which I used some gloss over.

I then tackled the background.  I decided to use the stencil with some Blueprint Sketch Distress Ink and made a 'V' shape fading it out at the edges, a bit like a cloth hanging over the edge of a table..it does look rather pale in the photo but is deeper colour in real life, and then I cut and added the sentiment using the same ink but heat embossed with WOW Clear Gloss Embossing Powder.  I also added the oval die cut as a plate for the pie, and I originally added some Blueprint Sketch around the edges, but decided to strengthen the look with a blue alcohol pen in a similar colour which I think looks OK.

Thank you for visiting my blog today and I'll see you again soon.


I am entering the following challenges:

Stencil Fun Challenge - Aug. '24 Anything Goes/Summertime.
Simply Clean and Simple Challenge - Aug. '24 Anything Goes/Off Centre.
Addicted to CAS Challenge - No. 265 Blended.
Allsorts Challenge - Weeks 793/4 Anything Goes/Summer Days.
NBUS Challenge - No. 65 Where we use our Never Before Used Schtuff.

I am also joining in with Darnell's I.D.E.A.S., a challenge she has set herself but says anyone can join in with.  This is Week 2: Dies.

Saturday, 10 August 2024

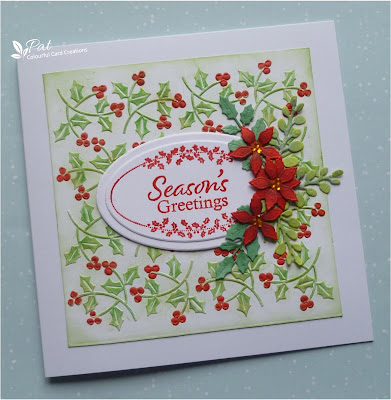
Season's Greetings with Flowers and Holly

Hi all.  So far this year I have made no Christmas cards, so I thought that maybe it was time to start.  To give myself a kick start I saw this John Next Door Box Kit Magazine No. 10 with an embossing folder, stamps, dies and papers and thought it looked as though there were quite a lot of possibilities for interesting cards, so true to form it dropped in my basket..lol.  I used the embossing folder, one of the stamps and several of the dies and all on their first use.

 
I started by embossing the holly and berries folder which is 5" square onto white card, and then inked up the design with Mowed Lawn Distress Ink using a blending brush.  I then inked all the berries using a Cardinal Red alcohol pen.  I didn't want to get too much ink on the background and thought the holly leaves needed more colour so I used my coloured pencils in a couple of different greens and went over each of the leaves and the stems which gave a stronger look to it, and I finished by adding some Mowed Lawn around the edges.   

I then moved on to the sentiment for which I cut the two oval dies which come with the set, and added the holly frame and one of the sentiments which are made to fit the smaller oval, and inked it with Versafine Satin Red Ink heat embossed with WOW Clear Gloss Embossing Powder.  I then cut the flowers..the die comes with a large and two smaller flowers on the one die, but I just used the smaller ones cutting twice as the middle flower is double layered, and then coloured them with three of the reds that I have in my set of alcohol ink pens including the Cardinal Red I used on the berries, and a couple of darker colours to add depth.  I then added the little yellow gems using three on each of the flowers.  I also cut one of the stems of holly which is double ended with berries in the middle, but I just cut the berries away and this made two pieces.  I also used another leaf stem and cut this three times.  I coloured the holly with a mid green and the other leaves with a lighter brighter green alcohol pen for a bit of variation.  I didn't add any dimension with foam tape because I was afraid that it would be far to thick to get in an envelope..as it is I think it will just about pass the postal slot test.

Thank you for coming to visit me here today and I'll see you again soon. 


I am entering the following challenges:

Snippets Playground Challenge - No. 486 Where we use our snippets of card and paper etc.  I used snippets of white card for the two oval mats, the flowers and the leaves. 
NBUS Challenge - No. 65 Where we use our Never Before Used Schtuff.
The Holly and Ivy Christmas Challenge - No. 166 Anything Christmas Goes.
Peace on Earth Challenge - No. 69 Anything Christmas Goes.
Merry Little Christmas Challenge - No. 57 Anything Christmas Goes.
Can You Handle The Pressure Challenge - Anything Goes/Wheels.

I am also entering Darnell's I.D.E.A.S., a challenge she has set herself but has said anyone can join in.  This is August Week 1: Ink/Color Mediums.

Sunday, 4 August 2024

On the Riverbank

Hi everyone.  I have a masculine card today featuring a cute frog from a set of stamps from Craft Consortium called The Riverbank, hence the title of the post.  It also has a swan which I have used in the past, but there are two frogs which have never seen ink, so am using one of these for this card.  I am also using a stencil from That Special Touch range called Orbit.. and I thought it had the look of ripples on the water spreading outwards. 


I started by cutting a mat to fit a 5" x 7" card and masked off the edge of the water and covered the bottom half with Distress Ink in Tumbled Glass, and then added the stencilling using Broken China DI, both applied with a blending brush.  I decided at this point to add the sentiment to the right and beneath the masked edge using Versafine Deep Lagoon Ink, but as it is a much darker tone of blue I placed it in my stamp positioner and stamped it off on a spare piece of card before stamping onto the background, and heat embossed with WOW Clear Gloss Embossing Powder.  I then moved on to the letters cut from white and double layered to give them more substance.  I coloured these with more Broken China adding a heavier layer at the bottom of the letters for an ombre look.  Lastly I stamped the frog and the lily pads twice each (two larger and two smaller) using Versafine Smokey Gray Ink and heat embossed with the Clear Gloss EP...I doubled up the frog, leaving the lily pads with just one layer.  I then coloured these with my alcohol pens.  

It is a similar layout and idea to this previous card here with the image as part of the sentiment, but this time it is not part of the word but just with two of the letters each side of it to make up the word 'Best'.  I'm saying this as my hubby looked at it and said 'Oh, it says 'Beast', and when I said  of course not he said the frog was roughly the shape of an 'A', which frankly had not crossed my mind.  I did counter with the fact that I have never seen a sentiment used with the word 'beast' in it, but I suppose I could start a new trend..lol. 

Thank you for visiting my blog today and I'll see you again soon.


I am entering the following challenges:

Simon Says Wednesday Challenge - Anything Goes/Pink Fresh Studio.
Allsorts Challenge - Week 791/2 Season's Delights/Anything Goes.
We Love Stamping Challenge - Aug. '24 Focal Sentiment or Quote/Anything Goes.
Stamping Sensations Challenge - Aug. '24 Anything Goes/Summer in the Garden.
AAA Birthday Challenge - No. 64 Critters.
NBUS Challenge - No. 65 Where we use our Never Before Used Schtuff.


I am also joining in with Darnell's I.D.E.A.S., a challenge she has set herself but has said anyone can join in.  This is Week 5: Stencils.